

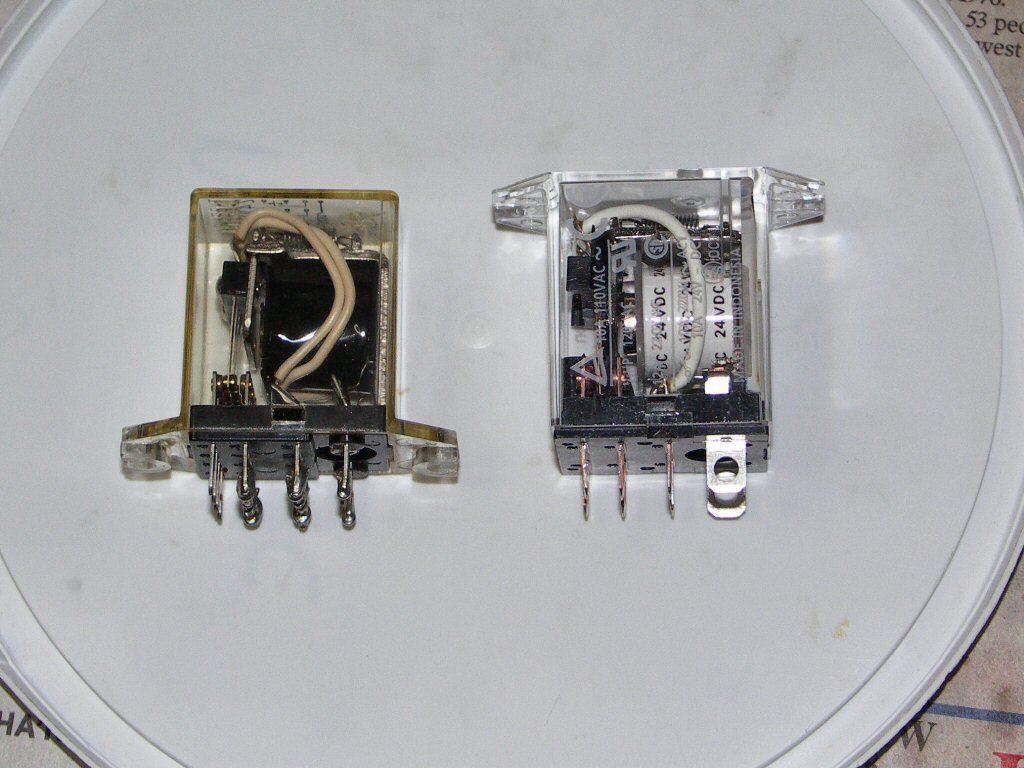
OK...someone is going to embarrass me by showing me a source for the orignal style. I'm a pretty good scrounger for parts, but I've not yet found a replacement for the original flange-mounted relays for the Pioneer receivers and amps that used them. The original relay is a 4PDT 24VDC job identical in every way to the modern Omron MY4-DC24...identical in every way except one...the original relay has a mounting flange at the 'bottom', or the end of the relay with the coil and contact solder tabs. Omron does not offer an MY-style relay in any contact configuration with a flange (perhaps they did at one time, and perhaps some of the amps and receivers that I've serviced used them, but I do not recall and it's a moot point anyway since they do not seem to be offered by ANY manufacturer now).
All is not lost...Omron does offer a relay with a mounting flange in the 'LY' configuration. This is a DPDT relay rather than the original 4PDT, but the DPDT LY-style is rated for 10A per contact, and is a perfectly usable substitute for any amp or receiver that was originally equipped with a 4PDT MY-style relay. The coil current is even the same as the original 4PDT MY-style relays (37mA), so no changes to the driver circuit are necessary.
Omron offers two LY-style relays with a flange...the LY2S, with the flange mounted on the solder-tab end of the relay, and the LY2F, with the flange mounted on the end of the relay opposite the solder tabs. Unfortunately, the LY2S (the one which we'd much prefer) does not seem to be easily available. I've done a fair bit of searching, and it appears that unless you're prepared to order 100 of these relays (or more), you're out of luck.
Eh...but not totally out of luck. If you look at how the relay is mounted, there's no reason you can't use standoffs to mount the LY2F-style relay, and since the rectangular cutout for the relay is nice and tight, allow this cutout to stablize the lower end of the relay. The original holes are even the right size and spacing to mount a new LY2F with no drilling or tapping.
Here's a pic of the original 4DPT MY-style relay (left), and the DPDT LY2F-DC24 replacement (right). Digikey PN #Z191-ND.
The distance from the underside of the mounting flange of the new LY2F relay to the end of the relay is about 33.5mm. Two 15mm male/female standoffs will allow the end of the relay to extend into the original mounting hole for support. The original relay is held in place with two 3mm machine screws, and these standoffs (Digikey PN #24315K-ND) happen to have the threads we need. So, two standoffs are threaded together, and mounted in the original threaded chassis holes with a flatwasher (the threads do not extend all the way to the body of the standoff, so the small washer is needed). I also used a dab of Loctite on the threads.
Once these are threaded in, two washers are placed on top of the standoffs to prevent stress cracking of the flange mounts (I used a small dab of grease to hold them in place), and then the relay is set into position. The screws which were used to mount the original relay are given a washer (again, to help prevent stress cracking of the plastic), and threaded in to hold the relay. Here's the end result on an SX-737:
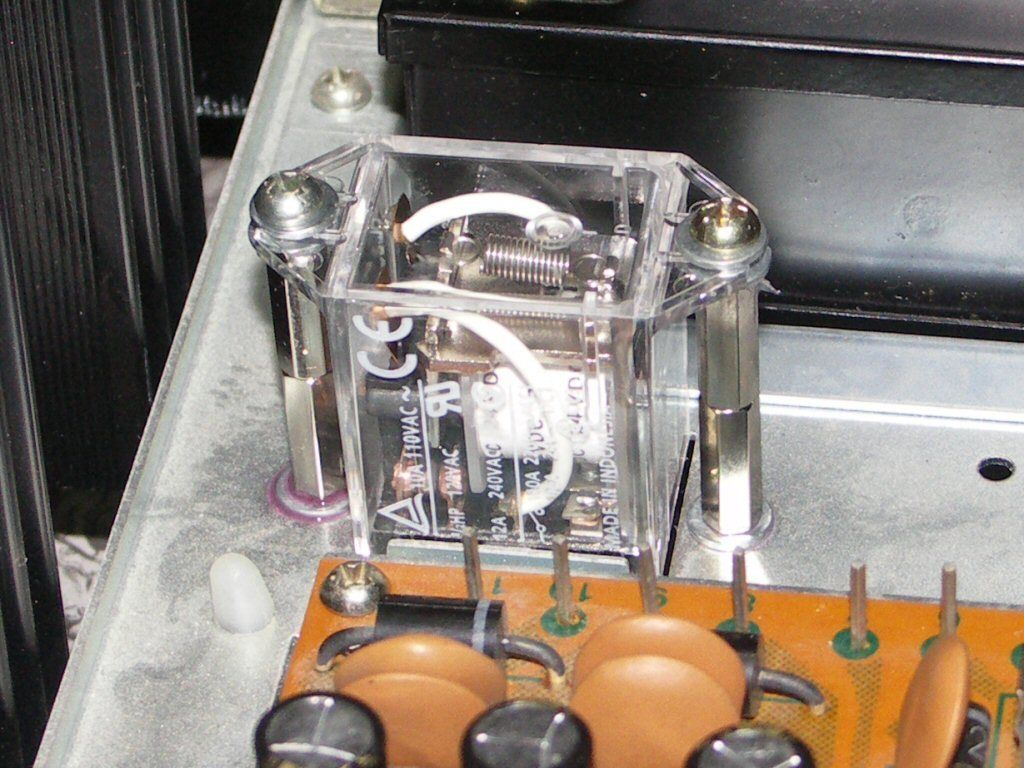
Once that's done, it's simply a matter of soldering the wires back in place.
Like I said, someone is prolly gonna jump in here and tell me where I can get the proper relay, but I looked. I really did. In the meantime, this works, and it is done without having to do anything too bizzare, or having to make any mods to the chassis.
All is not lost...Omron does offer a relay with a mounting flange in the 'LY' configuration. This is a DPDT relay rather than the original 4PDT, but the DPDT LY-style is rated for 10A per contact, and is a perfectly usable substitute for any amp or receiver that was originally equipped with a 4PDT MY-style relay. The coil current is even the same as the original 4PDT MY-style relays (37mA), so no changes to the driver circuit are necessary.
Omron offers two LY-style relays with a flange...the LY2S, with the flange mounted on the solder-tab end of the relay, and the LY2F, with the flange mounted on the end of the relay opposite the solder tabs. Unfortunately, the LY2S (the one which we'd much prefer) does not seem to be easily available. I've done a fair bit of searching, and it appears that unless you're prepared to order 100 of these relays (or more), you're out of luck.
Eh...but not totally out of luck. If you look at how the relay is mounted, there's no reason you can't use standoffs to mount the LY2F-style relay, and since the rectangular cutout for the relay is nice and tight, allow this cutout to stablize the lower end of the relay. The original holes are even the right size and spacing to mount a new LY2F with no drilling or tapping.
Here's a pic of the original 4DPT MY-style relay (left), and the DPDT LY2F-DC24 replacement (right). Digikey PN #Z191-ND.
The distance from the underside of the mounting flange of the new LY2F relay to the end of the relay is about 33.5mm. Two 15mm male/female standoffs will allow the end of the relay to extend into the original mounting hole for support. The original relay is held in place with two 3mm machine screws, and these standoffs (Digikey PN #24315K-ND) happen to have the threads we need. So, two standoffs are threaded together, and mounted in the original threaded chassis holes with a flatwasher (the threads do not extend all the way to the body of the standoff, so the small washer is needed). I also used a dab of Loctite on the threads.
Once these are threaded in, two washers are placed on top of the standoffs to prevent stress cracking of the flange mounts (I used a small dab of grease to hold them in place), and then the relay is set into position. The screws which were used to mount the original relay are given a washer (again, to help prevent stress cracking of the plastic), and threaded in to hold the relay. Here's the end result on an SX-737:
Once that's done, it's simply a matter of soldering the wires back in place.
Like I said, someone is prolly gonna jump in here and tell me where I can get the proper relay, but I looked. I really did. In the meantime, this works, and it is done without having to do anything too bizzare, or having to make any mods to the chassis.
Last edited:
")
 Since I have a neat solution, the last thing I want is to deal with a large parts house with my piddly $600 order and wait 6 months for them to show up. I hate those guys. They barely understand the word 'Customer', and 'Service' is what they have done to their car. Certainly they've never used the two words together in the same sentence, let alone have a vague concept of the meaning. No thank you...my solution works just fine.

