A-1000/A-1020 info/repair thread

OMGCat!

Super Member
There seems to be a decent amount of interest in these amps but just a few threads here or there with descriptions and repair info.

I think Bratwurst7s repair thread is pretty much the most in depth that I've found.
http://www.audiokarma.org/forums/showthread.php?t=635631
If you know of others post time here so they are easier to find.

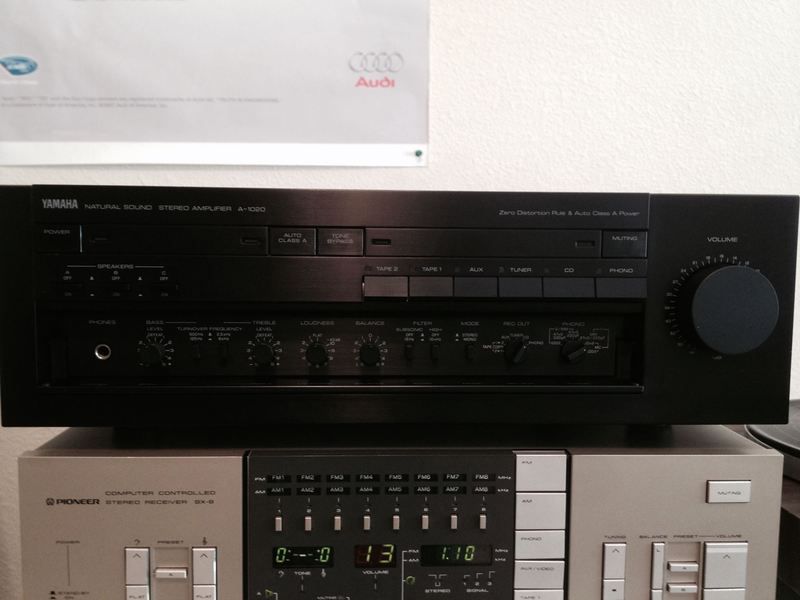
I'm in the middle of a rebuild of an A-1020 at the moment. I have a bunch of Yamaha stuff but the A-1000 was my first intro to Hi-Fi and my first intro to Yamaha when my father bought one new in '85. My best friends father happened to have an A-1020 and I spent hours listening to that when I was a teenager so both units have sentimental value. I decided to pick up whatever clean one showed up first.
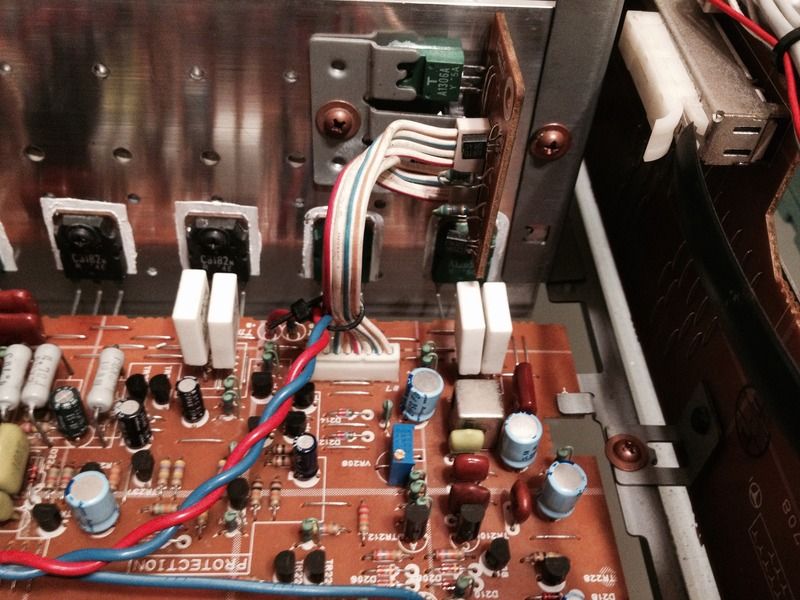
This one appeared clean in the pictures and wasn't missing any buttons so I decided to go for it even though it was advertised as non-working. It almost ended up a crappy CL deal but turned out ok because the seller didn't know how to work the voltage selector switch. After getting rid of the dust, setting the voltage switch and properly configuring the jumpers the poor thing actually worked. It even sounded very nice. Cosmetically it's good+ I'd say.


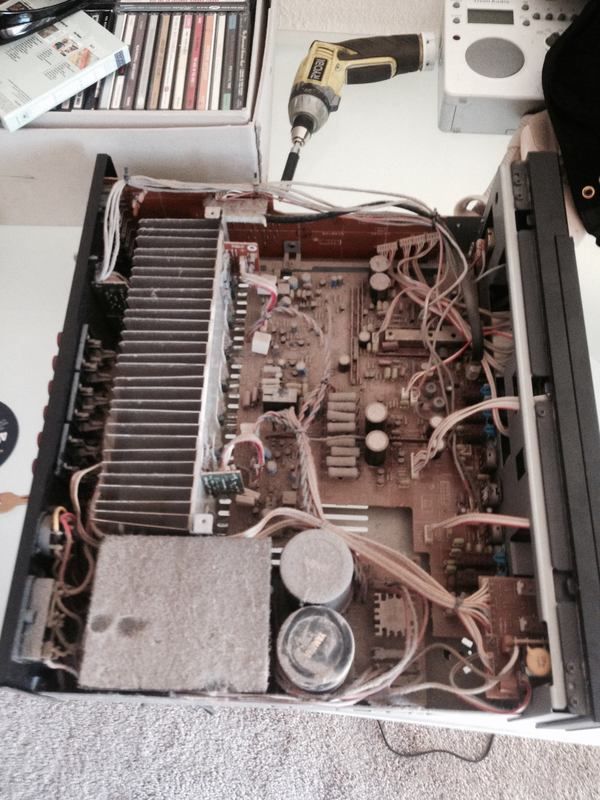
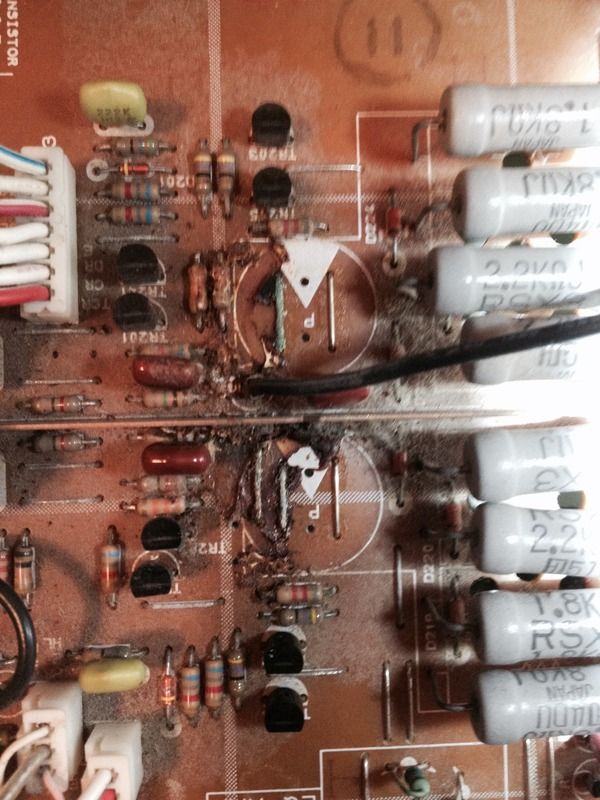
First the glue. There was glue under my caps and it ate stuff. A few resistors, a bunch of jumpers, a diode or two. No biggie unless it eats through something and nukes the whole thing and then it becomes the biggest biggie. This bit of carnage is under the Black Gate caps.


Secondly the solder joints on these amps suck. Half of the speaker post solder joints were broken but still (kind of) making contact. The transistors on the driver board could be wiggled and probably pulled out if you wanted to. A good portion of the joints on the main board have the tell tale rings around them. I'm going to go over every joint. I don't want something making intermittent contact and driving me up a wall.

Third, the caps really do need to be replaced on these. I know some people argue originality or whatever but I've pulled only 4 caps so far and only one was at value. The rest were 10-40% low.

Fourth, replace the heat sink compound. It was totally dried out and more cement like than anything. Replace the micas too unless you feel like trying to clean that stuff off somehow.

Lastly (so far) is the carbon film resistors. I pulled a few for replacement due to being green and fuzzy from the glue and tested them just for science. The 22ohm measured 220ohm and a 2.2kohm measured somewhere around 30kohm. I'm going to measure all of them in circuit but if this is any indication I'll probably have to replace most of them.

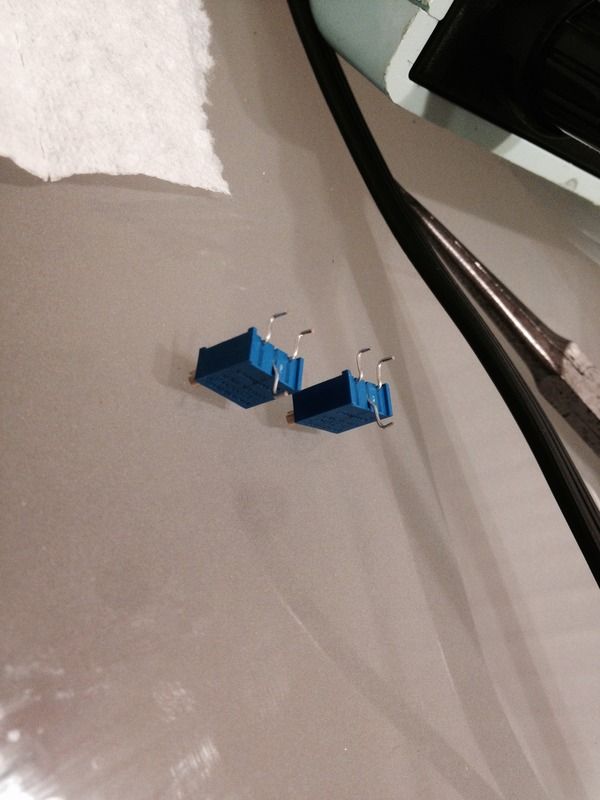
I decided to go with the Bournes multiturn pots and found a way around having to add a lead extension and I've posted pics so you can see how. You can also see how nice and clean it's become :)


To add a :) I got a T-1020 coming from the auction site because I'm OCD and couldn't use my T-80 with the wrong amp.

That's it for now. I'll add to this as time permits me to work on it and everyone else feel free to add whatever you like.
 
Last edited:
Good luck! (like those factory Blackgates huh!) Just had my neighbors son's 1020 on the "bench" because it quit working.... uh... jumpers? where'd they go?

You'll really enjoy the 1020 tuner, very good IMO!, a sleeper!

Got a couple of 1020 cassette decks here waiting for some love too... really great in their day!
 
I really love jumpers. They are the source of a lot of good deals here it seems like. This one had one jumper going Receive to Receive and one from Send to Send. Just because something fits doesn't mean it belongs in there. They printed those words on there for a reason ya know?
 
A couple of quick thoughts...

Glad that my thread was of some use to you!

You did a very nice job of cleaning the amp, looks great. Doesn't look to have any nicotine goo either, that's a plus.

I must have been brain dead to not to have seen how to do what you did with the trim pots. Looks very nice, good work there.

I guess that I got lucky concerning the glue, especially considering the nicotine goo it's surprising that I didn't find corrosion. On my A-520 I used some snipped off capacitor leads that I had saved as replacement jumpers for the corroded ones.

I think that the caps really get cooked by the heat in these amps. I've only recapped 5 amps so far but the ones in the A-1020 were by far the worst.

Cheers,
James
 
I must have been brain dead to not to have seen how to do what you did with the trim pots. Looks very nice, good work there.
..sometimes a photo is worth the proverbial 1000 words.

Nice looking amp (on the outside!). I'm wondering if your amp was run in Class A most of it's life, hence the wear and tear, looks like it may be from the heat. And that glue looks nasty. My glue in my A-720 was nothing like that.

Good luck with your restore, I'm sure it will be worth it! On the a-720 I subbed out the opamps in the phono section and shortened the audio path by bypassing the run of wire to the accessory jumpers, I think it made a difference. Something to think about once you get this settled, if you want to go down that road.
 
Thanks for the kind words guys :)

James your thread was definitely a big help in getting ready to go at this amp. It was nice having an idea what to expect.
I did the same thing for new jumpers. I bagged up a bunch of clippings from the last amp I had on the bench, er, kitchen table so it was just a matter of perfecting the bends and length.

I like the idea of removing those two feet of wire going back and forth for the adapter jacks since I'll never use them anyway.
I've never tried playing with op amps though I've read a lot about it. Which sockets do you solder in?
You may be right about the Class A use. Maybe the years of Class A with a thick blanket of dust covering everything is my cap and resistor killing culprit.
Whatever the case despite the out of spec parts it managed to make it through with it's original compliment of transistors (or at least period correct replacements) so I'll count that as a net win.

EDIT: We should add the A-720 as well if anyone wants to add resto info here.
 
Last edited:
Here's a link to the thread I created with some photos: http://www.audiokarma.org/forums/showthread.php?t=628641

I didn't use adapters for the opamps because the space was so tight. There are some other suggestions for other opamps that may sound better.

Anyway, good luck with the restore, these are nice sounding amps. And btw, I saved the Blackgates and tested them later when I had a cap tester, they measured good as new. Maybe someday I'll put them back in if I don't use them for another project.
 
Thanks for the link. I am going to make sure this thing doesn't explode before I go modifying but I'm definitely interested. The phono section sounds excellent as is, I'm interested in hearing it when the amp is back to good health.
Unfortunately my BG caps are beat. Well the two 1000uF are. The bipolars are ok but I've swapped them out anyway. Maybe later I'll swap them back in if I get to feeling experimental.
I did go ahead and delete the jacks for the adaptor. I actually had a wire with the proper connector from a tape deck I recently parted so it was just a matter of unsoldering and soldering in the much shorter section. I wrapped the original wires up so it can easily go back if I wanted to.

Progress...sort of.

I think the reason that my amp has so much corrosion compared to most others is that something was spilled in it and left. There is a much bigger epicenter of destruction than there should be if it was just glue and there is some sort of residue on the board where stuff is green and corroded.
I noticed that the zener diodes under the resistor bank were included in the mess and there was some residue as well so I pulled them to clean it. I figure I may as well change the diodes while I'm there since they have been cooking under those big resistors the whole time beside the spill residue.
I checked the resistors and they ohmed out perfectly in spec.
I got curious and decided to yank a few emmiter resistors and check as well with less positive results. They are all between .3 and .4 ohms rather than the .22 they are supposed to be so they are going to get changed out as well.

I figured I'd have to make a second order as I haven't made it through an amp without one yet.

Ok, question time. For some reason the service manual fails to list out the values for a few resistors which is no problem except for four that read much different than what the stripes say.
Here's a picture:


Red/Red/Black/Gold no? 22ohms? I have four of these things and two test 220ohms and two test 2.2ohms out of circuit. Did Yamaha get a batch of mismarked resistors or something? Should I replace them all with 22ohms?

Secondly, the HZ6C-1L, is the 1N5233B-TAP a good replacement?

Thanks and happy Saturday
 
k, question time. For some reason the service manual fails to list out the values for a few resistors which is no problem except for four that read much different than what the stripes say.
Here's a picture:
Read the second bullet statement at the top of the parts list on page 12 of the service manual.:thmbsp:
 
They are all between .3 and .4 ohms rather than the .22 they are supposed to be so they are going to get changed out as well.
Did you subtract any test lead resistance?
 
Read the second bullet statement at the top of the parts list on page 12 of the service manual.:thmbsp:

That's why I'm here :) I'd like to see this amp run again and not have it blow up due to user ignorance, ha.

Sure its not red/red/brown ?

Sure its not red/red/gold ?

What are there reference designators Rxxx ?

The 220ohm resistors are R219 and R220. The 2.2ohm are R408 and R410. It's very possible that I'm reading the colors wrong. I also can't find either of these listed in the parts list of the SM so I am here.

Did you subtract any test lead resistance?

I pulled them and checked them using the component checker socket. The only leads are the ones on the resistors themselves. With my meter they read around .6ohms.

VVV Perfect, thank you. BTW, the only reason I checked resistors 408 and 410 was because (to my eyes) they look identical to 219 and 220 and lacked glue residue and green leads. There is nothing wrong with them aside from confusing me.
 
Last edited:
The 2.2ohm are R408 and R410.
Scat says there suppose to be 220Ω. Do they look original ? Like the rest of then? I've never ever seen resistors decrease in value. Always increase. If they look OEM I'd stick with 2.2Ω. Could very well be a typo in the scat.
 
R408 and R410 I also can't find either of these listed in the parts list of the SM
Thats because they are not listed in the parts list...
Did you
Read the second bullet statement at the top of the parts list on page 12 of the service manual
?
They are carbon film 1/4 watt
R407 - 410 are noted in the legend box in the top left hand corner of the schematic diagram -- suspect most likely incorrectly listed as 220Ω
 
Last edited:
Thats because they are not listed in the parts list...
Did you?
They are carbon film 1/4 watt
R407 - 410 are noted in the legend box in the top right hand corner of the schematic diagram -- most likely incorrectly

Read but didn't grasp. Makes sense now.
Thanks very much for the assistance :thmbsp:
 
I'm glad another A1020 thread popped up.
I had no idea it had The Glue.
Mine plays nicely except that the Source Direct causes distortion sometime until switched on/off a couple of times.
 
I'd definitely want to go in there and de-glue it before something happens. Most times it's just a few resistors and jumpers, maybe a diode or two that get all fuzzed up and need changing. I'd guess from the various A-xxx(x) threads that your caps are probably wiped too. I'm about half way through mine and have only removed three that are in spec.

Sounds like your button needs a bit of cleaning but if turning it on and off a few times fixes it then that's probably fine too.
 
Back
Top Bottom