My Audio Research SP3-A-1 rebuild thread

jcolletteiii

Active Member
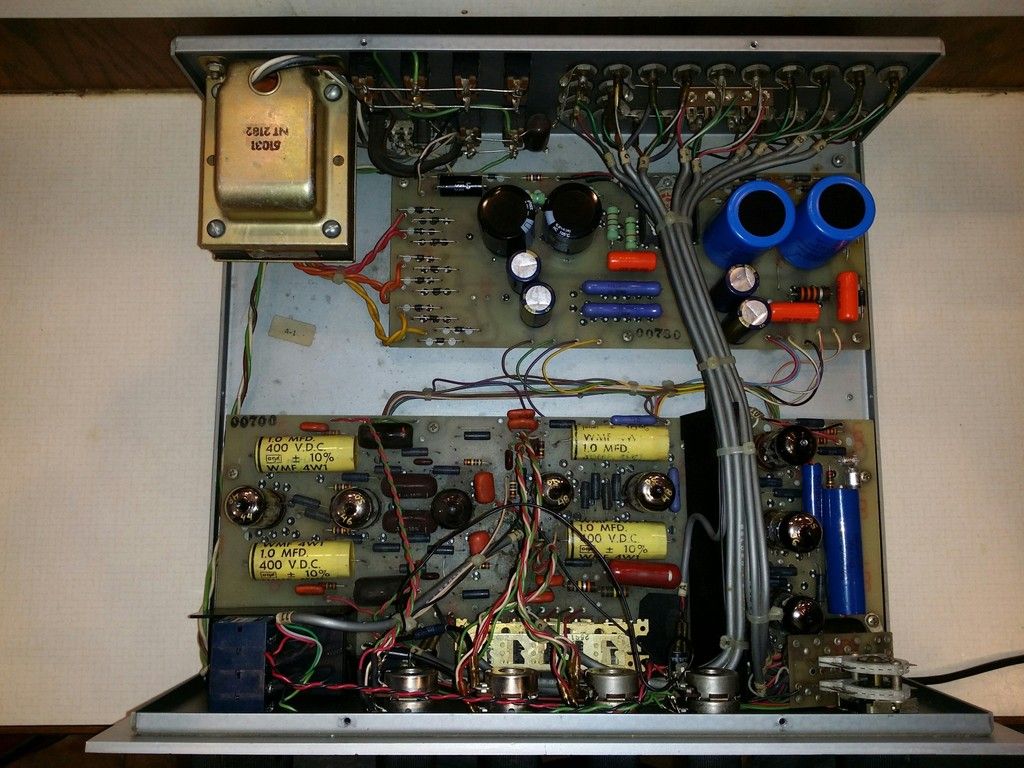
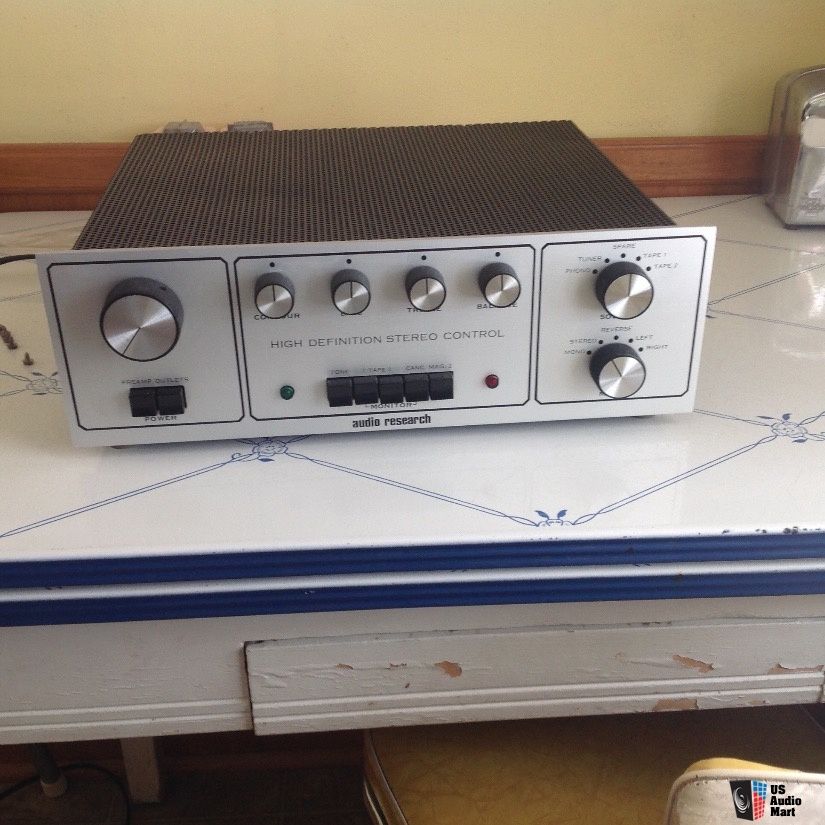
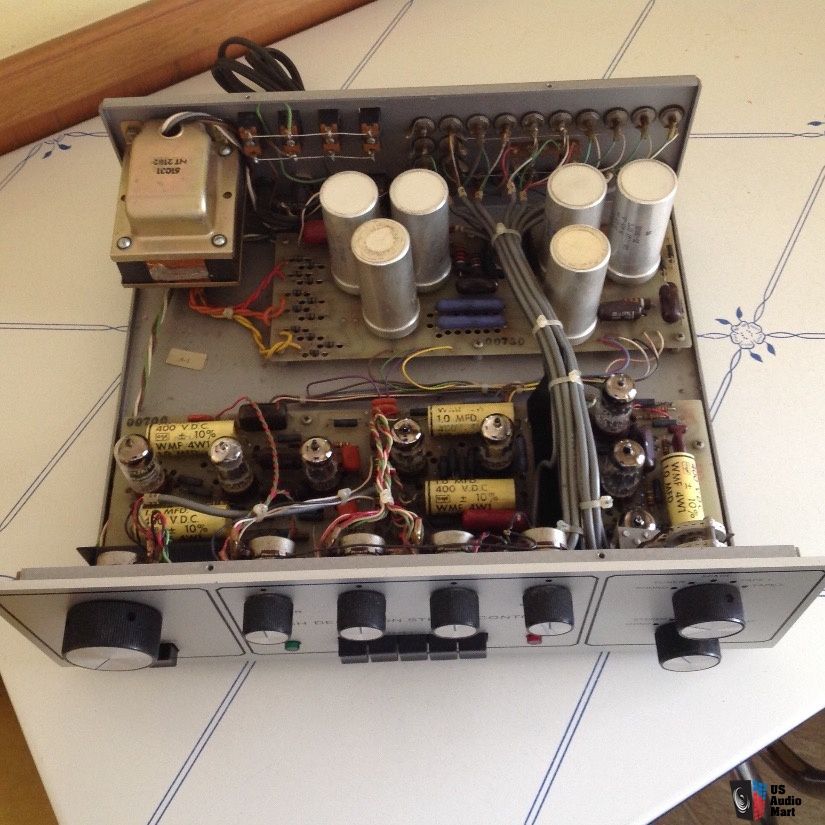
Going to use this thread as a documentary for all of the stuff, info, rebuilds, and modifications that I'll be doing to my recently acquired ARC SP-3. This is the A-1 model that retailed for $795 in 1975. AR has a fantastic reputation for sonic excellence, customer support, and - probably most important for me - this preamp has tone controls and variable loudness (ARC calls it contour, but the curves in the manual are classic loudness contours for sure). I tried going toneless, but - nope couldn't do it. Not being able to compensate for bad recordings just made me unhappy.

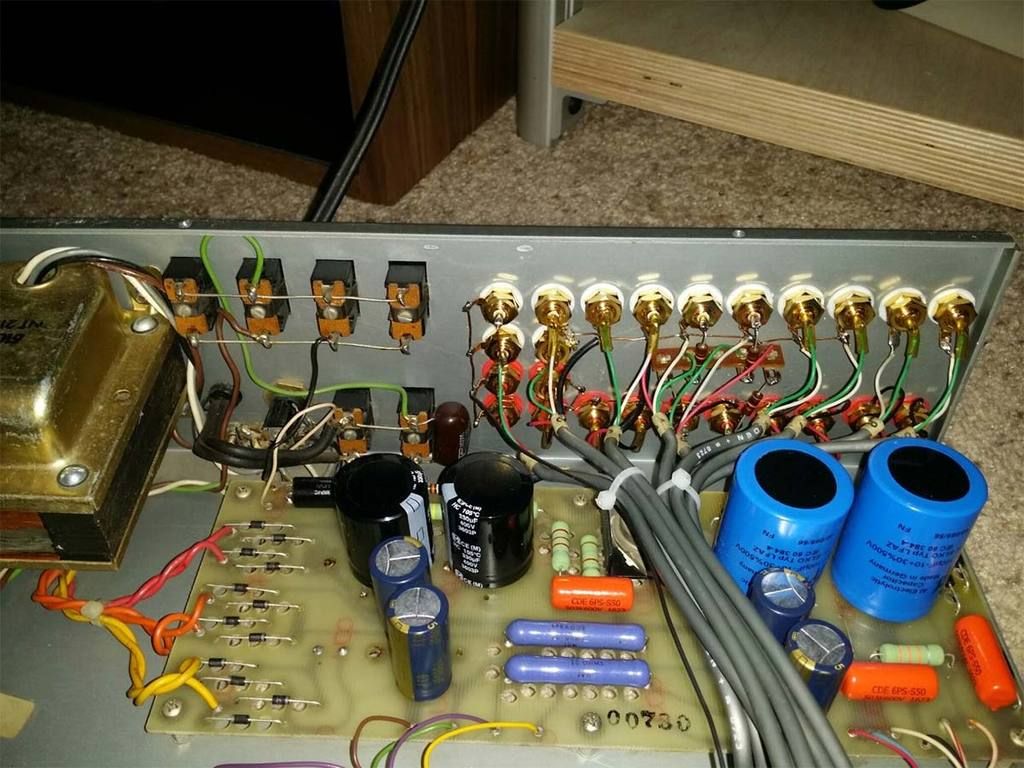
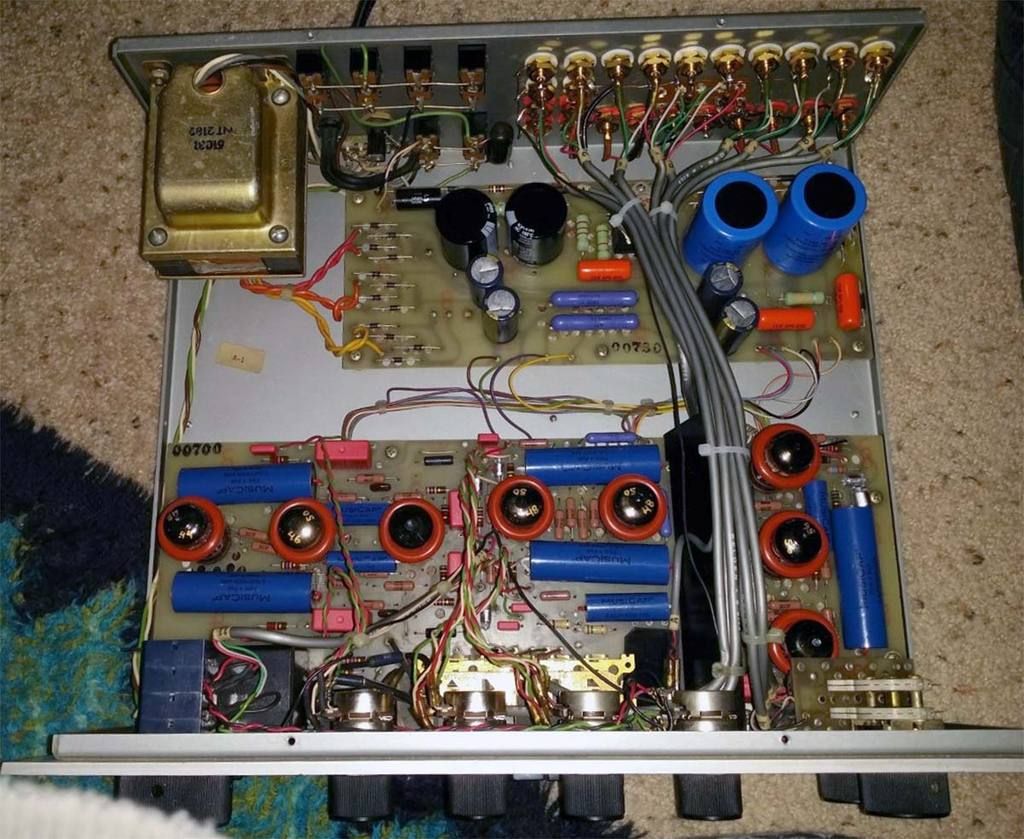
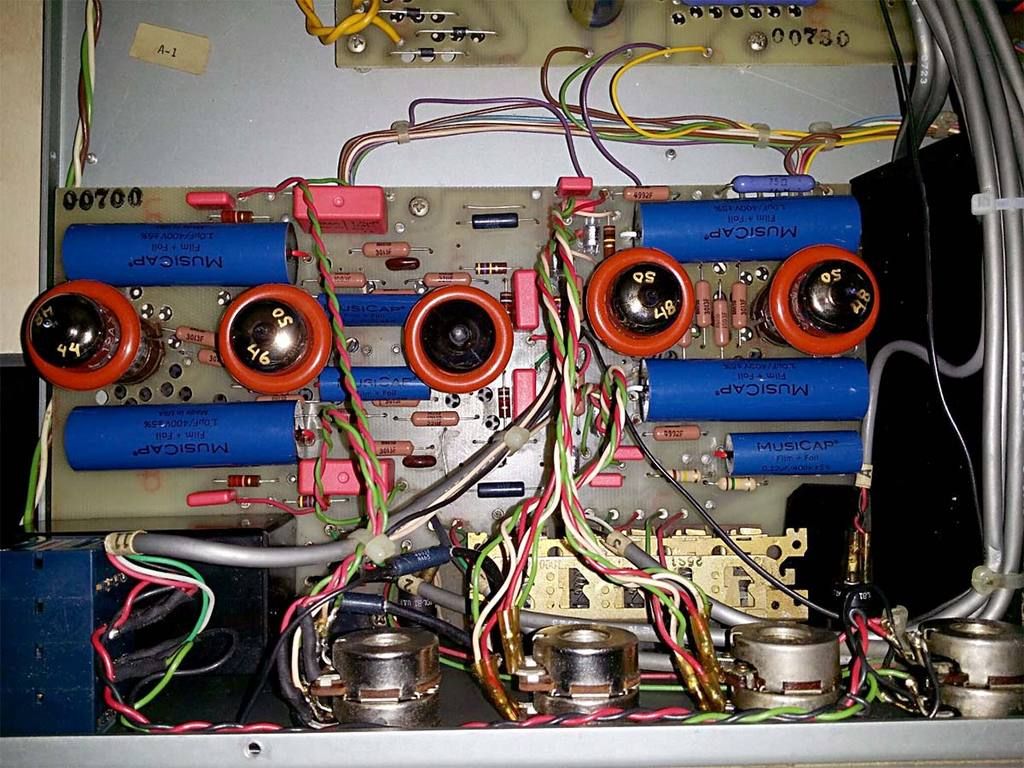
So I found this guy after watching all of the usual places where such things are posted for sale, and I think I snapped it up about 30 minutes after it had been posted. Came with 8 pretty lively 'nos' tubes, although one has already bit the big one... the others look pretty good. I've ordered a sleeve of NOS Raytheons to fill up some of the less critical sockets. Looking for something special for V1 and V4. The faceplate is in nearly perfect condition, and there have been absolutely no modifications that I can see - bone stock. And grimy. This unit had definitely been owned by a smoker at some point - it has the brown, sticky, grungy residue all over everything inside. So I sat down with some deoxit and q-tips and paper towels, and I've cleaned part of the interior out. Still have most of the main board to go, but I've cleaned up the phono section pretty nicely. Here are some of the sellers shots from the ad.

1209638-audio-research-sp3a1-tube-preamp.jpg


1209639-audio-research-sp3a1-tube-preamp.jpg


It sounded pretty darn nice as it arrived. I took my Marantz 2250 out of preamp duty and plugged the phono in and routed the outputs through my Citation II, and man, did it sound nice. The seller had told me that the green pilot light was out - found some little replacements on fleapay. Easy replacement - just unscrew the lamp housing from the front right through the faceplace. Then I started playing with settings and controls. The seller said the pots had been cleaned - I don't buy it. Scratcy, scratchy, scratchy. So on the counter it went and the pots got a thorough cleaning with deoxit. While cleaning, I noticed that the volume pot had some funny behavior. I'd turn it and there was resistance from the front pot as there should be, but the back pot seemed to be 'slipping'. So I emailed the folks at ARC, and asked them about a replacement, and they sent out a new Alps blue that is custom manufactured for them. This pot has a very nice feel to it. It doesn't feel like a potentiometer at all, but more like a stepped attenuator. It has a series of steps as you rotate the shaft - 40 in all (yes, I counted them!). This is what the replacement looks like next to the original.

20160429_230034.jpg


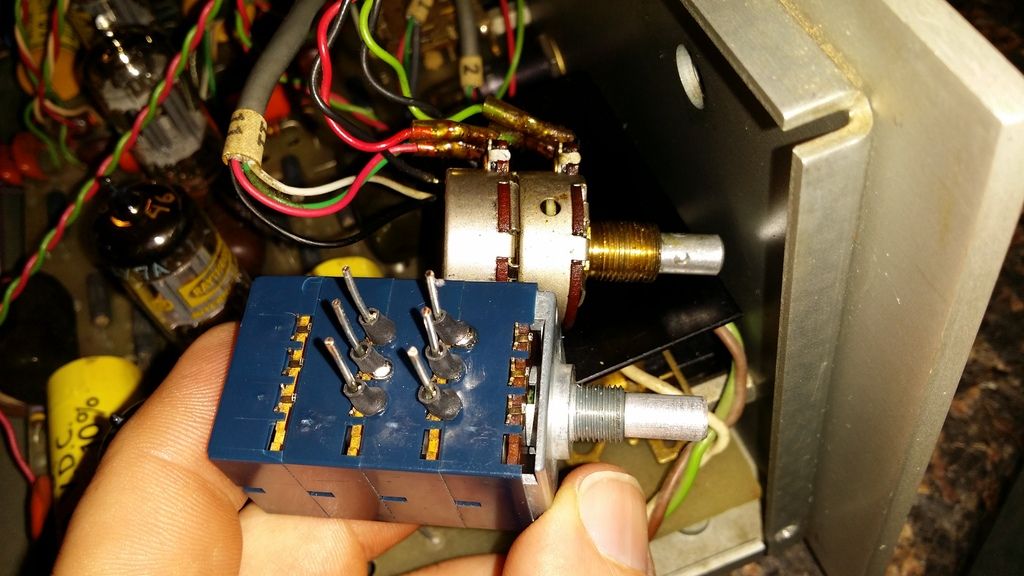
They really didn't give me too much info, but I though it would be a drop in replacement. I measured the resistance and found it to be (near) 100k - so that was okay. But, as you can see in the photo above, the threaded part of the replacement's shaft was quite a bit shorter. In fact it didn't even protrude past the face plate! So I covered all of the holes in the pot body with electrical tape, crossed my fingers that I'd have enough threads after modification (ARC charges $100 bucks for these!), and out came the dremel and the hand file. I filed off the ~1/4" cast on aluminum 'bushing' at the front of the pot, and about an hour later I had this...

20160430_140654.jpg


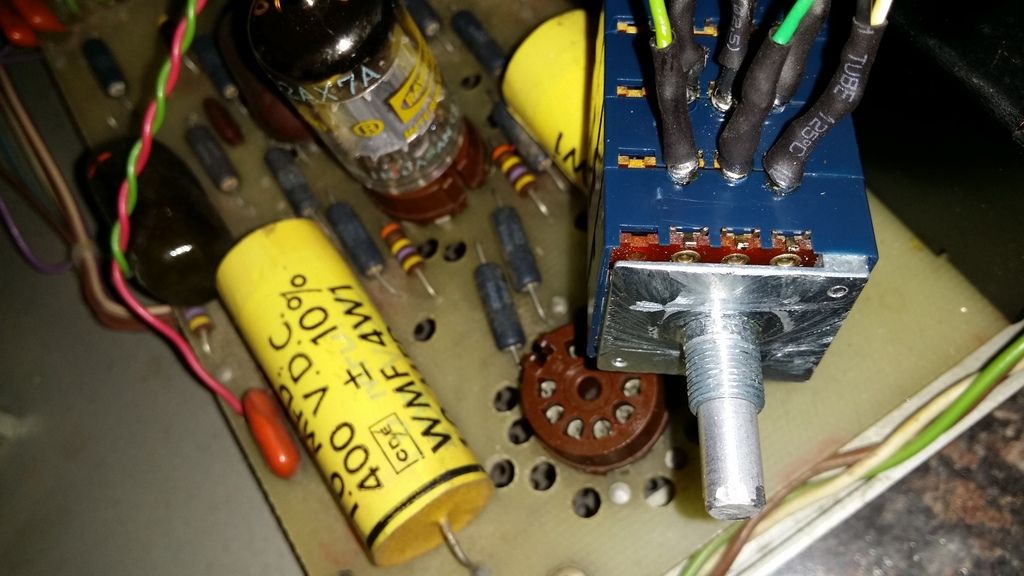
Okay, well maybe more than an hour later. As you can see, I'd already soldered it in in this photo. Had to check the old pot to see which pins were which - and they were all the same on the new one. So, in it went. The original pot had a 250k value - the replacement from ARC has a value of 100k ohms, but everything sounded good when I fired it up. Well sorta. When I switched it back on the first time, I had no source output. There was definitely volume control getting to my speakers when I turned the potentiometer up, and the balance was working. So I disconnected it, back on the counter it went and I took a look to make sure I hadn't inadvertently pulled a wire out somewhere. Nope - everything looked good. So I put it back in to my system and powered it up again. Nothing but a bit of hum at high volume levels. Then I noticed the center tube in the phono section wasn't aglow. I guess in futzing around with the switch, I must have hit that tube a bit harder than I should have. Shame too - it was a nice 'nos' GE long grey plate 12AX7. Bummer - live and learn. Turned it off, stuck in an nos Sylvania, powered it back up, and all is well. Better than well, actually! The volume control is now smooth as bumpy butter (40 bumps!).

However, now that the volume is working properly, I am noticing that the contour pot is intermittent in one channel. So this week, it's tracking down a linear Alps pot to replace that with. So here's a question for you all: the original is 250k ohms, is there any reason to stick with that value in the tone control circuit, or should 100k be okay? Many thanks in advance!

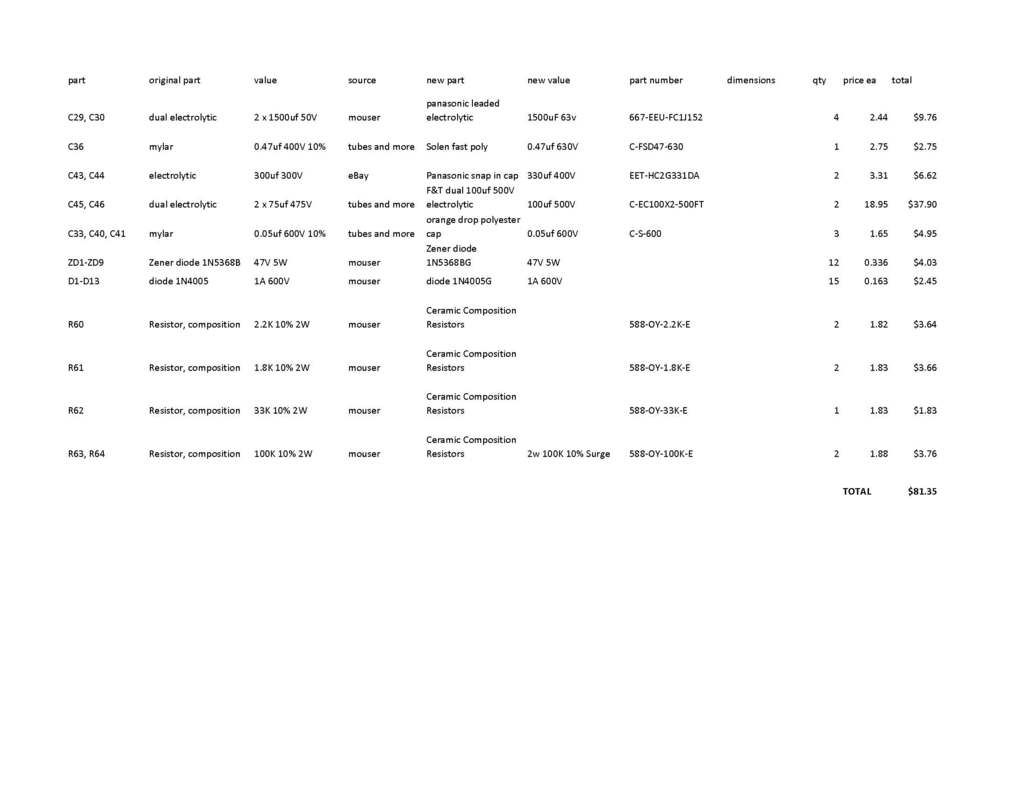
Future plans for this preamp include fabricating a reproduction of the ARC WC-1 walnut case using some highly figured solid walnut, and replacing the capacitors and all of the old zener diodes in the power supply. I will probably re-stuff the old can capacitors carefully to retain the stock look. I've already found some dual section 75uF caps that should work for C45 and C46...
 
I replaced the volume control with the ARC part years ago. That is a wonderful control with the smooth detented control and that big volume knob. I rebuild Tom's unit to make it ready to rock and he is tickled with the result. Looking forward to doing mine in the coming years. His were not restuffed caps but some that work great. He had me install a couple Clarity Caps (MR) in the line stage output and with that improvement, he wants to add them to the tone control output, too as they sound great, better than just some well selected Mouser parts. Cost more but it is absolutely cheap compared to the sound these classics can provide.

I'll be watching this space for sure.
 
I have the same year and model,with the matching D76A power amp.While I rebuilt the D76A in a previous thread,I've never begun the pre-amp restoration due to time constraints.Luckily,mine is working perfectly despite being all original,and is in daily use in my main system.While the volume pot in mine is still quiet and tracking well,I'm going to be replacing it with a stepped attenuator.Got all of the parts on hand,just not the time...

Hi Blue:) Did you ever complete your SP3 rebuild?
 
I have done Tom's not mine. I'm using my brother's SP-9II so I have not put the 3 at the top of my list.
 
This one is working nicely with the exception of the contour pot. There are some 'dead spots' as you turn the control on one channel. Space is a consideration with the tone control pots more than the volume pot - not sure an Alps would fit in there. Does anyone have experience with Alpha potentiometers? They make a 250k ohm dual pot that has the same approximate dimensions as the originals. I think I'll try taking the original apart first and giving it a cleaning. I know the front will be pretty easy to get into, but not sure about the back. Anyone ever take apart a dual section pot for maintenance?
 
A major update is in the works, but I'll kick this back to the top by asking this: Does anyone out there own an SP-3 with the original ARC walnut case? I'd like to get the measurements of the length and width of one of the side boards and the width of the top board. I can certainly eyeball what 'looks' right compared to photos on the net, but I'd like the actual dimensions if I can find them! If not, I may have to contact ARC and see if they have the drawings on file...
 
Okay, so I've been living with this preamp for over a year now, and am very happy with it. But recently, I've been training my ear to listen more and more critically to some of my really good recordings, and I've noticed some 'graininess' in my right channel that did not appear to be in the left channel. I can hear this effect best when the volume is mid - so some pretty good volume, and because of my obsessive nature, I couldn't stop thinking about this. So, I thought it was time for at least a partial recap of this 45 year old preamp. My initial plan was to get the power supply done and then see where to go from there. I really wanted to keep the look of the amp 'classic' - in other words, keep the big aluminum canister caps, and restuff them. However, after seeing what was involved - I decided to do the recap with modern caps, and retain the original caps until I have a bit more time to play around with - like over the summer. I might gut the old cans, and just place them over the new caps without doing a proper restuffing job. The new caps for the PS were pretty easy to source, and I used mostly Panasonic and JJ's. I also decided to replace all of the diodes, and some of the resistors as well. And this thing was dirty too - so a good, thorough cleaning of the boards was in order as well. The guy I bought if from said that it was a no pet, non-smoking house. But, I think it was more like a multiple-pet house where even the pets smoked!

When I was looking around for info on PS caps and resistors, I found a really awesome set of videos on Youtube of a guy who did a thorough restoration of an ARC SP-3a, and I sourced many of the same parts that he had used.


The Power supply was really pretty straight forward (well, for the most part). All of the caps I used fit in the original holes pretty well - a couple of short jumpers were needed to get the new caps (with only one negative lead as opposed to 4 negative tabs on the original cans) to fit into the old circuit. In fact, I found I hadn't connected the negatives together when replacing C29 and C30 - they went from dual section 1500uf 50V to 2 individual caps replacing each of the cans. The original cans had the positives in the middle and 4 negatives around the edges of the can. I had the polarity right with the 2 positives where they should be and the 2 negatives where they should be, but didn't tie the two negatives together! Yikes! When I initially powered it up after replacing all of the PS caps, the diodes, and resistors (the big power resistors seem to be fine), the tubes failed to light up and I immediately powered down and re-checked my work after the caps had discharged. That's when I found my mistake and hoped that I hadn't fried anything. Plugged it back in after adding some jumpers, and it powered right up. I do think that it sounded a little quieter. I checked the capacitors later, and there was 1 section in two of the dual section cans that I could get no capacitance reading from. Makes me wonder how it was running! Here's the power supply after the recap. In the image below, you'll also notice that I started on the phono section as well. More on that in a bit. So there were some bad caps in the PS, and the resistors had drifted some - they were probably still within 10% or so, but they were creeping up toward the high end of that 10%, so they got replaced. I did not check all of the diodes, but just replaced them all. I don't want to have to open this thing up again for quite some time when all is said and done.

20170405_183625.jpeg


So how did it sound? Well, I'd like to report that the new caps made a giant difference, but no - that was not the case. It did sound a bit quieter - that's maybe to be expected with 45 year old components I suppose. I'm around that same age and I've probably gotten noisier as I've aged! But... that damned graininess was still there. After some more listening, and thinking about the circuits a bit more, I decided to restore the phono and tone control circuits as well - well, actually, to do a full restore. Most of the components, all of the resistors and all caps were going to come out, get tested, and more than likely replaced. Along with a thorough cleaning of the boards. In the photo above, perhaps you can see the difference between the PS board and the main board? It was grungy! Not so much anymore! In any case, the bill of materials for the PS is given below.

BOM_PS.jpg


Anyone have an original wood case for this amp? I need some measurements! Stay tuned - phono section coming up soon.
 
My strong recommendation is to replace all of the carbon composition resistors,but leave the original metal films alone. The brand of c-comps used by ARC really do not hold their values well,and go noisy fairly often.While the value issues generally affect the higher resistance parts,they're all inclined to noise and grit.

You need to clean the tube sockets also,but I'm guessing you've already done that,haha! My own were horribly noisy,but have responded well to cleaning for now. Do keep in mind that the original sockets are of about the same quality as those you'd find in an old television set,so they don't hold up that well over time either. Mine will be getting Belton's when I finally get off my a** and start my own SP3 restoration:)

Nice job on the power supply resto!
 
Thanks arts! I did replace all of the old carbon comps with new Ohmite and Kamaya resistors. I ordered quite a few extra so I could get the values to within a few percent and so I could match them as best I could. I have not thought about the sockets, other than to clean them and tighten the pins up shortly after buying this unit last year. That's good advice - I'll have to take a look at the ones that you mentioned!

No one with a wood case? I need those dimensions!
 
Phono Section.

As you may have noticed in the PS photo that I posted above, I had started replacing some of the 1uf coupling caps in the phono section. I had been doing a lot of reading on caps, what various people seemed to like, who recommended what, and also thinking about price. I was willing to spend some money on the coupling caps, but no way was I going to spend the crazy money on them. I narrowed down the choice to Musicaps or Auricaps, and the Auricaps that most people seemed to recommend are no longer made but have been replaced by ones that have not been commented upon widely. So I took a chance - I ordered four of the Musicaps - two each in 1.0uf 400V, and 0.1uf 400V for the phono section. They arrived very quickly - ordered them from Tubes and More who always seem to have stuff for the best prices. I also ordered a bunch of stuff from Mouser: Ohmite and Kamaya carbon comp resistors, and some of the capacitors. I also ordered a whole bunch of polystyrene capacitors from Dave at justradios.com - really fast shipping.

One of the mods that I really wanted to do was to use Brian Clark's suggested values for the RIAA caps and resistors in the phono section to get a better, flatter RIAA curve. Clark suggested that the cap values for this preamp should be 3000pf and 893pf - the 3k was easy, but it was either parallel two caps per channel or find a value close, order a bunch and get as close as possible. Justradios carries a tremebdous selection of polystyrenes, so I ordered 10 x 910pf 10% 630V, and I had two that were 892 - so in they went. The new RIAA resistor values are 86.6K (old one was 100K) and 1.44M (old one was 2.2M). I replaced all of the small value silver micas with polystyrenes as well. Here was the phono section after a few hours' work.

20170405_183634.jpeg


As I removed things, I cleaned the board with glass cleaner and a q-tip, then cleaned it again with a dry rag. Really cleaned up nice. One thing you'll notice is that the Musicaps are quite a bit larger than the stock mylar coupling caps were. I was on the fence about using the Musicaps for the C37 position at the front of the phono section. It's really tight up there and the Musicaps are just too long to have shoehorned in, the V3 tube is right there - just wouldn't work. So I opted for WIMA MKP10's for some of the smaller value coupling caps where space was more limiting. All of the metal film resistors that I took out of the phono section were still in spec. But, again - they are 45 years old, and I don't know how many hours this amp had been run for, so I replaced them all with new Vishay 1% resistors. All of the soldering and desoldering went smoothly - I use a good flux-impregnated desoldering braid. I think I've only had one trace come up on me, and just a tiny bit. It went back down nicely when I soldered the new resistor in. I work very slowly and methodically - desolder a few parts, clean the board, test the old parts, test new parts, solder them back in. I also like to keep the resistors off the board a bit for added air flow and heat dissipation. I notice that ARC did not do that, maybe just a bit surprising.

phono.jpg


Now, when I powered this back up after doing most of the replacements (I still had not received the WIMAs yet the first time I listened to the new phono section) I *DID* think there would be a change in the sound. I have 3 LPs that I play more than most, and used these as evaluations of any sonic changes. 1) Cake's 'Pressure Chief', 2) Dave Brubeck's 'Time Out', and CCR's 'Chronicle'. After about 12 seconds of the first track on Pressure Chief - 'Wheels', I had to pick my jaw out of my lap. I though that there had to be something to the whole boutique cap craze, but I never expected that much of a change. The music was clearer, the lower notes and bass much cleaner and way more impactful. The stereo image seemed to be much more clearly defined, although I'm not sure this LP was recorded in such a way to allow that... Put on Brubeck and the difference was still in my face. The bass (instrument, not Hz) was stronger, more authoritative. The piano seemed mostly unchanged, but the piano on that recording is a bit dull on all of the tracks. But the sax - oh, my - the sax. The guitar work in Chronicle was better than I've ever heard it before, but the vocals were a bit harsher. The detail seemed better as well. I couldn't put my finger on it, but I thought there was maybe a bit more resolution too.

Then I put on side D of Moby's Play. Quieter backgrounds - probably from the PS recap. Nothing other than that struck me until 'The Sky Is Broken' came on. It was good, the vocals maybe a tiny bit harsher than I recall previously, but then I heard something I had never heard before - I heard Moby turning pages. Now, I'm not sure if this is additional resolution that I'm only now hearing for the first time, or if I'm listening more closely because I want there to be some difference. My first impressions having listened to this change for less than 3 hours is that there is certainly a fairly significant improvement in sound, and probably more resolution. Some of the harshness in the vocals seems to have subsided now - I've been listening quite a bit - I have maybe 10 hours on the rebuild at this point.

Some of that initial graininess was also gone. But... I (gasp) use the loudness and tone controls - so I ordered more stuff from Mouser and Tubes and More, and the rest of the amp and tone board were going to be done next. I'll post my bill of materials after I write up the last part in a few days. I need to update it anyhow.
 
jcolletteiii.. I have one sp3 which was botched by the previous owner trying to attempt Curcio Mod.. I think I should attempt to reset it to its natural beauty.. Can you send me the BOM in text file.. Also I have watched the videos by Blueglow, that guy is cool in explaining to the minute details.
 
Nice write-ups. Tom's SP-3A-1, same as this preamp, got Clarity MR caps on the outputs. He likes em so much he wants em on the Tone section, too. Each of those go directly to the outputs on the preamp depending on what is selected on the front panel.

I keep learning what folks are doing and while using some other preamp, the SP-3 is in the system right now. Sounds good. But Spiney's 9090DB is getting play time on the main speakers at the moment. It is fixed, he needs to come get it.
 
Do you have a copy of the original Brian Clark article that was published in The Audio Amateur? I've been looking for this for ages:(

Alas, I do not. I've tried all of the usual places and can't seem to locate it. I'm thinking of trying interlibrary loan next. There are a couple folks who've rebuilt the phono section of the SP3 with the values given by Clark. I have to say, though, if you do this you may end up playing around some. The values for the components are R7 changes from 2.2M to 1.44Meg; R10 changes from 100K to 86.6K; C4 stays the same - 3000pf; and C5 goes to 893pf. 893pf is a value not made (so far as I can tell); I went with nos polystryrenes that I bought from justradios - I bought 10 and selected the two closest - I think I ended up with two around 891 and 892. I probably should have bought 16 or even 20 of them to get it spot on. For the 86.6K - that's a standard value, so I ordered some Vishay Dales. For the 1.44 meg, I first bought some Yageo metal films (Mouser 603-MFR50SFTE52-1M43) in 1.43M and selected two right at 1.44. I put them in and fired it up - it sounded terrible. Very flat - those two small blue resistors had made an audible difference, and not a good one. I ordered up some Kamaya carbon comps in 1.5M 5% and selected two that were close - I think they ended up at 1.46 and 1.47. I made just that replacement and listened again, and all was better. I swear, I heard a marked difference from that single pair of resistors. Your mileage may vary!

I need to go back and update my materials - when it's all updated, I'll post it up.
 
I *THINK* this spreadsheet is up to date. The red indicates different values from stock. I think that the total could be kept down, but I order multiple extras so I can select the two components with the closest values. This total does not include a few extras that I've done on top of the electronics - like 24x gold plated surface mount RCA female jacks. And I still need new rubber feet. And the walnut for the new reproduction wood case. Speaking of which - does anyone have the original walnut wood case?
 

Attachments

  • SP-3_parts.pdf
    84.2 KB · Views: 50
I've been plugging away at the main amp / tone control board, and I've got just about everything that I plan on replacing done at this point. At the back of the PS board, you'll see shiny new RCA jacks. The old nickel plated jacks were kind of grungy and I though 'while I'm in here...'. I used the Rean/Neutrik female gold plated over brass chassis mount RCAs that Mouser sells for a few bucks each. I was also perpetually plugging the wrong channel in at the back of this preamp as I never look at the tiny print that points out which channel is which, so I used red and white RCAs for the visual reminder. This took awhile. If you decide to tackle this - it looks like a pile of spaghetti back there, and it kind of is, but take lots of pictures and draw a diagram. Also, the ARC wiring harness is pretty well labelled with numbers. The main problem is that with the PS board in place, there is not a lot of working room. It is doable, however with patience as I did not remove the board. All told, the jack replacement took me around 5 hours over the course of two nites. I just plugged along starting at one end, and slowly working toward the other end.

power_supply.jpg


The main board was also finished off this week - yesterday in fact. My last capacitors came in a few days ago and I removed the old ones and tested the new ones before picking pairs based on values I got for some of the key spots. The ARC schematic for C23 and C24 mention specifically that these should be matched pairs. The ones I took out were not, but the ones that went back in were within 2% of each other. The front end of the main board was the grungiest part of the amp. I was cleaning for quite some time. With each component I removed, I cleaned beneath and around before soldering in the replacement. I am very happy with the outcome. And that graininess that was in the right channel? GONE! Curious though - I suspected that would be from a capacitor - but none of the caps in the tone board tested very far out of spec - I think only two caps were out of spec by a bit over 20% or so. The sound has improved noticeably from the pre-work state, the bass is definitely better defined, and the soundstage is wider for sure. It will be interesting to see if I notice changes as the caps age beyond just a few hours. One negative that I have noticed, and which bothers me quite a bit - the blue outer label on one of the Musicaps has begun to peel back (look at the photo below, upper of the second set of coupling caps from the left on the maun board). I think I'll be sending an email to the vendor and see if I can get a replacement sent out. At at least $20 bucks a cap, this is a problem that should not ever arise, IMO.

overall.jpg


All that was left before buttoning it back up, and putting the bottom mesh back on was cleaning the flux residue. I used isopropyl and a bunch of cotton swabs, shop towels, paint brushes, and time to clean up the solder joints. But it was worth it - the boards came out quite nicely. Over the course of the entire restoration, only one trace was partially damaged - these traces seem to be pretty robust - more so that the Dynaco ST-70 board for sure. One of the round through-hole traces partially lifted and got snagged on my iron's tip and I ripped a small piece of it off. There was still plenty left to get a good connection though. Have to be careful during desoldering operations, and definitely take the time to keep your tip sharp and clean!

underside.jpg


This has been the first full restoration that I've ever done. I've done a bunch of power supplies - one on a Marantz 2250, a 2230, my Luxman PD-277 table, A Dynaco ST-70, and the entire power supply in my Citation II (that was much tighter!). This has been a great experience, and I definitely feel more competent for having done it.

Next I would like to build a repro walnut case, but ARC told me today that they would not release any dimensions from engineering drawings, which they admit that they have. But, they told me that they would check their physical archives, and if they have a model with a wood case, they would take some dimensions from the model. A dimension is a dimension as far as I'm concerned and I don't quite see the distinction, but I understand the policy. Hopefully, they have one stashed away in their collection!
 
Looks good. I was wondering if better cable could be used between the jacks and the boards/pots?

I installed an inrush current limiter on my SP and I really like the way the green power lamp bulb takes a few seconds to come up to brightness. I just know they amp is not getting hit with a full 120+Volts all at one time. I put this back at the AC line in to one of the unswitched jacks. Probably would be better in the line from there to the power switch, though, looking at it now (your pic) and knowing more about those devices.

The RCA jacks I used on Tom's SP-3 were the ones from Amplified Parts that have the nuts on the back panel. I felt those would be easier to install. Yours look good though and should be just fine. On my unit, not getting a rebuild yet, I tightened the original jacks and the few gold ones I have put in the unit (phono inputs and the outputs).

Can we get a close up of the main board?

Looking forward to reading your impressions after you have had it powered up for a week or three.

I was wondering some of this stuff myself. Would really good wire make a difference? I'm not sure over such short runs. I'd love to hear from folks who have done such things, and also anyone who knows what ARC uses for wire these days and how in compares to the wire in these older units.

I too was considering some kind of soft-start device. But, you read about stuff online and there are multiple ways to do it and some folks say that you shouldn't do it this way for this reason, or that way for that reason. What device did you use, and why?

Here's a shot of the main board after the restoration.

board.jpg
 
Also, tubesandmore (Antique electronic supply) is sending out a replacement for my 'peeling' Musicap tomorrow. Great people to deal with, fantastic customer service!
 
Back
Top Bottom