FM-200-B Acquisition

Gadget;
That has been my solution for many years. A nice file corrects the problem with the polarized plug. For a while I was able to get new non-polarized sockets from DynaKits.com, but they ran out and can not get any more. Dyna used 4 of them on their PAS preamps. Virtually every one seen on eBay has one or more of them busted.
Joe
 
I managed to find a few new non-polar ones in one of those "dollar bin" boxes at a radio show. I think I got all 4 or so that he had and put them into my own PAS2.
 
A year ago I worked on a PAS2 for a friend who had always wanted a Dynaco system when he was young. I also put together a Stereo-70 on a new polished stainless steel chassis from DynaKitparts.com. When finished it looked like new and sounded as good too with improved power supply. It became a Christmas present for him with some JBL L36 speakers. It is now his pride and joy which gets demonstrated to visitors. He has a large LP collection as he was a music major in college. His wife bought him a new turntable with magnetic cartridge to use with it. Later I gave him a restored FM-5 tuner to go with the system.

I still have my own PAS-3X, FM-3 and Stereo-70 from when I was in college years ago along with the AR-2Ax speakers all bought while I was working for the Hi-Fi dealer in Austin in the 1960s. I developed my love for Fisher products as we sold them and were a warranty service station for them too. It is nice to see so many fans of Fisher equipment here.

Joe
 
Today after doing some staining on the Electra equipment cabinet, I decided to work on the case for the FM-200-B. I had already glued the patch to the right front trim of the cabinet and had it ready to reassemble to the rest of the cabinet. As it turned out the groove at the back edge of this piece did not quite go back to the same depth as it had originally, so I will be removing the entire right side of the cabinet. A few taps on the inside with a hammer should do it as the bottom edge is already broken free. Then I can use my belt sander to gradually grind down the front edge until I get the forward edge to be even with the forward edge of the top and bottom of the cabinet. The 45 degree bevel edge is the correct angle and shape, but will have to be ground back until it is even with the top and bottom trim.

In retrospect I believe that the routed channel in the front trim piece for the right side may have had too much glue build-up in the channel to allow it to seat to the same depth that it did to begin with. I had cleaned it out with my pocket knife ahead of time, but must have missed some. Like many of my wood projects, I wind up having to make adjustments to parts to get the best fit. The vertical groove between the right front trim piece will be a little wider than the others, but it will have to do, unless I can successfully trim a thin strip of walnut wood the right size to fill in part of that groove. In any case it winds up extending the length of time It takes to complete the cabinet repair. Such is life.

Joe
 
Larry;

I have to admit I tried that!:rolleyes: I thought of a way to recover from this error even beyond grinding back the leading edge of the trim and re-beveling the piece. I can grind it down a small amount equal to the thickness of a piece of walnut veneer and make it wide enough to match the groove between the top trim and the back portion of the cabinet. That will probably be the best looking fix for the poor line-up of the right front trim. I doubt anyone would ever notice the difference. Where there is a will there is a way!:thumbsup:

Joe
 
Late yesterday I removed a pristine non-polarized receptacle from a parts chassis to use on the 200-B. I may get a chance to install it today and restore that capability of my 200-B unit. I will be using nuts, screws and starwashers to install the AC receptacle as I do not have rivets and tools to install rivets. Choosing rivets and installing them is not easy. The thickness of the chassis metal plus the ID of the hole to be filled get into the process. It is one thing to install rivets in a factory environment and another in existing equipment that already has other switches, sockets etc. installed.

Joe

I posted this earlier today in another thread,and figured I'd include it here as well,as a quick (edited) cut and paste.

The rivets on these are standard 1/8'' diameter,and Pop rivets with a length between 1/8'' & 1/4'' will be fine as replacements.Use only the steel type,as the aluminum ones are too soft,and repeated flexing will eventually cause them to loosen. Also,always use the proper washer on the side that deforms,as the mandrel will often pull through or even break the metal mounting flange of the socket. Also,after you ''pop'' the rivet,reinsert the broken mandrel piece from the head side and using a small hammer,knock out the remaining mandrel head.It doesn't happen often,but I have seen them fall out into the circuitry due to vibration.

In my case (a bit of showing off here:naughty:
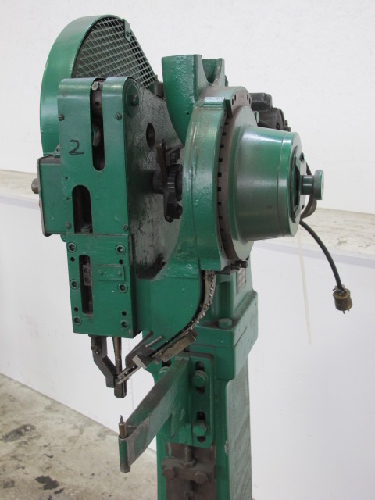
) I do quite a bit of this type of work,and have a proper tubular rivet,eyelet and turret installation setup,with different clinchers and setters for each application.I have one foot-operated press for doing typical chassis work and terminal boards,and a hydraulic-jack monster that I made that clamps into a huge bench vise.This is for doing heavy,large work (think Ampeg SVT and V-series amps,McIntosh MC-2xx etc.) that exceeds the throat depth of my small press.


Cheers,

Art
 
Art;

Thanks for this data. A while back I remember seeing a rivet installation tool on a website. The price did not look too high and I might eventually get one if I run into many more issues like this one. I don't know exactly how the person who broke this AC receptacle managed to damage it, but the body was pushed back into the chassis and the metal retention flange on the inside of the chassis was still riveted to the chassis! It must have been given a really hard hit with something.

Pop rivets, while useful for some items, do have their issues as you noted. I have not installed any steel pop rivets and have my doubts about doing it. I have had difficulties enough with the aluminum ones and do not like their looks after the job is done. I used 4-40 hardware to install the replacement socket that I had on hand. It looks different than using rivets, but is sturdy and can be redone later if I ever get a rivet installation tool. Somewhere in my bookmarks of browsed sites I have a link to the company who advertised their rivet installation tool. I need to look it up again.

I have a Bud Box that I plan to use for installing a MPX-65 converted to a WX type in my 202-R tuner. It will be lying at the rear of the 202-R inside its wooden cabinet (with an extension set of wood panels at the rear). I was looking at it today and plan to reduce the height of the bud box down to the approximate 2 inch height of the Fisher chassis.

In the meantime, this 200-B works so well it surprises me.

Joe

I have seen many ac receptacles damaged in the manner you have described.The worst are the ones where the plastic/bakelite is chipped away where the prong goes into the socket,which allows contact with the metal flange.Not a big deal,unless the unit has a grounded power cord or is connected to something that does.Spectacular,to say the least.Don't ask how I know,haha.

Going with threaded hardware is just fine in this application.No vibration,so no worries:)

Unless you plan to do frequent work of this nature,a manual Pop riveting tool is just fine.But,you have to buy a good one for best results.They aren't much more expensive than the cheapies,but will provide excellent cosmetics and be easy to work with.I do a fair amount of work with Pop rivets,so I sprung for a pneumatic tool.It really saves the hands!

Most (all?) chassis were riveted with a Chicago machine. This is what I had at work,and it made restoration work a breeze.I have a line on one going for cheap,but my garage is already a machine shop that is filled to capacity,so I'm probably going to pass on it.

20110428135406625_L.JPG
 
Art;

That Chicago machine looks pretty stout. I see some hand operated rivet tools with a jaw reach up to about 2 inches. That would be OK for rear chassis apron areas like the AC socket we are discussing. However, for an item such as a tube socket well into the middle area of a typical receiver or tuner chassis it would likely require a very specialized tool. The design would have to be capable of operating close to other components or else many other parts would have to be removed or somehow moved out of the way for restoration projects. Do you know of any machines that would serve well in that situation?

Joe
 
Art;

I should add that for the most part I have managed to repair many tube sockets where a single contact broke off or was somehow damaged. The key is finding a very similar tube socket to rob a contact from. I have run into a few sockets that had a burned spot in the insulation which required replacing the entire socket. In such a case either a pop rivet or screw, nut and starwasher repair was done. Sometimes there is just no easy way to do certain repairs.

Years ago I ran into an AC socket similar to what you described but as a plug was being removed, both prongs hit the chassis metal with the resulting blinding flash and explosion of brass globules and a nice burned area on the chassis metal. Of course the breaker was tripped too. So many people force polarized plugs into these non-polarized sockets and do not realize what a hazard they are creating for themselves and other people. Two years ago I was working on a Dynakit FM-5 tuner that I had originally built myself. It had been struck by lightning. I made repairs to the antenna input circuitry and replaced the RF FET and repaired a vaporized trace in the same RF area. That got the unit going. Everything was just fine until I connected it to my main system and it caused another tuner that was also connected to the system to emit a trace of smoke along with a pop. I later discovered the AC switch in the Dyna tuner had managed to short the AC hot lead to its chassis and when I plugged it into my main system another tuner which had a grounding AC plug had a circuit trace inside that vaporized. I had to replace the Dyna tuner's AC switch and repair the other tuner's circuit trace too.

Life can be exciting at times!:eek2:

Joe
 
Most of the hand-riveters have about the same 2 inch reach,although some are longer or are better designed to allow better clearance. The swivel head types open up more possibilities,as you can get the handles out of the way. For the ''deeper'' jobs I use the pneumatic,as the nosepiece is over 3 inches long and also on an angle from the body.

Some jobs are just best done with threaded fasteners.A good example is a 7-pin socket shoe-horned between a couple of IF transformers.Not gonna be removing all that,no sir!
 
Art;

Yes IF transformers are rather delicate items and in general FM IF circuitry lead dress and component location and orientation have to be carefully considered and observed when removing or installing parts. It is not a job to be undertaken casually. Care has to be exercised especially with any capacitors that are temperature compensated as those types are not easily obtained these days. I have many years of experience with electronics repair and some design work. That said, even the best of us sometimes create problems while working on an item that are difficult to recover from.

Joe
 
Yesterday I worked on the wood cabinet for this tuner. I managed to get both sides glued to the wooden base and after the glue cured the cabinet is now quite sturdy. I still have some filing and shaping to do on the right side front trim. It is coming along slowly. There is a bit of a problem with the right side front trim being splayed out to the side some. I am thinking about drilling a very small hole of the top and bottom with the right side trim pulled into correct alignment with clamps. Then I can insert some small finishing nails (or brads as some call them) to hold the pieces together when glue dries. The heads of the nails can be covered up with some wood putty and stained to conceal this repair. The last item to take care of is the scratches on the top. I bought a cheap iron to use in steaming the wood surface to get the scratch to diminish as much as possible. Then an application of fresh stain or perhaps one of the wood rejuvenating products should restore a decent look to the cabinet. I can always look for another cabinet or even make a new one if need be. The cabinet was an extra with this unit. I was mainly interested in the basic tuner and it has not disappointed me.

Joe
 
Today I worked on the cabinet repair for the tuner. I had successfully replaced a section of wood trim on the right front part of the tuner. Then the entire cabinet was glued back together. It had been about 5 days since I had done anything to it. I began by sanding the cabinet with some 120 grit followed by some 220 grit sandpaper. There were scratches and gouges on each side and the top. I pulled out my cheap iron and used it to steam the surface of each side. The gouges did not get all their finish removed in the initial sanding. After the first steaming they became less depressed. I lightly sanded those spots with 220 grit and steamed those spots again. I did this several times. When I stopped almost all of the gouges and scratches were removed and then I applied some Minwax Special Walnut stain. I took pictures first after the overall sanding, then after steaming the surfaces and finally after stain had been applied.

Here are some pictures.
Cabinet after sanding web 01.jpg Cabinet after sanding web 02.jpg Cabinet after sanding web 03.jpg
The pictures above were after sanding the cabinet.
Cabinet after steaming web 01.jpg Cabinet after steaming web 02.jpg Cabinet after steaming web 03.jpg
The pictures above were after the steaming procedure.
Cabinet after staining web 01.jpg Cabinet after staining web 02.jpg Cabinet after staining web 03.jpg
The pictures above were after the cabinet was stained. The first picture is the repaired right front trim. I will have to add some stain to the leading edge which has the added piece of wood. If that does not get it the same color as the back portion, I will sand it lightly again and put some veneer over it, sand lightly and then re-stain the trim repair.

Joe
 
WOW! BOY, did THAT IMPROVE!!!!! That 200-B is gonna look Gang-busters, Joe!
 
Larry;

Thanks for the compliment!

Repairing the sharp front edge of the front trim on these cabinets is not easy. The way the mitered pieces come together is critical and since the cabinet had all but disintegrated, getting all the old glue removed from the mating edges was all but impossible. My conclusion after all this is that it is easier to build a new cabinet than to reassemble a cabinet that has come apart.

One thing that I did to the front edge of the cabinet was that I sanded down the sharp edge. Having a sharp edge is just asking for it to be damaged since there is little strength in such a shape in wood. Now the front edge is about 3/32 of an inch wide which is stronger and also it helped make the front look equal and balanced. After the right front trim had been repaired and the cabinet re-glued the various front trim did not exactly line up like it was originally. With the edge sanded all trim pieces look decent and although it could be criticized it looks decent enough that it really dresses up the tuner when the chassis is installed in it. Just a few more touches here and there and it can go into service.

I have noticed that many later cabinets dropped the sharp edge at the front and went to a simple square edge that projects a bit forward of the lip that the chassis front trim panel rests against. Not only was this easier to produce, it also holds up better over time.

Joe
 
I went back to Rockler for some iron on walnut veneer and cut two strips to lay side by side while I ironed them onto the right front trim side. I had to be careful because while the glue is still hot the pieces will move about. I finally managed to get them bonded to the wood underneath (which had been sanded clean again). Then after cool-down I did a another sanding of the new veneer to smooth the surface, followed by application of the walnut stain again. This time the result is even in color all the way top to bottom and front to back on the trim piece. Once the stain has had time to dry fully - probably by tomorrow, I will take another picture of the right side.

Joe
 
As promised, here is a picture of the right side of the FM-200-B cabinet after application of the iron-on veneer and restaining of the surface. The walnut stain I had was not identical with the original stain so after wiping off some of the walnut stain I added just a touch of red mahogany and rubbed it in with my finger. This brought the same color to this section as the rest of the cabinet. Now it looks right.
Cabinet after final stain web.jpg
Joe
 
Simply incredible Joe. The wide range of skills you bring to your work and the dedication to detail shows itself so well in the finished piece. You'd never know what it looked like when you started.........

Outstanding!

Dave
 
Back
Top Bottom