

You are using an out of date browser. It may not display this or other websites correctly.
You should upgrade or use an alternative browser.
You should upgrade or use an alternative browser.
Altec 606-Inspired Build Using A-7 Components
- Thread starter gdmoore28
- Start date
gdmoore28
Super Member
I would install Great Plains latest version of the 604 using a sectorial horn and ceramic magnets.
Oh, I would, too, twiiii! But that would require me to ignore the most important word I've written in this entire thread: budget!

GeeDeeEmm
gdmoore28
Super Member
Had a chance today to finish up the bases (mostly), and did a rough test fit of all the panels, except for the motor boards, of course. If the numbers work out right, I've decided to vent these through the front of the bases - a slot port with matching grill cloth covering the openings. This will not only increase the cabinet volume by .5 cubic feet, I think it will be an attractive alternative to mounting the requisite 3 - 3" X 5" ports in the motor board in order to achieve the hoped 44Hz box tuning.
As noted before, these will be eventually suited up in mahogany veneer and adorned with 1950s styled adornments. (The bases are already veneered in mahogany.) Just what those will be will be determined by what the reclaimed wood dealer has in stock. I'm definitely looking for some mahogany crown moldings to go around the base. We'll see what else pops up.
GeeDeeEmm
gdmoore28
Super Member
Forgot to include pictures of the near-completed bases. As noted before, I was lucky to find some unfinished mahogany mdf panels to construct these, so that will save me a bit of veneering once that project is undertaken. These panels were reclaimed, thus the nail holes in them. Those will need to be filled, of course.
Initial plans were to install 3" casters at all three corners, but I removed some adjustable heavy-duty feet from the same cabinet that provided the mahogany panels, so I decided to use what I had on hand. That means moving these around will require me to use my two wheeler. Hopefully I won't have to move them often.
Incorporating the extra .5 cubic feet into the cab volume provided by using the bases required that the vent dimensions be recalculated. These new numbers were calculated by my friend Chris at the Parts Express Tech Talk forum. Thank you, Chris!
The new port will need to be 1.5" tall, 14" wide (ignore the 17" width shown in the photo - sorry!), by 3" deep. This will yield a box tuning of 37Hz and a respectable F3 of 42Hz. Not bad at all for a small(ish) enclosure and a woofer that really enjoys boxes of 8-10 sq. ft..
The next several days will be taken up by working on my friend's big zero-turn mowers, so progress on the cabs will be rather limited. Back in a while.
And thanks so much to those of you who are watching this build and offering comments. I truly appreciate the interest and recommendations you've made. That makes this project all the more fun!
GeeDeeEmm
Last edited:
gdmoore28
Super Member
As noted in my last post, I'm currently working on lawnmower repairs for a friend, so progress on the cabinets has slowed to a crawl. Enclosure work has been limited to those times when I'm waiting for lawnmower parts to arrive. Nonetheless, I have been able to accomplish a few things.
I cut the ports in the enclosure bases and love the way these are going to look. They are 14" wide, 1 1/2" tall, and will need to be extended another 2 1/2" into the bases.


The port extensions will be made by stacking sheets of 3/4" mdf and then cutting the same port size in them. Once that is accomplished, each port "frame" will be cut down to occupy as little space as possible, and glued into place over the current port slots inside the bases.
Naturally, I want them to look as though they were cut from one piece of mahogany, so the inside of the ports will be veneered, which will require some veneer bending. So, I made a form. The veneer strips will be wetted and then wrapped around the form, taped in place, and allowed to air dry for a day or so. Once they are removed from the form, they should be perfectly shaped to adhere to the inside of the base ports. Here's a picture of the veneer form:

I also decided to modify the enclosure tops so that they will more closely follow the front profile of the cabinets. This was an easy modification. I just cut down some scraps left from the tops mdf and glued them onto the front of the tops, then sanded them down so that they blended into the lines. Of course, the tops and fronts will be veneered, so everything will look like one solid piece.


Finally, I did a little bit of stain experimentation. The following picture shows the unstained mahogany, the same piece with clear poly only, and then a piece with dark mahogany stain followed by poly. Remember, absolutely NO surface preparation was done on these scraps, so there is a lot of trash and grain lifting. Try to ignore that.
I can't make up my mind. I'm trying to envision the colors spread over those large panels. Which colors do you guys like best?

Oh, couple more notes. I just ordered some classic-looking tan grill cloth. The grill will be constructed with a mahogany frame and slats running vertically on the front in order to break up the large acreage of grill material.

Finally, (really - finally!) I ordered up 50' of 2" mahogany pre-glued edge-banding veneer. This will allow me to avoid taking the edge veneer from my large main sheets. The banding will be used on all the narrower edges around the entire cabinet and should be a real time saver.
That's it 'till next time. As always, comments are most welcome.
GeeDeeEmm
I cut the ports in the enclosure bases and love the way these are going to look. They are 14" wide, 1 1/2" tall, and will need to be extended another 2 1/2" into the bases.
The port extensions will be made by stacking sheets of 3/4" mdf and then cutting the same port size in them. Once that is accomplished, each port "frame" will be cut down to occupy as little space as possible, and glued into place over the current port slots inside the bases.
Naturally, I want them to look as though they were cut from one piece of mahogany, so the inside of the ports will be veneered, which will require some veneer bending. So, I made a form. The veneer strips will be wetted and then wrapped around the form, taped in place, and allowed to air dry for a day or so. Once they are removed from the form, they should be perfectly shaped to adhere to the inside of the base ports. Here's a picture of the veneer form:
I also decided to modify the enclosure tops so that they will more closely follow the front profile of the cabinets. This was an easy modification. I just cut down some scraps left from the tops mdf and glued them onto the front of the tops, then sanded them down so that they blended into the lines. Of course, the tops and fronts will be veneered, so everything will look like one solid piece.
Finally, I did a little bit of stain experimentation. The following picture shows the unstained mahogany, the same piece with clear poly only, and then a piece with dark mahogany stain followed by poly. Remember, absolutely NO surface preparation was done on these scraps, so there is a lot of trash and grain lifting. Try to ignore that.
I can't make up my mind. I'm trying to envision the colors spread over those large panels. Which colors do you guys like best?
Oh, couple more notes. I just ordered some classic-looking tan grill cloth. The grill will be constructed with a mahogany frame and slats running vertically on the front in order to break up the large acreage of grill material.
Finally, (really - finally!) I ordered up 50' of 2" mahogany pre-glued edge-banding veneer. This will allow me to avoid taking the edge veneer from my large main sheets. The banding will be used on all the narrower edges around the entire cabinet and should be a real time saver.
That's it 'till next time. As always, comments are most welcome.
GeeDeeEmm
gdmoore28
Super Member
I don't know if I'm going to live through this speaker build! Last night I heard a noise in our house and got up to investigate. In the darkness, I didn't see my shoes, so I tripped over them and fell face first into one of the Heresy speakers sitting here. On top of that speaker was a small glass display case containing a piece of a WWII JU82 fuselage. Fortunately, the glass did not break, but the aluminum piece managed to penetrate my "tragus" and into my outer ear canal. I'm quite certain that I also re-broke the left rib that I told you about last month. So, if this thread suddenly disappears, just think to yourself, "I wonder what he fell off of this time?" ")
Little progress last week except for sanding, squaring up some corners, and preparing for veneering. This makes for boring pictures. But I decided to purchase a fifty-foot roll of 2" wide mahogany edgebanding with heat adhesive. Will have to bone up on ironing, but this will save some of my big sheets of veneer. I've held some of this banding up to the cabinet so you can imagine what the cab will look like after 100% coverage. I think it will be delicious.


While was moving the cabs around, I just had to do a test fit to make sure everything still looks nice when assembled. I think it does. Of course, when I look at them, my mind is racing over what they will look like covered in veneer and trim pieces added.


GeeDeeEmm
Little progress last week except for sanding, squaring up some corners, and preparing for veneering. This makes for boring pictures. But I decided to purchase a fifty-foot roll of 2" wide mahogany edgebanding with heat adhesive. Will have to bone up on ironing, but this will save some of my big sheets of veneer. I've held some of this banding up to the cabinet so you can imagine what the cab will look like after 100% coverage. I think it will be delicious.
While was moving the cabs around, I just had to do a test fit to make sure everything still looks nice when assembled. I think it does. Of course, when I look at them, my mind is racing over what they will look like covered in veneer and trim pieces added.
GeeDeeEmm
gdmoore28
Super Member
I'm waiting on lawnmower parts to come in, so I had a chance to work on the cabs a bit today.
(By the way, if you use lawntractors, as most folks around here, be careful when hooking up booster cables to them. My customer can't see well and hooked them up backwards. Result is a burned rectifier and charging coils. Expensive to fix on a Bad Boy. Lesson over.)
I picked up a couple of 1 1/4" mdf panels at our local ReStore for $2 and decided to use them to make new motorboards to replace the ones I mis-cut. Man alive, this stuff is dusty. Combined with the high temperatures and humidity we're having this week, I ended up coated in sawdust mixed with sweat. Very uncomfortable.
You can see that I've not yet cut the super tweeter holes because I'm wavering on them. I have some University HF206 horn tweets that I've been saving for this project, but I'm wondering if I'd be best served by installing a better, more modern horn. We'll see.

The rest of the day was taken up between drinking iced CocaCola and straightening out some lines that are not perfectly straight. Boring, but necessary.

That's all for today, kiddos. Not much, but at least I'm still alive - so far.
GeeDeeEmm
(By the way, if you use lawntractors, as most folks around here, be careful when hooking up booster cables to them. My customer can't see well and hooked them up backwards. Result is a burned rectifier and charging coils. Expensive to fix on a Bad Boy. Lesson over.)
I picked up a couple of 1 1/4" mdf panels at our local ReStore for $2 and decided to use them to make new motorboards to replace the ones I mis-cut. Man alive, this stuff is dusty. Combined with the high temperatures and humidity we're having this week, I ended up coated in sawdust mixed with sweat. Very uncomfortable.
You can see that I've not yet cut the super tweeter holes because I'm wavering on them. I have some University HF206 horn tweets that I've been saving for this project, but I'm wondering if I'd be best served by installing a better, more modern horn. We'll see.
The rest of the day was taken up between drinking iced CocaCola and straightening out some lines that are not perfectly straight. Boring, but necessary.
That's all for today, kiddos. Not much, but at least I'm still alive - so far.
GeeDeeEmm
elitopus
Addicted Member
Lookin good! With summer here, I bet the lawnmower repairs are pretty much non-stop. Its good you have some time to relax and work on the speaker cabs.
Its cool that you are repurposing the wood from the SA. I end up using a lot of what I have around, or what I can get for cheap. I even keep the screws from anything I disassemble... just in case
Its cool that you are repurposing the wood from the SA. I end up using a lot of what I have around, or what I can get for cheap. I even keep the screws from anything I disassemble... just in case
gdmoore28
Super Member
Lookin good! With summer here, I bet the lawnmower repairs are pretty much non-stop. Its good you have some time to relax and work on the speaker cabs.
Its cool that you are repurposing the wood from the SA. I end up using a lot of what I have around, or what I can get for cheap. I even keep the screws from anything I disassemble... just in case
Ha! I drive my wife and kids absolutely bonking-hair-pulling crazy because I save even the tiniest screws and washers from everything we throw away - just in case! But, who do they always come to when they want something? Yep.
A few weeks ago my beloved wife (and I mean that!) insisted that she help me clean out and straighten up the shop. The entire day was spent with her coming to me with items in hand and asking, "Do you need this? How long has it been sitting here?" You know my answer! Since that day, I've had to re-rearrange my shop again so I can find things that used to be right at hand.
She doesn't understand. But, I love her more today than 42 years ago. Good gal.
GeeDeeEmm
gdmoore28
Super Member
Yesterday was a very frustrating day. I was using my straight router bit to clean up the driver hole a bit, when the router depth guide screw worked loose and let the bit go all the way down. In the process, it made a sizeable gouge in my cutout. Drat - and other words. I have the damaged area repaired now with wood filler. Today I'll go at it with sandpaper wrapped around a tube and clean up the profile.

The biggest mistakes I've made so far occurred when I widened up the front edges of the cabinets. Because of several reasons, these cuts were not straight. Much of today was taken up using a really cool wood repair paste that I found at Lowes. It's powder that you mix with water to whatever consistency you want. It's much easier to work with than Bondo, and much cheaper. It sets up quickly and dries very hard, but not so hard that it's difficult to blend.

That's a piece of it that I'm holding in my hand. This works much better than wood putty at filling holes (even spaces!) because it does not shrink when it dries. No need to do several coats. I doubt it can be stained, though, so wood putty still has a place. All of the areas I'm filling will be covered in Mahogany veneer, so it doesn't matter.

Still waiting for lawnmower parts, so I may get to work some today. The temperature is hovering in the 90s and the humidity is sweltering. Sawdust mixed with sweat is one of the most uncomfortable mixes on earth. I have to be careful because when I get that uncomfortable I tend to hurry and compromise.
GeeDeeEmm
The biggest mistakes I've made so far occurred when I widened up the front edges of the cabinets. Because of several reasons, these cuts were not straight. Much of today was taken up using a really cool wood repair paste that I found at Lowes. It's powder that you mix with water to whatever consistency you want. It's much easier to work with than Bondo, and much cheaper. It sets up quickly and dries very hard, but not so hard that it's difficult to blend.
That's a piece of it that I'm holding in my hand. This works much better than wood putty at filling holes (even spaces!) because it does not shrink when it dries. No need to do several coats. I doubt it can be stained, though, so wood putty still has a place. All of the areas I'm filling will be covered in Mahogany veneer, so it doesn't matter.
Still waiting for lawnmower parts, so I may get to work some today. The temperature is hovering in the 90s and the humidity is sweltering. Sawdust mixed with sweat is one of the most uncomfortable mixes on earth. I have to be careful because when I get that uncomfortable I tend to hurry and compromise.
GeeDeeEmm
Attachments

gdmoore28
Super Member
My long-awaited lawnmower parts finally made their appearance today, so the next couple of days will be devoted to fixing mowers.
Today I managed to cut the holes in one cabinet that will connect it to the pedestal/vent. I was so hot and sweaty that my eyeballs were subjected to floods of salty water running across them, onto my eyelashes, then onto my work piece. I don't know if it was because of the breath-stealing heat and humidity, or the wandering-brain-syndrome that accompanies aging, but I somehow managed to mis-measure the cutouts between the cabinet bottom and the pedestal.
I think that, because I was so tired, I just didn't have the reserve mental or physical strength to throw whatever tool was in my hand at the moment. I did manage to call forth a bevy of curse words that did not contain Our God's moniker in them, and in that I am glad. The cabinets will still work fine, just not like I'd planned, so no real loss.
First pic shows the cutouts; second shows speaker skeleton sitting on its base, which is temporarily attached.


Also had some time to work on the vent extension for inside the base. I cut the first one (made up of three 3/4" boards glued to one 1/4" board) with a jig saw one board at a time. Yep. I ended up with four boards with different sized slots in them. Once glued together, that exercise was an obvious failure.
On the second unit, I made entry with my band saw once all four boards had been glued up and the result was much better. So the first attempt was thrown away, and a replacement is glued up and ready for cutting.

All for now, kiddos. See you in a day or two, hopefully.
GeeDeeEmm
Today I managed to cut the holes in one cabinet that will connect it to the pedestal/vent. I was so hot and sweaty that my eyeballs were subjected to floods of salty water running across them, onto my eyelashes, then onto my work piece. I don't know if it was because of the breath-stealing heat and humidity, or the wandering-brain-syndrome that accompanies aging, but I somehow managed to mis-measure the cutouts between the cabinet bottom and the pedestal.
I think that, because I was so tired, I just didn't have the reserve mental or physical strength to throw whatever tool was in my hand at the moment. I did manage to call forth a bevy of curse words that did not contain Our God's moniker in them, and in that I am glad. The cabinets will still work fine, just not like I'd planned, so no real loss.
First pic shows the cutouts; second shows speaker skeleton sitting on its base, which is temporarily attached.
Also had some time to work on the vent extension for inside the base. I cut the first one (made up of three 3/4" boards glued to one 1/4" board) with a jig saw one board at a time. Yep. I ended up with four boards with different sized slots in them. Once glued together, that exercise was an obvious failure.
On the second unit, I made entry with my band saw once all four boards had been glued up and the result was much better. So the first attempt was thrown away, and a replacement is glued up and ready for cutting.
All for now, kiddos. See you in a day or two, hopefully.
GeeDeeEmm
Attachments

gdmoore28
Super Member
Looking good keep up the good work
Thanks so much! I'm down to the very sloooooooow stuff now - filling holes, final fitting, yadda, yadda. Can't wait get all this stuff done and get on to veneering and finishing these up. Thanks for watching!
GeeDeeEmm
gdmoore28
Super Member
Ashamed to say that I missed church this morning, but I did. Woke up feeling quite ragged and played hookey. I'm sure my pastor will have something to say next week!
Once I worked out the soreness I had a chance to work on the cabinets a bit. The first pic shows what I spent most of my time on - finishing leveling the top panels for mating to the actual tops. Fortunately, my grandson and his friend came over to hit a few golf balls, so I had a little company to pass the time.

These are shaping up rather nicely. I have to learn that not paying acute attention to panel fitment during assembly means much, much work later on.
I also glued the vents into place in the bases of the cabinets, then temporarily attached the bases to the cabs to check for alignment. Good to go.

Finally, what in the heck is this contraption?

It's a stand that will hold the tops vertically stable while I veneer the edges. I kept wondering exactly how I was going to position them while doing the edging. I was having visions of having to bend over and work sideways, and that thought was discouraging. So, I took some scraps and glued/nailed up this stand so I can stand up straight and apply pressure to the edging.

That's all for now, kiddos. God bless.
GeeDeeEmm
Once I worked out the soreness I had a chance to work on the cabinets a bit. The first pic shows what I spent most of my time on - finishing leveling the top panels for mating to the actual tops. Fortunately, my grandson and his friend came over to hit a few golf balls, so I had a little company to pass the time.
These are shaping up rather nicely. I have to learn that not paying acute attention to panel fitment during assembly means much, much work later on.
I also glued the vents into place in the bases of the cabinets, then temporarily attached the bases to the cabs to check for alignment. Good to go.
Finally, what in the heck is this contraption?
It's a stand that will hold the tops vertically stable while I veneer the edges. I kept wondering exactly how I was going to position them while doing the edging. I was having visions of having to bend over and work sideways, and that thought was discouraging. So, I took some scraps and glued/nailed up this stand so I can stand up straight and apply pressure to the edging.
That's all for now, kiddos. God bless.
GeeDeeEmm
gdmoore28
Super Member
I have wrestled with this UHF augmentation since before beginning this build. I've read several posts about the subject, and so far only WardsWeb reports any success in integrating a super tweeter with the 802D/511B combo. Nonetheless, that's the way I'll be going.
Now, which super tweeter? The University HF206s I have on hand rolloff only a couple thousand hertz above the 802s - 12KHz. And it's very enlightening to look at the charts of some of the more popular super tweet horns. Almost all of them begin a rather severe rolloff in the 12-14KHz range - which is perfect for the ProSound applications they are designed for. But, I want a little more to justify my trouble.
For example, the Faital Pro FD371. https://www.parts-express.com/pedocs/specs/294-1000-faitalpro-fd371-8-specification.pdf Look at that beautiful response curve - almost straight as an arrow all the way out to 20K! Smooth.
The inexpensive JBL/Solenium ST200 accomplishes almost the same response - and for less than $20! But the . . . uh . . . economical construction methods, while fine for most applications, just would not fit in with this "classic" look that I want.
Enter the Beyma CP21F. It has the looks, mimicing the JBL 2405 slot tweeter, so the visual should integrate well with the cabinet motif.

And the frequency response and the rest of the specifications look great. In fact, the published FR numbers are even better than the 2405.
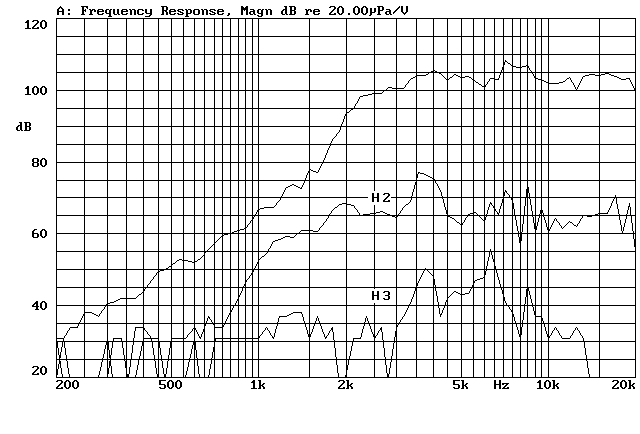
The retail price for these is nibbling near $200 each, but, as always, you can find them in the $130 range. I found a used pair that look good, so we're going to see what happens.
GeeDeeEmm
Now, which super tweeter? The University HF206s I have on hand rolloff only a couple thousand hertz above the 802s - 12KHz. And it's very enlightening to look at the charts of some of the more popular super tweet horns. Almost all of them begin a rather severe rolloff in the 12-14KHz range - which is perfect for the ProSound applications they are designed for. But, I want a little more to justify my trouble.
For example, the Faital Pro FD371. https://www.parts-express.com/pedocs/specs/294-1000-faitalpro-fd371-8-specification.pdf Look at that beautiful response curve - almost straight as an arrow all the way out to 20K! Smooth.
The inexpensive JBL/Solenium ST200 accomplishes almost the same response - and for less than $20! But the . . . uh . . . economical construction methods, while fine for most applications, just would not fit in with this "classic" look that I want.
Enter the Beyma CP21F. It has the looks, mimicing the JBL 2405 slot tweeter, so the visual should integrate well with the cabinet motif.
And the frequency response and the rest of the specifications look great. In fact, the published FR numbers are even better than the 2405.
The retail price for these is nibbling near $200 each, but, as always, you can find them in the $130 range. I found a used pair that look good, so we're going to see what happens.
GeeDeeEmm
gdmoore28
Super Member
The veneering begins. For all the cabinet and top edges, I'm using mahogany pre-glued veneer. This is the first time I've used pre-glued, and I like it - a lot. I've experimented so far using an iron (slow, but easy to do, and very precise) and a heat gun (fast, but easy to burn the veneer. The heat gun does melt the glue much better, though. For the rough mdf edges of the cab top, the heat gun actually makes the glue penetrate much better.)
These pics make the edges look rather rougher than they are, but this is preliminary rough trimming. The veneer is actually hanging over the edges about 1/16" or more. The finer grits will come later.


Onward we go.
GeeDeeEmm
These pics make the edges look rather rougher than they are, but this is preliminary rough trimming. The veneer is actually hanging over the edges about 1/16" or more. The finer grits will come later.
Onward we go.
GeeDeeEmm
gdmoore28
Super Member
Veneering day. Went to work early this morning. I've been totally spoiled by the iron-on veneer. Today I started on the unbacked stuff with contact cement. What a pain it is compared with the heat-and-apply variety.
Got the tops finished, and I think the results look pretty good. The veneer I have was book matched, but it just didn't suit me when I laid it out for pattern. It looked much more interesting laid out like the individual pieces are just wide boards. So that's the way I went.
I did a spectacular job of lining these plies up with zero gaps, but an odd thing happened as the cement began to dry. They began to shrink just a miniscule amount and opened up a hairline joining line. When I wet them, they swelled back together perfectly. So, I'm going to have to find some way to make sure the moisture content is just high enough when I finish them to swell the joints back together. Suggestions welcome.
Hopefully tomorrow, it will be on to veneering the boxes themselves.
GeeDeeEmm
gdmoore28
Super Member
How can you tell that you are a real speaker builder at heart? Because, if you are, everything you see that is nominally rectangular begins to look like a good speaker project just waiting to happen!
Such was the case yesterday when the lovely Mrs. Emm and I stopped at the Goodwill Store after church. As soon as we walked in the door, the wife whispered to me, "Speaker boxes!!!" There they were - four large boxes in naked birch plywood. Something looked funny, though. All four had several 4" LED light fixtures in them, and what appeared to be fixtures for holding glass in place where the motor board would normally be.
Then, I remembered a video that The Mrs had shown me last week. They were some of those magic mirrored boxes that use one-way mirrored glass. When the lights are turned on inside, any object placed on the mirrors look as if they are multiplied hundreds of times.
web&fr=mcafee#id=29&vid=81444531d82739134b269c1b3cffdd12&action=view
Here are the two boxes that I purchased:

How will I utilize these two eight cubic foot cabinets? Honestly, at this point I have no idea. 'Till something pops into my head, these will be stored.
The rest of my time has been taken up with laying down contact cement. This process is not fun, but it looks great.


See how the bases are made from a different, reddish, fine-grained mahogany plywood? Now that I'm seeing how nice the heavily-grained mahogany veneer is looking, it just makes sense to veneer the bases in the veneer, too. So, that's what I've started to do, and having that grain run consistently over all visible surfaces looks great. I have one base done, and the change is dramatic. I'll try to remember to take comparison pictures for the next post.
GeeDeeEmm
Such was the case yesterday when the lovely Mrs. Emm and I stopped at the Goodwill Store after church. As soon as we walked in the door, the wife whispered to me, "Speaker boxes!!!" There they were - four large boxes in naked birch plywood. Something looked funny, though. All four had several 4" LED light fixtures in them, and what appeared to be fixtures for holding glass in place where the motor board would normally be.
Then, I remembered a video that The Mrs had shown me last week. They were some of those magic mirrored boxes that use one-way mirrored glass. When the lights are turned on inside, any object placed on the mirrors look as if they are multiplied hundreds of times.
Here are the two boxes that I purchased:
How will I utilize these two eight cubic foot cabinets? Honestly, at this point I have no idea. 'Till something pops into my head, these will be stored.
The rest of my time has been taken up with laying down contact cement. This process is not fun, but it looks great.
See how the bases are made from a different, reddish, fine-grained mahogany plywood? Now that I'm seeing how nice the heavily-grained mahogany veneer is looking, it just makes sense to veneer the bases in the veneer, too. So, that's what I've started to do, and having that grain run consistently over all visible surfaces looks great. I have one base done, and the change is dramatic. I'll try to remember to take comparison pictures for the next post.
GeeDeeEmm
Last edited:
gdmoore28
Super Member
I am so glad that my veneering process is nearing completion. The process is getting very tiresome and repetitive, and it's at this point that I should simply take a few days' break to recharge my enthusiasm. But, the dog days of summer are upon us, and before long the heat in my shop will be unbearable, so that fact keeps driving me forward.
On a whim yesterday I decided to bevel the edges around the motor boards. So, I put the veneering process aside for an hour and did the deed. And I'm glad I did. These were beveled at 30 degrees.

Here's one of them temporarily fitted in the cabinet.

The walnut veneer you see on them presently is how I found them. I think they were a table top.
Question now, though, is what to do with them. Right now I'm inclined to paint the motor board faces in a very "delicate" shade of Altec green, or maybe even Altec Hammered green, then cover the beveled edges in mahogany veneer. I'd prefer veneering the front of the motor boards in mahogany veneer, but my supply is almost exhausted. Finding some more with the same grain pattern will be almost impossible. I'll have to think on this one.
I also veneered the visible areas of the bases. I'm really glad I went this direction.


Back soon.
GeeDeeEmm
On a whim yesterday I decided to bevel the edges around the motor boards. So, I put the veneering process aside for an hour and did the deed. And I'm glad I did. These were beveled at 30 degrees.
Here's one of them temporarily fitted in the cabinet.
The walnut veneer you see on them presently is how I found them. I think they were a table top.
Question now, though, is what to do with them. Right now I'm inclined to paint the motor board faces in a very "delicate" shade of Altec green, or maybe even Altec Hammered green, then cover the beveled edges in mahogany veneer. I'd prefer veneering the front of the motor boards in mahogany veneer, but my supply is almost exhausted. Finding some more with the same grain pattern will be almost impossible. I'll have to think on this one.
I also veneered the visible areas of the bases. I'm really glad I went this direction.
Back soon.
GeeDeeEmm
Attachments


Similar threads
- Replies
- 3
- Views
- 425