DIY Asphalt Patching and Repair

mfrench

Addicted Member
I've got an asphalt driveway in need of some attention. We had a friend who does this stuff give us a bid, and he suggested that it might run upward of $6k to do a complete overlay (about 175' x 12' wide). Too rich for our blood.
So, I got to thinking,.... I do a lot of handyman stuff, and started to wonder about doing some patch-in repair by myself.
I guess at this point, my main question is; Has anybody here done this kind of thing?
And a followup.... Will a weighted roller be enough to compress/compact the asphalt?
I'm thinking about one of those water rollers like you might use for compacting soil for sod application, and sod compressing.
I'd rather not go to the expense of renting a heavy piece of equip't like motor powered asphalt roller.
I also have a plate compactor and 70b jackhammer at hand. But I cannot imagine it doing a very even job of surface finishing.
We do have an asphalt plant fairly near us, so getting hot asphalt is possible.

Anybody?
Thanks in advance.
 
Thanks.
Yeah, its mostly small patches on the shoulder. We had some root up-lifting, and fracturing. So, its going to be mostly patching in of that damage.
I've widened the driveway, considerably. I'll probably just gravel in the extra width; we're in the country, so that isn't out of place. I'd like to repair the fractured shoulder to clean up the appearance of what is there.
 
Last edited:
Just make sure base is good and firm. A defined edge works best also, kind of a frame works of sorts so you get vertical edge. 2" of rock, 2' of asphalt. You will need an asphalt rake.
 
They set asphalt directly on dirt here. We don't have a freeze. I thought I'd need the gravel as well, but, they were adamant about not needing it. We have decomposed granite for soil, which drains quickly, and no frost heave,... so,...
At any rate,... I'm digging out the edge to clear it for whatever follows. I'm taking it down to about 4".
 
How big are the patches? If you have a friend in the paving industry that would be a big plus. Digging out asphalt patches; and raking and rolling them smooth isn't something I'd recommend for anyone that hasn't been around blacktop. Make sure your local plant will sell in small quantities also. A mason dump will hold 3-4 ton easily and they'll probably do that but probably not a couple of wheel barrows of hot mix The tree roots are only going pop up once again unless you do something about them. If you are determined to do this yourself have all the prep work done first. A good smooth well compacted gravel base, square cut edges and at least one experienced helper. You'll be fine with your compactor and a garden sprayer filled with fuel oil.
 
@motorstereo
Sorry for the delayed reply. I've gotten used to the new notification system here, and don't recall having received notification of your reply.

The patches are mostly shoulder oriented, from crumbling asphalt. There is one that is larger than the others. It is a triangular shape that is about 18" long and 18" from baseline driveway shoulder to peak of the triangle (into the field). That spot is all the way thru to the base. There are a few delaminations, and generally a ragged shoulder.
This is the bottom 2/3 of the project. You can see the largest hole in the shoulder (filled with a couple of rocks for now). I've dug the uphill shoulder back by a considerable amount. The driveway was barely 8' wide. Now, with the new cut, it is around 14.5' wide. Of that new width, a couple of feet of it will be taken back by retaining wall; the mortarless concrete cottage stone type, 60lb blocks. I'm just going to gravel in the margin between old driveway and new shoulder.

DSCN2640_zpsgbaqhk9a.jpg


Looking back up the same stretch, including new retaining wall footing trench:
DSCN2644_zpsneylm4ts.jpg
 
The crumbling's going to keep crumbling unless you saw cut the broken down areas. The rest looks like it should work. Better get going on this before the rain keeps coming.
 
I started laying in blocks today. The first course is a bugger, after that its quite quick; heavy, but fairly quick.
It seems that my area has an endless string of asphalt travelers looking for work, as there were a constant string of them cruising by making all kinds of claims and offers today.

OK,.... I've determined a deadline,.... 7.5 days to try to wrap this up.
http://www.weather.com/weather/tenday/l/92028:4:US
 
Last edited:
mfrench; Sorry I wasn't able to get back at you either because of the new format. I had no idea where you had posted this. I know this isn't why you want to hear but after looking at the pics my recommendation would be to resurface the driveway. The broken up sections mean there's not a good gravel base or the blacktop is thin or both. A patch is a patch and it's nothing more than a temporary fix. Just like pothole repairs you've seen on the streets that keep needing to get repaired. There's lots of fly by nighters and gypsy pavers looking for a quick buck and these aren't the guys you want on your property. The right way to do it is to dig it up; make sure you a good gravel base and a good layer of hot mix; usually 2 1/2 loose. Good luck to you
 
Wall built (99'), and newly widened margin asphalted. I'm waiting for the new asphalt to cure, and will seal it all in another month, or, after the rain season (we've been so warm and dry, this might have already occurred).
I had a pro contractor do the work. They came in with a Cat skid-steer, with a header grinder, and cut out the edge, and did a header grind interface.

index.php
 

Attachments

  • DSCN2769.jpg
    DSCN2769.jpg
    119.6 KB · Views: 28
Looks like they did it right ... and the asphalt margin should do a nice job of locking that wall in place ... hard to tell from the pic ... did they slope the new stuff away from the wall for drainage? Gonna seal coat the old stuff to match?
 
I had them leave the edge along the wall slightly high, especially between the blocks. It is for ease of description, coved up slightly at the edge.
In the area where the old drainage flow crossed the driveway, we had them build in a small berm to control the area where the flow traditionally crossed the driveway, to keep it from pouring over that edge, into what we call the bowl (the low-side of the driveway).
Yeah, the asphalt gives strength to the wall; and conversely, the wall keeps the asphalt from spreading out at the edge.
But I also dug the wall footing courses out such that there was a continual run of blocks that were below grade, and running well below grade before the next upward change of courses brought the next higher course to just below grade. So, there is really an entire course of blocks below grade that are not visible.

Forgot to mention the deeply buried unseen....
I installed a 4" drainage system behind the wall, with clean-outs to the surface every 20', all along, up to the top of the wall. This was done to prevent hydrostatic pressure from pushing the wall over. Its all backed by 3/4" crushed gravel, and GeoTex fabric material to aid in the drainage.
 
Last edited:
:thumbsup:

One advantage to fixing as opposed to new ... you got a pretty good idea of what to expect. Only concern I'd have is drainage for any water that gets in between the blocks and asphalt. I imagine it's tight now, but might be worth keeping an eye on as time goes by and the asphalt pulls away. Good drainage, no issue, but might be worth investing in some hot tar every now and then to keep it sealed properly.
 
It looks good! It sounds like some thought went into it as well. I have a long gravel drive way to the top of the hill I live on. A contractor bought the property at the bottom recently and uses the drive way to get his equipment in and out. And for the use of our drive way he keeps it graded, graveled and fills the pot holes. I was going to pave it but free up keep has save me the expense. :D 
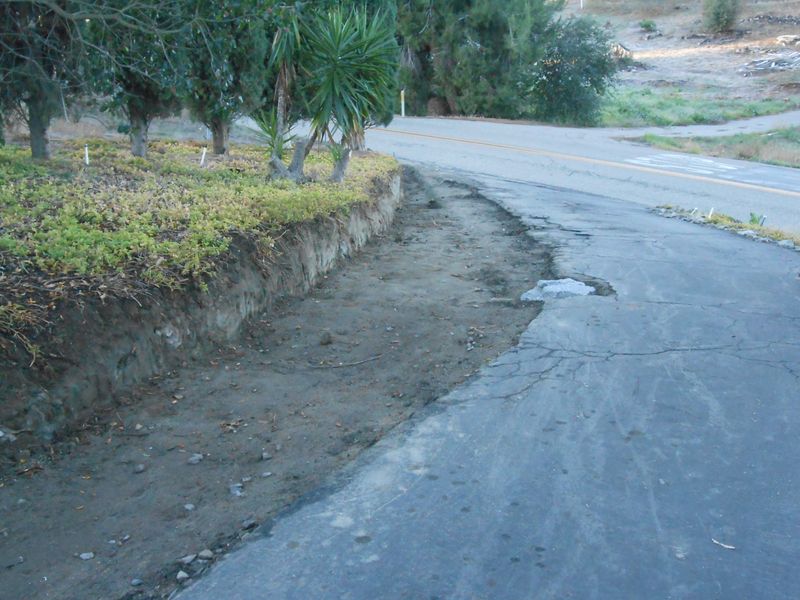
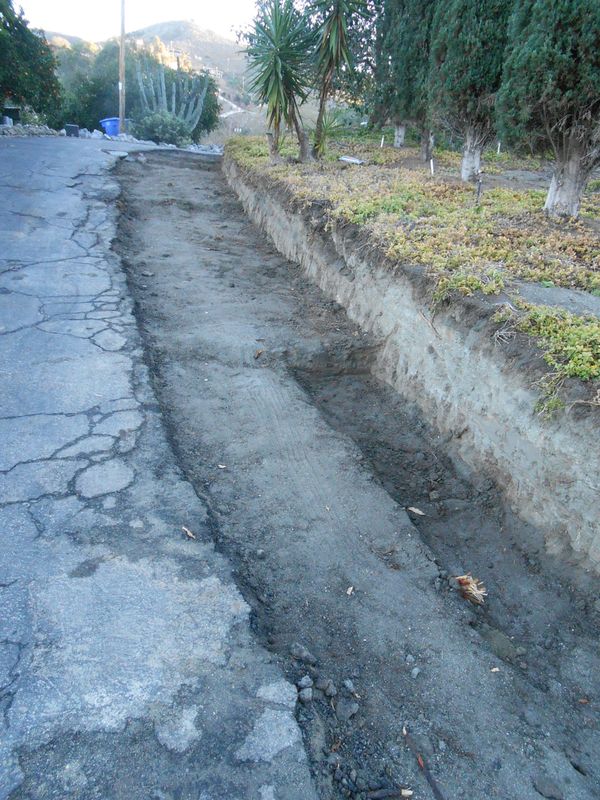
I like how you did the wall, should really help with soil erosion.
 
Ahh, you understand the concept behind the wall finishing, with the turned-out "wings". If there was nothing to check the flow behind the wall, it would quickly end up eroding. So the wings are there to check the flow every 10 yards or so; I really didn't measure for it, just based them on a cadence.
We looked downright white trashy for a while, with a plastic sluiceway down the margin, to prevent erosion during the rains that hit while it was bare; a super slip-and-slide. To hold the plastic in place, I threw a little of everything that i had at it; a long run of pvc pipe on the side that interfaces the existing asphalt, and a long run of pressure treated 4" garden timbers up against the wall face, and a couple of rolls of Gorilla tape to tape down the asphalt interface to keep runoff from getting under the plastic. And about 40 sandbags to hold all of that junk in place. It worked. And I'm really glad to have it finished.
index.php
 

Attachments

  • DSCN2747.jpg
    DSCN2747.jpg
    141.7 KB · Views: 19
Back
Top Bottom