

You are using an out of date browser. It may not display this or other websites correctly.
You should upgrade or use an alternative browser.
You should upgrade or use an alternative browser.
DIY Interconnects...
- Thread starter stewey
- Start date
Not selling your soul to the monster is an excellent idea. Get some nice reasonably priced gold plated Dayton Brand RCA plugs from PartsExpress and some RG-62/U coaxial cable. This 92 ohm cable has 1/2 the capacitance per foot of regular coax so won't attenuate the highs as much, even on long runs.
Use the link at the bottom of the AK pages to order from PartsExpress. They will give AK a commission which helps us all.
Use the link at the bottom of the AK pages to order from PartsExpress. They will give AK a commission which helps us all.
Last edited:
tubino
A guy with too many tubes
Another approach entirely is to start with Allen Wright's Cable Cookbook. (Or is it Super Cable Cookbook?) His approach is somewhat unorthodox, but I've built several interconnnects his way, and danged if he isn't right.
What's nifty is that he starts off with simple and cheap, and ups it bit by bit to a silver foil & teflon deluxe version.
Tubino
What's nifty is that he starts off with simple and cheap, and ups it bit by bit to a silver foil & teflon deluxe version.
Tubino
You can give these a shot to http://audiokarma.org/forums/showthread.php?s=&threadid=7733&highlight=DIY+cables
stewey
Active Member
Thanks!
I'm going to go to a local electronic parts store and see what they have - if they have suitable stuff I'll give it a try. I'm not much of a believer in the audible effects of cables - so I don't know if I'll go to the extent that Wardsweb did. Primarily I'm looking for a low cost alternative to otherwise ridiculously priced quality cables.
The cables I own now are well, really old crap!!! So they need to go. I'm just getting my surround processor going, so I want some custom length higher gauge cables. If the result is less than embarrassing I'll post pics and open myself up to criticism")
I'm going to go to a local electronic parts store and see what they have - if they have suitable stuff I'll give it a try. I'm not much of a believer in the audible effects of cables - so I don't know if I'll go to the extent that Wardsweb did. Primarily I'm looking for a low cost alternative to otherwise ridiculously priced quality cables.
The cables I own now are well, really old crap!!! So they need to go. I'm just getting my surround processor going, so I want some custom length higher gauge cables. If the result is less than embarrassing I'll post pics and open myself up to criticism
tubino
A guy with too many tubes
Re: Thanks!
Costs a dollar or two, and you can watch TV while you braid. If you only need 2-3 feet and don't have problems requiring shielding, it works great and sounds fine. Amaze your friends, baffle your enemies. If it makes you feel better, slide the braided wire inside a teflon tube, cover with a flashy nylon braid or shrink tubing and make them look expensive. Use the stiff type of shrink tube at the connectors and they'll look like you paid dumb money for them.
Downside with keepin' them nekkid is that they are fragile -- but at least they are flexible and the weight won't strain the sockets on your vintage gear...
Tubino
Amen, brother! Okay, here's a simple cheap one from Allen Wright. Buy a spool of reeeely skinny solid-core wire, like 30ga. Cut three lengths about 1.3 times desired finished length. Attach the midpoint of all three to something, and BRAID all three wires together. Keep it neat and even! Finished with one side? Flip it around and do the other half. Slip on some pieces of shrink tubing, solder the connectors on (defy convention and use light, thin, unplated ones), use the shrink tubing to reinforce the point where wires meet phono plug. Don't forget to use an ohmmeter to get connections right if you only use one color. Oh, and there are many things you can do with the third wire: ground at one end only!Originally posted by stewey
I'm looking for a low cost alternative to otherwise ridiculously priced quality cables.
Costs a dollar or two, and you can watch TV while you braid. If you only need 2-3 feet and don't have problems requiring shielding, it works great and sounds fine. Amaze your friends, baffle your enemies. If it makes you feel better, slide the braided wire inside a teflon tube, cover with a flashy nylon braid or shrink tubing and make them look expensive. Use the stiff type of shrink tube at the connectors and they'll look like you paid dumb money for them.
Downside with keepin' them nekkid is that they are fragile -- but at least they are flexible and the weight won't strain the sockets on your vintage gear...
Tubino
Re: Thanks!
There aint many here who goto the extent that Wards goes to ! I bet those IC's didnt cost him much more then his time and a few bucks
I have been meaning to make up up several sets just like his for ages. With Winter breathing down our necks here in the midwest I think its time I got off my butt
Originally posted by stewey
I don't know if I'll go to the extent that Wardsweb did. Primarily I'm looking for a low cost alternative to otherwise ridiculously priced quality cables.
There aint many here who goto the extent that Wards goes to ! I bet those IC's didnt cost him much more then his time and a few bucks
I have been meaning to make up up several sets just like his for ages. With Winter breathing down our necks here in the midwest I think its time I got off my butt
gonefishin
Super Member
Stewey...it's a great idea to DIY your own cables!
Another idea for you (and others) to try is to demo some cables. Right now you can sign up for your very own demo of various interconnects and speaker cables. Check out the Demo Forum for details. In the demo forum you will find a variety of speaker cables and interconnects. There are a few (very nice) designs "open" for demoing as we speak. Some of the other designs will be opened up at a later date.
If you'd like...sign up for a couple different Demo's. What better way to try something out...but to have it in your system...in your home! All you have to do is sign up with the appropriate coordinator for the item(s) you wish. Once you (and others) are singed up...you'll get to try it out for a bit...then you just send it to the next person.
have fun!
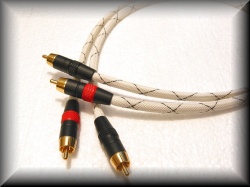
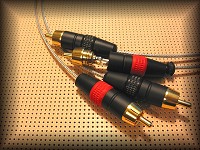
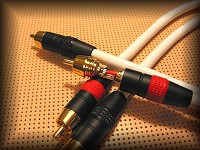
My stuff is kinda over the top as far as looks but the basic cable is cheap. The RCA connectors run about $20 for a set of four and the wire or coax (depending on what you want) shouldn't run you more than $10-15. So, for less than a dinner and a movie you will have some nice ICs. You don't need the glass lined anti-chaffing cover or the braided abrasion cover, that's just for looks.
Here are some coax:
http://audiokarma.org/forums/showthread.php?s=&threadid=3694
Here are some silver wire:
http://audiokarma.org/forums/showthread.php?s=&threadid=3678
Here are some coax:
http://audiokarma.org/forums/showthread.php?s=&threadid=3694
Here are some silver wire:
http://audiokarma.org/forums/showthread.php?s=&threadid=3678
here ya go on Ebay $8.99 + $5 shipping:
http://cgi.ebay.com/ws/eBayISAPI.dll?ViewItem&item=3051090021
http://cgi.ebay.com/ws/eBayISAPI.dll?ViewItem&item=3051090021
stewey
Active Member
I took Rob's advice...
...and picked up some RG-62. I didn't buy the any expensive plugs, they're just gold plated strain relief type. It was all very reasonable. About $15 US for everything to make 1 set of 2 foot cables, 1 set of 3 foot cables, and a single 1 foot cable for a digital coax connection.
I'll post pics once I get it all together.
Stew.

stewey
Active Member
Solder of course!
I had to be careful though. When I was soldering the braid to the outer contact the insulation that separates the braid from the core was getting soft. I didn't want it to melt and then make contact between the core and the braid. If anyone has any advice on how to avoid this please pass it along.
It all seemed to work out ok though. I hooked the baby cable up to run between the pre-amp out and power amp in posts on one of the channels on my SA-8800. The other channel used the standard jumper. Then I plugged my Koss Pro 4/AA's in and toggled the mode back and forth from left mono to right mono. I couldn't hear any difference so I was satisfied.
Perhaps not the most technical test, but I don't know how to perform any other tests. I do have access to a very sensitive digital multimeter if anyone knows any other tests to perform (not that I care that much).
pre-tinning just means you solder the pieces before you try and solder the two pieces together. You literally solder a little to each individually. Bring it up to temp and flow a little solder to it. This will make soldering the two together a lot easier and faster. When putting the two together you will want to apply the heat to the connector, as it will take more heat to bring to temperature.
Thatch_Ear
Addicted Member
Keep a damp sponge to clean your tip with and always melt a bit of solder on the tip of the iron before touching what you want to solder. That will get you much better/faster heat transfer.