Eico HF87 rebuild/update

ab0ez

AB0EZ
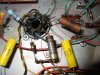
Hey everybody. Been busier than any man ought to be lately. But, I've been rebuilding this Eico HF87 for a friend up in the Seattle area. Here's a picture of the bottom as I got the amp.

Point out as many problems as you can see and then I'll post what I've done to the amp. I'm still waiting for some 7.5K resistors and then she'll be finished.
 

Attachments

  • DSCF6673.jpg
    DSCF6673.jpg
    113.9 KB · Views: 148
In the pictures below, and circled in red, are severely overheated 18K resistors and discolored 33K resistors. These are on the 6SN7 sockets.
 

Attachments

  • DSCF6670 circled.jpg
    DSCF6670 circled.jpg
    107.6 KB · Views: 82
  • DSCF6669 circled.jpg
    DSCF6669 circled.jpg
    103.4 KB · Views: 79
These caps are supposed to be .2uF....not 2.2uF! They are C9 in the schematic snapshot of one channel.
 

Attachments

  • DSCF6671 circled.jpg
    DSCF6671 circled.jpg
    98.4 KB · Views: 53
  • DSCF6672 circled.jpg
    DSCF6672 circled.jpg
    96.1 KB · Views: 42
  • C9.JPG
    C9.JPG
    76.4 KB · Views: 53
Here's a picture of one channel starting to be reworked. Gone are the 2.2uF caps and in are some .25uF 630V PIO caps. All of the old resistors are also getting replaced and wattage ratings upgraded.
 

Attachments

  • DSCF6674.jpg
    DSCF6674.jpg
    112 KB · Views: 65
One of the rules for this rebuild was the chassis could not be altered in any way. Another rule was the old electrolytics that are top mounted had to stay, for appearance sake. Here's a shot of the new filter nodes for the front end.
 

Attachments

  • DSCF6678.jpg
    DSCF6678.jpg
    88.6 KB · Views: 103
Got the 12AX7 input tube section reworked on the Eico HF87. Now to add the filament wiring and replace those nasty old NFB wires with some silver Teflon wire.
 

Attachments

  • DSCF6681.jpg
    DSCF6681.jpg
    117.3 KB · Views: 77
I dumped Eico's dorky "let's power the 12AX7 filament via one pair of the output tubes bias circuit" method and will try running 6.3VAC through a toroid core. If that isn't quiet enough, then I'll fit a small 12 or 6.3VDC power supply.
 

Attachments

  • DSCF6684.jpg
    DSCF6684.jpg
    110.8 KB · Views: 64
Here's a shot of the chassis showing the added terminal strips for the new cathode resistors, caps and bypass caps. Also shown is the new, non mechanical, "soft start" section, some more rework and one of the power supply filter nodes.
 

Attachments

  • DSCF6690.jpg
    DSCF6690.jpg
    120.5 KB · Views: 89
While waiting for a few more parts to arrive, I just couldn't deal with the old rusty looking mounting hardware for the tube sockets and transformers and replaced them with shiny new hardware. All of the old hardware and parts will be returned to the owner in a ziplock bag. The bag is getting quite full!
 

Attachments

  • DSCF6740.jpg
    DSCF6740.jpg
    85.4 KB · Views: 89
A few pics showing the reworked OPT section and new 100 ohm screen stopper resistors. Also shown are the .047uF bypass caps and new filament wiring.
 

Attachments

  • DSCF6701.jpg
    DSCF6701.jpg
    116.9 KB · Views: 59
  • DSCF6700.jpg
    DSCF6700.jpg
    106.6 KB · Views: 48
  • DSCF6699.jpg
    DSCF6699.jpg
    113 KB · Views: 72
New cathode resistors installed.
 

Attachments

  • DSCF6721.jpg
    DSCF6721.jpg
    112.5 KB · Views: 57
  • DSCF6722.jpg
    DSCF6722.jpg
    96.3 KB · Views: 45
New 750pF 1KV silver mica caps installed.
 

Attachments

  • DSCF6755.jpg
    DSCF6755.jpg
    106.6 KB · Views: 56
  • DSCF6757.jpg
    DSCF6757.jpg
    89 KB · Views: 42
New uF5408 voltage doubler diodes, 50 ohm choke (the 50 ohm resistor got chucked!) and some of the filter caps wired in. You can also see the original 3K wirewound resistor. It still measured right on the money and showed no signs of any overheating or physical damage. I might add it was the only resistor that still measured within spec and/or wasn't thermally stressed.
 

Attachments

  • DSCF6761.jpg
    DSCF6761.jpg
    99 KB · Views: 51
  • DSCF6759.jpg
    DSCF6759.jpg
    94 KB · Views: 44
  • DSCF6758.jpg
    DSCF6758.jpg
    97.9 KB · Views: 63
So let's see, more capacitance in the power supply, new filament wiring, all resistors and caps hand matched to less than 1% between channels....what else can we do? Well, there's still some room in that chassis and B+ might be a little high with today's higher line voltages so.....let's add another 50 ohm choke and make another LC filter section!
 

Attachments

  • DSCF6762.jpg
    DSCF6762.jpg
    118.6 KB · Views: 42
  • DSCF6768.jpg
    DSCF6768.jpg
    99.8 KB · Views: 40
  • DSCF6769.jpg
    DSCF6769.jpg
    124.7 KB · Views: 59
IIRC the stubby wires from the power transformer are for a fixed bias supply,if you wanted it.When I rebuilt mine I used 6v from the heater supply from the 6SN7's,for the 12AX7,there was no hum that I could hear.I left the rest pretty much stock.Nice job on the upgrades!
 
Last edited:
Any considerations for staying with the cathode bias vs. using the existing bias tap (unused) and fixed bias? Nice work, BTW, and the reason I'm asking is that I have an 87 that I have yet to restore. I have an 89 that I have gone through and have compared the two and prefer the 89. I'm attributing that in large part to fixed bias vs. cathode bias. Your thoughts?
 
Some of the HF-87's have long leads on the transformer for the bias taps,but are just taped up.(mine had long leads)The kit instructions said to cut them short,so some are long, some are short.
 
When you first posted, I wondered about those cooked resistors. What caused them to burn like that, and did it cause any damage downstream?

Thanks for the illustrated rebuild!
 
The owner of the amp wanted to keep it cathode biased, so that's why that change was not made.

Now, believe it or not, the amp was working when the owner brought it over to my place! The owner had been using this amp as a daily driver. I didn't do any voltage measurements when I saw those cooked resistors. Once we shut if off after a real quick audible test, that was it, so I'm not sure why they are burned up. I can tell you I've seen this a couple of times on HF87s.

I think it would be really interesting to do an A/B comparison with two HF87s, both with the identical upgraded power supply, components and wiring like this one has. That way, any differences would be due to biasing methods. Otherwise it's kinda apples and oranges.

Thanks for the kind words, guys. This has been a fun little project thus far. Now if only those 7.5K resistors would get here!
 
I am note sure,but I think they replaced an 18 K resistor(on common cathode)with 2 (7.5K) and I think it should have been 2 (36k),I may be wrong,,,
 
Back
Top Bottom