How to fix this toilet leak?

kotofei

permanent gear evolution
Greetings,

Today I was distracted from listening to the music by my better half who found a leaking toilet. Indeed, it was some water at the left side of the toilet which re-appear after flushing.

We remodeled the first floor bathroom a year ago and I installed a toilet onto a new wax seal. I've had some difficulties with screwing the nut on the left metal rods that attach a toilet to the floor. Anyways, it was sort of OK until now.

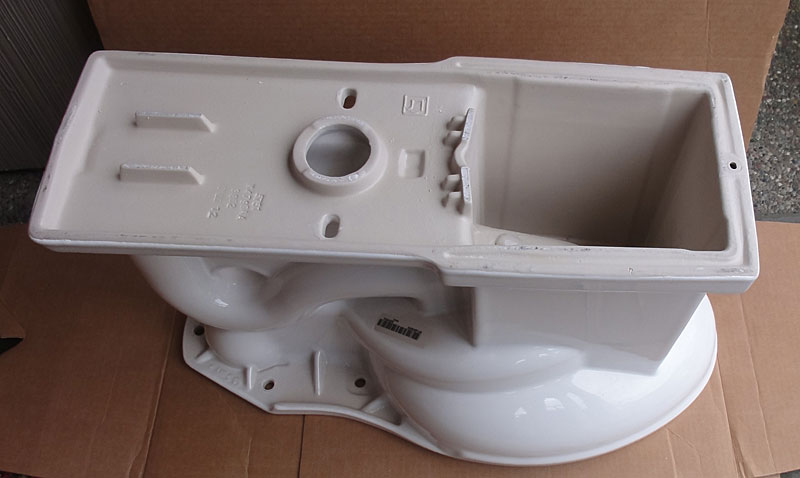
I unscrewed nuts from both rods and removed the toilet; however, the left metal rod was lifted together with it. The rod detouched from the plastic seat on which the wax seal goes and the white seat itself is broken where it was.

Apparently, this white thing was broken for a while, the wax seal didn't hold the water and it leaked.

Now, how to fix all this? The white thing should be replaced since it's no way to re-attach the rod securely to it. Is it an easy job for DIY or it's better to have a pro do it?
 

Attachments

  • toilet_1.jpg
    toilet_1.jpg
    89.2 KB · Views: 83
  • toilet_2.jpg
    toilet_2.jpg
    26.1 KB · Views: 56
  • toilet_3.jpg
    toilet_3.jpg
    81.7 KB · Views: 79
Lowes or a plumbing store will also have ABS plastic pieces in various configurations for that job depending on the specific circumstances. For example he had a problem of a raised floor not just a broken flange.

I don't usually do things like that TOH guy but it gives you the idea.
See how he set the two bolts looking up so when you set the wc (toilet) over them you knock them over. I use a pair of spare nuts and washers to attach the bolts solid so they won't get knocked over. If you don't want to bother to pick up the spare nuts when you buy the wax ring and nuts, at least save some of the old wax you cleaned away and use it to set the nuts firmly up right. That is not as solid as bolting them but much better than having them falling over when you are setting the wc over them.

He does so many things to me that are wrong, e.g.: he uses a channel locks pliers on a smooth valve like steam. A professional never chews up up the smooth flat part of a valve with a pliers. If you don't have a big enough crescent wrench use a hex smooth jaw wrench.
He also solders with out cloth gloves which makes it impossible to do a nice looking job.
etc.
 
The repair ring is probably glued to the pipe below. You may need to go below and cut the pipe. Then using a coupler, add a new flange and short extension pipe to locate it properly. If they did a crappy job of glueing the flange it might twist off if you give it some english. Try that first.
 
Mr Jim- That is right.
That is why I mentioned that the video is showing an elevation problem. They make a flange extension which sits ontop of the old flange and goes inside the pipe. To use it you need a little extra elevation space where your wax ring was. If you can find such a piece and have the room you can save yourself cutting the old flange off.
 
The flange in my case is plastic and it's apparently screwed onto the pipe below. I couldn't unscrew it so it might be glued.
 
1) Fix the flange, you can get repair kits, at the worst glue the bits together and put a metal reinforcement ring on top of it.
2) Ditch that horrible wax seal, they really should stop selling them. You can get a ribbed rubber seal in three sizes (3", 3.5", 4") that adheres to the bottom of the toilet and makes a much better seal without the mess. Clean the bottom of the toilet, stick the rubber part on, don't worry about it again.
 
Upon the close examination it turns out someone repaired the toilet before.

The 3" main pipe was broken an inch or so from the floor, and a repair 3.4-3.5" or so extension ring or pipe was glued on top of it . This ring apparently has a thread on top and a flange was screwed on this ring and glued to it.

The flange is also broken where second metal bolt was attached, it's just a huge crack and the bolt moves freely up and down together with the piece of flange thta holds it.

The toilet wiggled a bit before all this happen and repair should ensure it wouldn't wiggle anymore or the flange will be broken again.

I'm afraid fixing of this thing is not a DIY project for me...
 
Last edited:
Sounds to me all you have to do is unscrew/chisel out the threaded ring and screw in a new one, albeit the proper height to be flush with the floor.

Wipe it clean of the wax and water and post some new pics so we can see. I can't tell if that old flange was flush with the floor or not. If it's not flush, that could stress it with rocking or being pulled up and cause it to fail again.
 
As long as the repair ring is solidly connected to the 3" pipe, you can fix this.

Clean the bloody wax off of everything.

If you have the parts of the flange, use some plastic adhesive to reassemble them.

Use a repair part like the following to reinforce the flange:
http://www.lowes.com/pd_22062-943-21015_4294753286__?productId=1061201
http://www.lowes.com/pd_247812-143-PP835-56L_0__?productId=3133305
http://www.lowes.com/pd_253208-138-427784_0__?productId=50315043

If your main pipe is 3" diameter, this is the seal I'd recommend: http://www.lowes.com/pd_435294-187-FTS-3_4294753293__?productId=4007021
4" version: http://www.lowes.com/pd_334148-187-FTS-4_0__?productId=4006695
Fernco makes a 3.5" version, but I've only seen it at ACE Hardware.

Then you'll need new bolts. Most newer flanges use 1/4" bolts:
http://www.lowes.com/pd_13967-143-PP23049_4294753293__?productId=3130627

Some older applications use 5/16" - it just depends on the slots in the flange. My old cast-iron flanges are 5/16."
http://www.lowes.com/pd_13968-143-PP23056_4294753293__?productId=3130629
 
Here are the new pics. The old flange is NOT flush with the floor, as seen on first pic. It's 5-6 millimeters above the floor.

The main pipe is seen well at the last pic, just above the paper towel.

I can glue all the components back; however, what to do with the non-flush flange? Add some shingles between the toilet and the floor?

Sounds to me all you have to do is unscrew/chisel out the threaded ring and screw in a new one, albeit the proper height to be flush with the floor.

Wipe it clean of the wax and water and post some new pics so we can see. I can't tell if that old flange was flush with the floor or not. If it's not flush, that could stress it with rocking or being pulled up and cause it to fail again.
 

Attachments

  • toilet_4.jpg
    toilet_4.jpg
    32.7 KB · Views: 22
  • toilet_5.jpg
    toilet_5.jpg
    109.3 KB · Views: 23
  • toilet_6.jpg
    toilet_6.jpg
    61.2 KB · Views: 23
The toilet *should* have a "well" cast into the porcelain foot. Something like this:
tresham_love_1.jpg


The non-flush flange will just go up into the well inside the foot. Using the rubber fitting I posted rather than a wax seal will greatly help it to sit down properly, as there won't be a bunch of material piled up between the flange and the toilet.

That flange is really busted, and does a great job of illustrating why I'm not fond of non-reinforced PVC toilet flanges. They just don't have the long-term torsional stability of metal or metal-reinforced PVC.

That's a pretty shoddy, if probably perfectly functional, repair - someone obviously took a threaded closet flange and sealed it to the existing pipe with what appears to be silicone, rather than buying the correct repair part. If you get that broken flange out, can you get to the sides of the pipe to clean it? If so, I'd get a new flange like the following and solvent-weld it to the old pipe:
http://www.lowes.com/pd_253219-138-434954_0+1z0vjfi__?productId=50315057

Make sure you use screws in the screw holes to secure it to the subfloor. The person who did your install obviously did not. Flanges (and their associated piping) are generally much stronger when they have the whole house supporting them against flexing.

If that is sealed up well, and you don't think you can get to the sides of the pipe to clean it for solvent-welding a new flange in place (or the top edge of the pipe is too low to get the flange on it, but I don't think that's an issue), then you can get the same effect by glueing it back together and using a steel reinforcement over the top, as previously mentioned. Same thought about using the screws, screwed-down steel over PVC should make it pretty impervious to future damage.
 
Last edited:
...

Make sure you use screws in the screw holes to secure it to the subfloor. The person who did your install obviously did not. Flanges (and their associated piping) are generally much stronger when they have the whole house supporting them against flexing...

Thank you Sam for helpful suggestions.

The subfloor is concrete; how could I securely attach a flange to it? That is, how to get a screw into concrete and be sure it won't go out?
 
Thank you Sam for helpful suggestions.

The subfloor is concrete; how could I securely attach a flange to it? That is, how to get a screw into concrete and be sure it won't go out?

Use a masonry bit to drill into the concrete, then use an appropriate masonry anchor for the screw to hold in the hole. If your concrete is good quality, concrete screws might also work well. Make sure to use screws with flat-top and conical underside heads to seat in the countersunk holes in the flange.

http://www.familyhandyman.com/mason...to-choose-and-use-concrete-fasteners/view-all

As long as the rest of that soil pipe is in good shape, this shouldn't be a terribly complex project, just a bit time-consuming.

Speaking of which, I have a toilet and three sinks to work on tonight. Yay.
 
Last edited:
Good posts Sam Cogley! Bravo.

A project that seems simple to Sam and I may not be up your alley. OP, don't be averse to hiring a pro if you don't want to do it. I don't work on cars nor do taxes even when I am offered help and advice.
 
My family are pretty solid DIYers (my dad built his office, my parents' house, and three large garages on their property by himself, and with rather limited help from professionals). After college, I lived in a duplex that was getting pretty threadbare after 55 years of continuous use, and my landlady let me fix stuff and deduct the cost of parts and labor from my rent. When I moved out, that apartment had much better plumbing and I'd saved quite a bit of money.

And "hire a pro if you don't feel capable or have the time" is always good advice.
 
I've looked at several varieties of those wax-free "donut" seals, and I ended up deciding that the barbed rubber that fits into the pipe was a superior solution - especially in this case, where the flange sits up above floor level and obstructions between the bottom of the toilet and the flange need to be minimized.
 
Back
Top Bottom