

Brainwashed
Active Member
Well, I bought a pair of 4311's. I got them from the 'bay, mostly because I wanted them... he he. And now I finally have a bare system of a reciever, TT, and speakers  ... sorta.
Ok, so I went and picked up the JBL's, and brought them home, and hooked them up to my SX-980. They sounded good together at low levels, and so, I turned the balance all the way to the left/right, and listened to each individual speaker (woofer/mids/tweeters) and had to fiddle with the Presence/Brilliance knobs (which are loose) to get them to work. No big deal, I'll just take the crossover out and clean the the pots right? Um. No. I failed my attempt.
So, here's my question... how in the world is that crossover plate attached to the cabinet itself? I took the woofer out, and can stick my head in and see that it 'should' (in theory of course) come out... but can only see one screw with a round washer type thingummy on it, which is going to be a pain to get to, yet alone a hidden second one.
I'll probably spend the next couple of hours, uploading some pics so you can see what I'm actually talking about.
Oh, and thanks for reading!
EDIT:: To make it simple for people who search for 4311's in the future, I'll just put all the parts links in this first thread. The blue text is a clickable link. All parts are from www.partsexpress.com except the clarity caps. Those are available at www.e-speakers.com
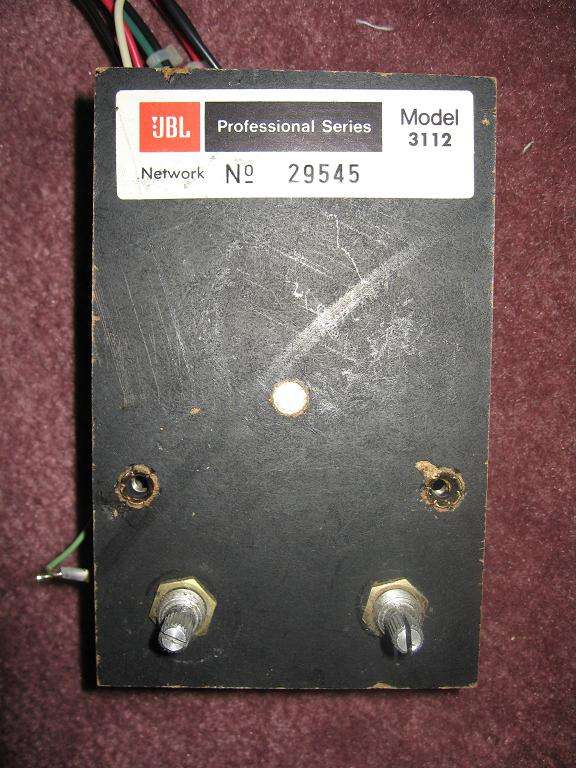
This is what the FRONT side of your crossover should look like:
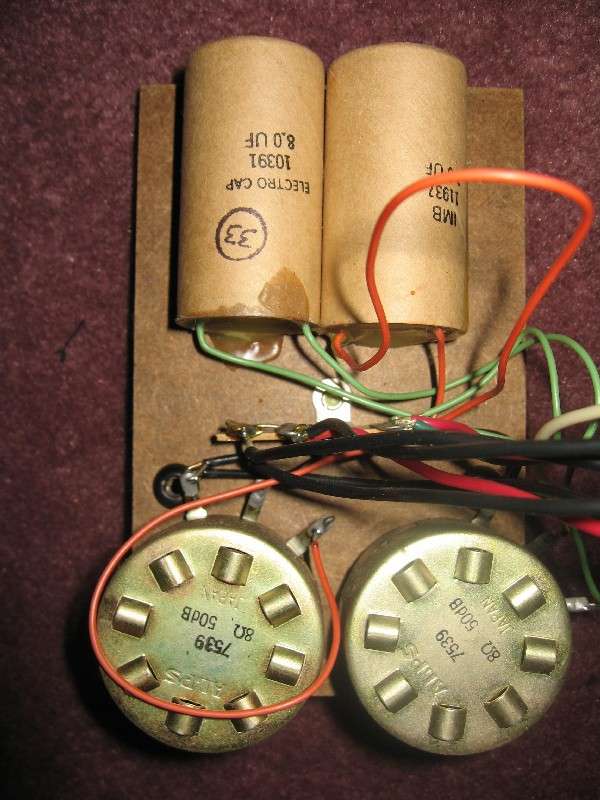
This is what the BACK side of your crossover should look like:
REPLACEMENT L-PADS
4 x L-PAD 15W MONO 3/8" SHAFT Part Number 260-248
CAPS FOR REBUILDING A PAIR OF JBL 3112 NETWORKS YEILDING "IMPROVED ORIGINAL" SOUND
4 x AUDIOCAP PPT THETA .010µF-600V FILM/FOIL CAPACITOR Part Number 027-700
2 x DAYTON PMPC-3.0 3.0µF-250V PRECISION AUDIO CAPACITOR Part Number 027-220
4 x DAYTON PMPC-4.0 4.0µF-250V PRECISION AUDIO CAPACITOR Part Number 027-226
CAPS FOR REBUILDING A PAIR OF JBL 3112 NETWORKS YIELDING A "BRIGHT" SOUND
2 x SOLEN 3.0uF-400VDC POLYPROPYLENE CAPACITOR Part Number 027-542
2 x SOLEN 8.2uF-400VDC POLYPROPYLENE CAPACITOR Part Number 027-564
CAPS FOR REBUILDING A PAIR OF JBL 3112 NETWORKS YEILDING A "MELLOW" SOUND
ClarityCap PX range
You'll want to select the Value from the dropdown menu, and type in the quantity:
Value=1.5uf Quantity:4
Value=3.3uf Quantity:2
Value=4.7uf Quantity:2
SPEAKER CAULKING
Also, in removing the woofer, I noticed what appeared to be a caulk of some type. In trying to keep everything as it was, I assumed that 30 year old caulk isn't exactly up to snuff, and found some more. I ordered 4, but at 36" lengths, you could probably get away with less, but I'd rather have extra than not enough, so for now it's:
4 x 36" SPEAKER SEALING CAULK Part Number 269-300
FOAM TWEETER DISCS
Available directly from JBL
Number is 818-894-8850
Hours are from 8-5 PST Mon-Fri, and best hours to call are from 8-12 and 2-5 PST.
LE25 :: #50402 - $1.97 ea (used in 4311 and older L-100)
LE25-2 :: #53363 - $2.04 ea (used in L-100A and other models)
JBL SCHEMATICS FOR ALL VARIATIONS OF '3112 CROSSOVER NETWORK' FOUND IN 4311's
3112 :: <<CLICKITY>>
3112-A,B :: <<CLICKITY>>
3112-C :: <<CLICKITY>>
3112-D :: <<CLICKITY>>
... sorta.Ok, so I went and picked up the JBL's, and brought them home, and hooked them up to my SX-980. They sounded good together at low levels,
and so, I turned the balance all the way to the left/right, and listened to each individual speaker (woofer/mids/tweeters) and had to fiddle with the Presence/Brilliance knobs (which are loose) to get them to work. No big deal, I'll just take the crossover out and clean the the pots right? Um. No. I failed my attempt. So, here's my question... how in the world is that crossover plate attached to the cabinet itself? I took the woofer out, and can stick my head in and see that it 'should' (in theory of course) come out... but can only see one screw with a round washer type thingummy on it, which is going to be a pain to get to, yet alone a hidden second one.
I'll probably spend the next couple of hours, uploading some pics so you can see what I'm actually talking about.
Oh, and thanks for reading!
EDIT:: To make it simple for people who search for 4311's in the future, I'll just put all the parts links in this first thread. The blue text is a clickable link. All parts are from www.partsexpress.com except the clarity caps. Those are available at www.e-speakers.com
This is what the FRONT side of your crossover should look like:
This is what the BACK side of your crossover should look like:
REPLACEMENT L-PADS
4 x L-PAD 15W MONO 3/8" SHAFT Part Number 260-248
CAPS FOR REBUILDING A PAIR OF JBL 3112 NETWORKS YEILDING "IMPROVED ORIGINAL" SOUND
4 x AUDIOCAP PPT THETA .010µF-600V FILM/FOIL CAPACITOR Part Number 027-700
2 x DAYTON PMPC-3.0 3.0µF-250V PRECISION AUDIO CAPACITOR Part Number 027-220
4 x DAYTON PMPC-4.0 4.0µF-250V PRECISION AUDIO CAPACITOR Part Number 027-226
CAPS FOR REBUILDING A PAIR OF JBL 3112 NETWORKS YIELDING A "BRIGHT" SOUND
2 x SOLEN 3.0uF-400VDC POLYPROPYLENE CAPACITOR Part Number 027-542
2 x SOLEN 8.2uF-400VDC POLYPROPYLENE CAPACITOR Part Number 027-564
CAPS FOR REBUILDING A PAIR OF JBL 3112 NETWORKS YEILDING A "MELLOW" SOUND
ClarityCap PX range
You'll want to select the Value from the dropdown menu, and type in the quantity:
Value=1.5uf Quantity:4
Value=3.3uf Quantity:2
Value=4.7uf Quantity:2
SPEAKER CAULKING
Also, in removing the woofer, I noticed what appeared to be a caulk of some type. In trying to keep everything as it was, I assumed that 30 year old caulk isn't exactly up to snuff, and found some more. I ordered 4, but at 36" lengths, you could probably get away with less, but I'd rather have extra than not enough, so for now it's:
4 x 36" SPEAKER SEALING CAULK Part Number 269-300
FOAM TWEETER DISCS
Available directly from JBL
Number is 818-894-8850
Hours are from 8-5 PST Mon-Fri, and best hours to call are from 8-12 and 2-5 PST.
LE25 :: #50402 - $1.97 ea (used in 4311 and older L-100)
LE25-2 :: #53363 - $2.04 ea (used in L-100A and other models)
JBL SCHEMATICS FOR ALL VARIATIONS OF '3112 CROSSOVER NETWORK' FOUND IN 4311's
3112 :: <<CLICKITY>>
3112-A,B :: <<CLICKITY>>
3112-C :: <<CLICKITY>>
3112-D :: <<CLICKITY>>


