JBL 4311's = system complete... for now.

and a beautiful job at it too. Very well looking and neatly executed XO's. Are the caps fixed to the masonite? You might wanna add a touch of hot glue / silicon for damping if they aren't. very nice!

Thanks. The caps were glued togeather on the backside and in between with a HD yellow hot glue. They were then affixed to the Masonite with the same glue before being soldered up. They are very secure and stable. I like to work clean. :)

- Woody
 
I just finished a JBL 4312 recap. Thanks to all the folks who posted their progress. I used the "Improved Sound".
The harshness of the upper mids seems to be altogether gone.
Thanks,
Dave
 
I have a pair of JBL-4311 WXA from back in college that I want to restore, get rid of some water marks left over from parties back then and others who don't respect other people's equipment, etc. Grrr. They just look a little tired overall.
I went on the net and found out how to remove black water marks from wood and tried the bartenders friend route. It did pretty well, not perfect, but did some light sanding on each speaker and used some walnut stain and I think they look good, not perfect, but neither box was totally abused.

I did the "improved" crossover upgrade. Not too hard, never replaced a capacitor on anything before. I didn't take photos, but I used the caps and filters from the Parts Express list here. Shot as much DeOxit as I could into the L-Pads without taking them apart and reassembled everything with some caulk for the woofers. Changed the binding posts to accept banana plugs as well. Oh yeah, stuffed some thick socks in the ports (have since taken them out). Trying to decide whether to do the plumbers drain plug or not. Going to listen to them awhile and decide. I like how they sound now, not getting the tiring thing I've been hearing about, not yet anyway. Listening to mostly rock and jazz.

Here's a crappy phone shot when they hadn't made it from the garage to the living room yet. Will try and load better photos later.

IMG_0850.JPG
 
Last edited:
I have read this thread several times now. Gets better every time!
OK, so I have a pair of almost pristine 4311's, they have been sitting dormant for decades. They were destined for the electronics recycling bin. The foam tweeter rings are gone, there is slight damage to the dust cap on one of the LE25's. I think the LE25's have been re-coned a long time ago. Everything else is stock. The LE25 on one side is a bit quiet. The L-pads seem clean and quiet, but the sound is lifeless out of the mids and highs. It is obvious that the capacitors are end-of-life. The cabinets were engraved for identification on the front labels, and in the wood on the back just above the terminals. The speaker grills/fabric were rotten and broken, but the cabinets are in excellent condition.
My plan: Definitely re-cap. Maybe replace the L-Pads, although I'm confident they are just fine. Maybe re-cone the LE-25's again if the re-capping doesn't fix them. Replace the grills and fabric, replace the front decals, and refinish the wood.
I have found a Canadian supplier for Solen capacitors, and I think I have found some that are almost exactly the same specs as suggested.

3mfd Fast Capacitors 250v PA Series Metallized Polypropylene, 0.0001ohms DF, 15mm D x 27mm L. Two of these.

3.3mfd Fast Capacitors 250v PA Series Metallized Polypropylene, 0.0002ohms DF, 16mm D x 28mm L. Two of these together with
4.7mfd Fast Capacitors 250v PA Series Metallized Polypropylene, 0.0002ohms DF, 19mm D x 28mm L. Two of these to make the 8mfd

Considering the specifications of these caps, does anyone have an opinion on how they would sound in comparison to the Daytons, or the 400V versions of the Solens?

Thanks for all the great documentation in this thread!IMG_2293.JPG IMG_2299.JPG IMG_2298.JPG
 
Very nice. I found some OEM tweeter foam rings on eBay that were the original, more "sparkly" style, not the light gray ones (ugly, IMHO) that you typically see. They are well worth looking for when they show up on eBay; they were listed as "original" or "OEM" and cost the same as the lighter gray ones.

OEM:

s-l1600.jpg


Aftermarket:

s-l1600.jpg
 
Last edited:
Yes; see eBay item no. 311939436288; seller is in Salem, Oregon. Only $8/pair shipped. "JBL LE-25 Foam Rings L100 - 4311- L88- etc. Original Equipment Manufacture".

No affiliation.

Yes, I saw those ones too.

However, I ordered the ones that were $6.99 US instead. They look like they are darker and a little thinner, and more dense foam. I was just trying to save a few bucks. When they come in, I'll have to make a decision to use them or not. If I order the LE25 pre-assembled re-coning kits from Speaker Exchange, they come with foam rings as well, but they look like the darker, thinner, denser foam as well. Simply speakers has the foam rings as well, and they look like the OEM ones.
I was going to order the complete new LE25 "Style" speakers from Simply Speakers, but they are 4ohm, and I I want to keep these 4311's as stock and original and authentic as possible.
 
IMG_2334.JPG IMG_2342.JPG
So, I've taken out the old capacitors. The 8uF looked a little dark, like it has gotten hot, I don't know if capacitors get hot. I did not replace the L-Pads, there were just fine. I did not put the 0.01uF bypass capacitors in, mainly because I couldn't find a source that didn't cost more in shipping than the capacitors were worth. I've only done one of the speakers, and had a quick listen to compare old and new. Right away I can hear a difference. The old capacitors sound slightly gritty, a little like square wave or possibly like a comb-filter in the high end. The new capacitors sound transparent, glassy, airy, and crisp. Definitely a difference, even without the 0,01uF bypass capacitors. I'll do the other one tonight.
 
Very cool. The Simply Speakers foam rings that you lined above, look (to my eyes at least) totally wrong. I have several sets of them and they are way too light in color.

The very dark ones that you linked (eBay and Speaker Exchange) look like maybe they are black neoprene, for the LE25-4 tweeters:

pair-vintage-JBL-LE25-4-Tweeters-L26L36-L100.jpg
 
IMG_2335.JPG
So, here is a strange one...
One of my 4311's is missing a t-nut and bolt! The 2213 woofer was being held on with only 3 of the 4 bolts. It must have been this way from the factory, I don't think these have ever been opened. I looked all through the cabinet to see if just slipped inside, but it is not there, and the bolt was not in the hole either. I have never seen anything like this before. (the photo is from the other cabinet where the t-nut same loose and my wife had to stick her arm in the cabinet and hold it with her fingers while I unscrewed the bolt)
So, obviously I need to source another 3-pronged T-nut and an appropriate sized bolt. Any ideas where to get one of these?
 
unnamed (1).jpg unnamed.jpg
So, I got the correct foam rings, and got the front decals from the print shop. I think they are as "done" as they are going to get with me.
I actually made two sets of new front decals. Both printed on heavy vinyl card stock, but I made one "inverted" so I could tack it over the correct one when they are used upside down in my living room. The numbers still go clockwise, but they start on the top right and go around the bottom to the top left.
Other than replaced caps, new decals, new grills/cloth, new foam rings, and a few coats of antique oil, these are all original and in excellent condition.
The more I play them, the better they sound. I've heard that new caps take a while to "break in". I don't know if that's true, or if it's just that they have been hanging on a wall for the past 20 to 30 years without signal running through them, and they are coming back to life.
By the way, if anyone wants the .pdf file I made to print the new decals, let me know and I'll email it to you. It is a 12" by 18" layout of the two correct, and two inverted labels. The vinyl card-stock sheets at my local print shop are 12"x18", so I made the layout to fit. Also, of course I couldn't find the correct font, so I took a photo of the old beat-up foilcals, and cut-and-paste the text in the the new layouts. Worked great! I'd give it a 95% on the professional graphics scale.
 
Hey all. Posting again. I'm going to be recapping the crossovers on another pair or 4311 and started reading up on the speakers again. I found a bunch of stuff about reversing polarity on some of the woofers that were in some of the 4311 models and need some clarification.
I have the straight up 4311 with 2212 LF, LE5-2 MF, LE25 HF on the 3112 network design. I have read that the 2212 is designed to move inwards but when I tested it with a 9v battery it moved out with +/+. Which is how the 3112 network looks like it is designed? Since the LF runs wide open I don't see a problem just swapping it and going +/- but I am no expert and don't even know if that would be correct.
The reading through forums and old diagram route is fun but can be exhausting and mostly just confusing.
If anyone has any solid input on this please let me know.
 
View attachment 1205280 View attachment 1205281
So, I got the correct foam rings, and got the front decals from the print shop. I think they are as "done" as they are going to get with me.
I actually made two sets of new front decals. Both printed on heavy vinyl card stock, but I made one "inverted" so I could tack it over the correct one when they are used upside down in my living room. The numbers still go clockwise, but they start on the top right and go around the bottom to the top left.
Other than replaced caps, new decals, new grills/cloth, new foam rings, and a few coats of antique oil, these are all original and in excellent condition.
The more I play them, the better they sound. I've heard that new caps take a while to "break in". I don't know if that's true, or if it's just that they have been hanging on a wall for the past 20 to 30 years without signal running through them, and they are coming back to life.
By the way, if anyone wants the .pdf file I made to print the new decals, let me know and I'll email it to you. It is a 12" by 18" layout of the two correct, and two inverted labels. The vinyl card-stock sheets at my local print shop are 12"x18", so I made the layout to fit. Also, of course I couldn't find the correct font, so I took a photo of the old beat-up foilcals, and cut-and-paste the text in the the new layouts. Worked great! I'd give it a 95% on the professional graphics scale.

Nice work - the graphics came out great.
 
Well, I bought a pair of 4311's. I got them from the 'bay, mostly because I wanted them... he he. And now I finally have a bare system of a reciever, TT, and speakers :banana: ... sorta.

Ok, so I went and picked up the JBL's, and brought them home, and hooked them up to my SX-980. They sounded good together at low levels, :music: and so, I turned the balance all the way to the left/right, and listened to each individual speaker (woofer/mids/tweeters) and had to fiddle with the Presence/Brilliance knobs (which are loose) to get them to work. No big deal, I'll just take the crossover out and clean the the pots right? Um. No. I failed my attempt.

So, here's my question... how in the world is that crossover plate attached to the cabinet itself? I took the woofer out, and can stick my head in and see that it 'should' (in theory of course) come out... but can only see one screw with a round washer type thingummy on it, which is going to be a pain to get to, yet alone a hidden second one.

I'll probably spend the next couple of hours, uploading some pics so you can see what I'm actually talking about.

Oh, and thanks for reading!

EDIT:: To make it simple for people who search for 4311's in the future, I'll just put all the parts links in this first thread. The blue text is a clickable link. All parts are from www.partsexpress.com except the clarity caps. Those are available at www.e-speakers.com

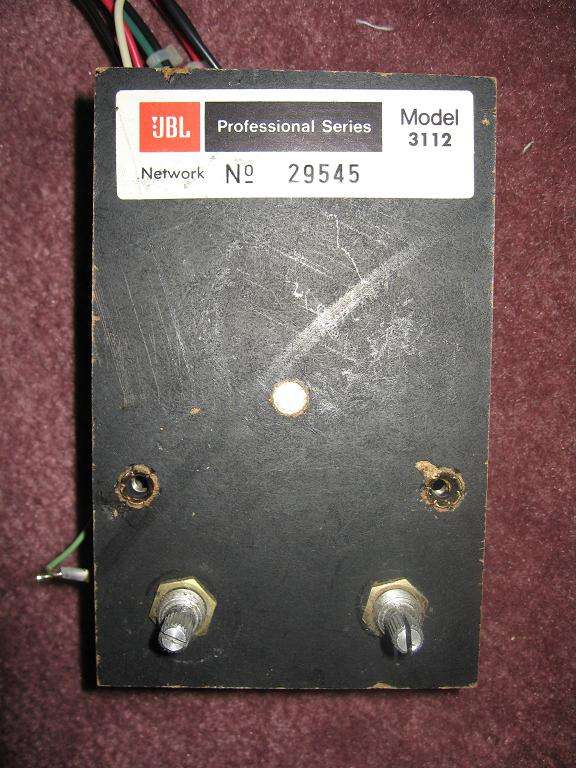
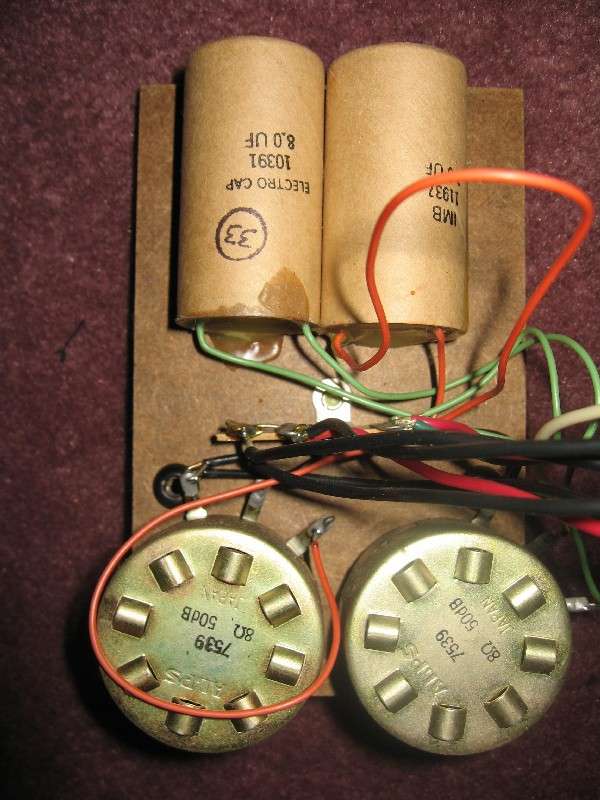
This is what the FRONT side of your crossover should look like:
3112ju3.jpg


This is what the BACK side of your crossover should look like:
3112backgz4.jpg


REPLACEMENT L-PADS
4 x L-PAD 15W MONO 3/8" SHAFT Part Number 260-248

CAPS FOR REBUILDING A PAIR OF JBL 3112 NETWORKS YEILDING "IMPROVED ORIGINAL" SOUND
4 x AUDIOCAP PPT THETA .010µF-600V FILM/FOIL CAPACITOR Part Number 027-700
2 x DAYTON PMPC-3.0 3.0µF-250V PRECISION AUDIO CAPACITOR Part Number 027-220
4 x DAYTON PMPC-4.0 4.0µF-250V PRECISION AUDIO CAPACITOR Part Number 027-226

CAPS FOR REBUILDING A PAIR OF JBL 3112 NETWORKS YIELDING A "BRIGHT" SOUND
2 x SOLEN 3.0uF-400VDC POLYPROPYLENE CAPACITOR Part Number 027-542
2 x SOLEN 8.2uF-400VDC POLYPROPYLENE CAPACITOR Part Number 027-564

CAPS FOR REBUILDING A PAIR OF JBL 3112 NETWORKS YEILDING A "MELLOW" SOUND
ClarityCap PX range
You'll want to select the Value from the dropdown menu, and type in the quantity:
Value=1.5uf Quantity:4
Value=3.3uf Quantity:2
Value=4.7uf Quantity:2

SPEAKER CAULKING
Also, in removing the woofer, I noticed what appeared to be a caulk of some type. In trying to keep everything as it was, I assumed that 30 year old caulk isn't exactly up to snuff, and found some more. I ordered 4, but at 36" lengths, you could probably get away with less, but I'd rather have extra than not enough, so for now it's:
4 x 36" SPEAKER SEALING CAULK Part Number 269-300

FOAM TWEETER DISCS
Available directly from JBL
Number is 818-894-8850
Hours are from 8-5 PST Mon-Fri, and best hours to call are from 8-12 and 2-5 PST.

LE25 :: #50402 - $1.97 ea (used in 4311 and older L-100)
LE25-2 :: #53363 - $2.04 ea (used in L-100A and other models)

JBL SCHEMATICS FOR ALL VARIATIONS OF '3112 CROSSOVER NETWORK' FOUND IN 4311's
3112 :: <<CLICKITY>>
3112-A,B :: <<CLICKITY>>
3112-C :: <<CLICKITY>>
3112-D :: <<CLICKITY>>


Really appreciate the info. About to attempt to recap my father's 4311 WX's. Any chance you've got pics of the crossover after you've done the "improved original" recap?
 
Thanks for this thread!
Recapped a pair of new to me 4311WX with Jantzen Z-standard caps (3.3 uf & 8.2 uf) along with new L-pads.
I used the job as an excuse to buy a hot glue gun, haha!
They sound night and day better, I mean really good, clear, clean, punchy and tight. Particularly notice cymbals, shimmery highs and the bass tightened up along with they got louder at the same settings on my Marantz.
I also think there was some out of phase wiring before which contributed to less than optimal SQ.
happy happy happy ...been listening all afternoon.
 
Your reports make me so much want to perform surgery on my beloved 4311b but even tho I do have some kind of guts I am a bit worried about the front plate removal and then the inner soldering should I ever handle to remove the plate.

A while ago I tried to remove the woofer, curiosity, to see what is inside, and even tho the 4 screws came out flawlessly the woofer itself seemed sealed and didn't want to damage the baffle by inserting some kind of lever in between but, still, could I not improve but at least take the sound back to the original and change the cable plugs on the back (ouch, JBL, I mean, they weren't cheap but those plugs oh my, never seen anything worse...).

I have a heat gun I use to remove varnish off of my boat, three different power levels but I guess even at the lowest it would be too hot, I wish I could see a video of somebody performing the surgery to give me hope into making it...

Congrats to you all for resurrecting those amazing speakers!!!

Giovanni
Hi Giovanni!
Regarding woofer removal, one trick is to use a sheet metal screw just slightly larger than the screw hole in the basket, and to screw it in just until it bites. Then use a set of pliers or vice grips on the screw head and pull to lift the woofer.
Good luck, Glenn
 
Ciao Glenn,

that's a good idea, thank you! I think I will delay attempts to when I have extra speakers ;) I am dealing for a pair of L220 :cool: which needs the passive to be refoamed and also some fixing to a crossover, if I menage to get and resurrect them I would sure give a try at recapping the 4311B and follow all of the precious advice out of this thread.

Grazie

Giovanni
 
Back
Top Bottom