

You are using an out of date browser. It may not display this or other websites correctly.
You should upgrade or use an alternative browser.
You should upgrade or use an alternative browser.
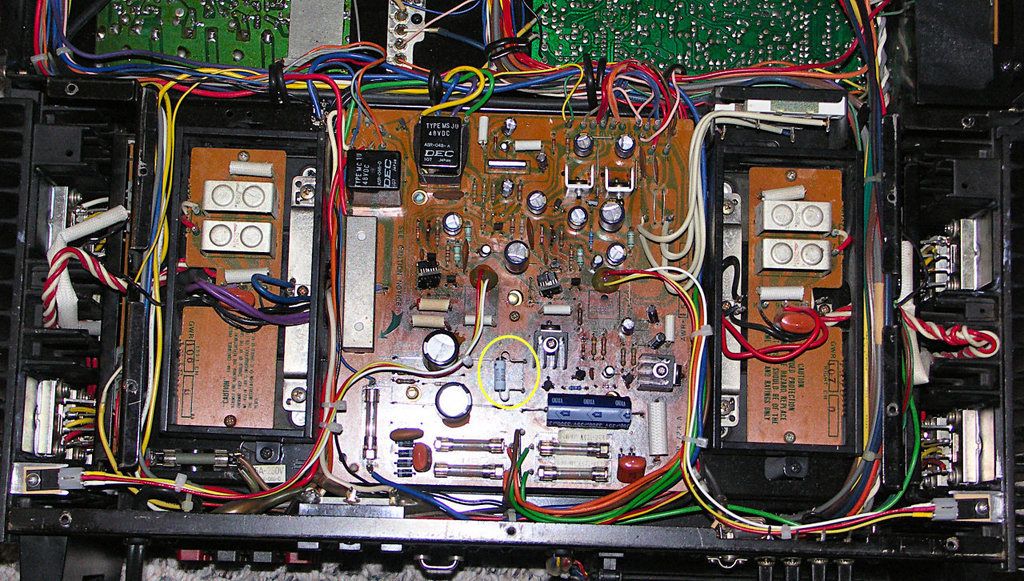
Pioneer SX-1980 Regulator Modification
- Thread starter EchoWars
- Start date
Gonna be a weird wiring mess, but you could if you were determined.
Edit: I'm thinking the swap to a better heatsink (such as suggested above) and changing to a 22 ohm, 3W resistor (should be bent away from the transistor) ought to be plenty if the 80V transistors are moved and the 80V heatsink removed from the board.
Edit: I'm thinking the swap to a better heatsink (such as suggested above) and changing to a 22 ohm, 3W resistor (should be bent away from the transistor) ought to be plenty if the 80V transistors are moved and the 80V heatsink removed from the board.
Last edited:
omri617
Super Member
Gonna be a weird wiring mess, but you could if you were determined.
Maybe to pass the wires underneath the Power Supply Board would make things look prettier..
As for Q203 , to use the existing round hole underneath the HS and lever up the wires...
SolderIron
Super Member
Best heat management is to move all the hot regulator trans off the PS board. Add a heat sink to mount a bank of them will take some work. Also the power drop off resistor is not needed if you have a good heat sink. The wiring is a bit messey, but no more heat problem. Another thought is may be to make a big heat sink for all trans on the PS board.
Saw where Mark was using large TO-126 transistors (A1220A and C2690A) for Q208, 209, 212, and 213. Didn't specify the reasons, but they'd be fine. I have been using the small-but-very-tough Zetex ZTX694B and ZTX795A for these positions.
The last one of these I did, I changed R202 to a 22 ohm 3W. Did some creative lead bending to get the resistor away from Q203 (see pic). It's mounted about 3/4" above the board and bent to the side to prevent heat transfer to the transistor.
So the total of parts to cool this sucker down are:
2x HS300-ND Digikey 25.4mm x 16mm TO-220 heatsink (to replace the wimpy original heatsinks on Q203 and Q205). These need a really short #6-32 1/4" screw for attaching the transistor, else the screw gets in the way of the parts needed to attach the heatsink to the PC board.
2x #4-40 x 1 3/8" machine screws plus four flat washers, two lock washers, and a #4 nut to attach these new heatsinks to the PC board for stability.
2x 94997A275 McMaster-Carr 2.9mm x 13mm sheet metal screw #1 philips drive to attach the TO-220 transistors to the big heatsinks.
2x 93475A210 McMaster-Carr 3mm stainless flat washer for the above screw.
2x WM2550-ND Digikey Molex TO-220 socket (NLA, but you can use a computer fan three-wire extension cable connector with 11" or longer leads to get the job done. Just clip off the male end.)
Small heatshrink to insulate the wire connection to the Molex socket. (Not needed if you use the computer fan wiring)
6 feet 22ga stranded hook-up wire (recommended). Each lead running from the PC board to the remote transistor will be about 11" long. (Not needed if you use the computer fan wiring)
1ea MJF15030G and MJF15031G Insulated tab TO-220 transistors to replace Q210 and Q211 (most places have them in stock now, and insulated tab is fine here, as these transistor will have a huge heatsink once attached).
OR
1ea MJE15032G and MJE15033G to replace Q203 and Q205 (live tab is fine here, and these are tougher parts than the insulated tab above).
4x BER113-ND Bergquist K10 Kapton thermal pad for the four TO-220 transistors. If you want, you can simply use heatsink compound, but the pads are so much cleaner.
1x P22W-3BK-ND Panasonic 22 ohm 3W resistor to replace the original 3.3 ohm 1/2W resistor at R202.
If you use a TO-220 with a live collector tab for the 80V pass transistors, you'll need:
2x 532-7721-8PPS Mouser TO-220 shoulder washer, and either the Bergquist K10 pad, or a couple of mica insulators for the +/-80V transistors.
Might note that the original +/-80V pass transistors get hot enough that the foil pads are often damaged or weak. Once I get the long wires soldered up, I spread a bit of epoxy where the wires meet the board to act as a strain relief.
I also replaced the stock 220µf 160V axial caps with 220µf 160V radial caps and stood them on end to help unclutter the board.
Along with a swap of pretty much every other semiconductor on the board, plus the building of the current sources, you can see that this is a hell of a project. But you can kiss that ugly-ass stock +/-80V heatsink goodbye.
Last edited:
Thanks very much for sharing Glen! Excellent job!
In this case, the soft-start and speaker relays were pristine and did not need replacement. But I noticed that Mattsd recently replaced the soft-start relay with either a LY1-DC24 or an LY1-0-DC24 (the latter having PC board pins). The original is 48V, so this would mean changing R102 from 3.3K 2W to 2.4K 5W. This resistor is pretty much right next to and under the 80V heatsink and with a 24V relay is going to run blazing hot (3+ watts dissipation) and will be transferring more heat then desired to the stock heatsink...another good reason to remove it.
This could all be avoided if you use a 48V soft-start relay. In yet another 1980 thread, I believe mattsd had a LY1F-DC48 relay. Odd, but it seems that the flange version is easy to find. Wish a PC-mount version were as easy to locate, so hacking on the solder tabs or the PC board (or both) might be avoided.
I do not replace the speaker relay unless it's hozed. The MY2 relay is awfully wimpy for a receiver that's outputting 300WPC, and in the event of a catastrophic output device failure will almost certainly fuse itself and take out a speaker (but most failures are with the regulator board, so the relay opens as intended). Unfortunately, the little MY2 is the only drop-in replacement out there, so unless you want to do a remote mount with a LY2F-DC48 relay (could use a socket in that case) or make some unreasonable modifications to the PC board, you're stuck with the undersized MY2 relay.
Good work Glenn,
When I look at some HP test equipment, that is exactly what they did, remote mount the series pass bjt on a HS. By rights one would do a switched load test to verify the transient response recovery and tame any ringing, if present.
There are times it is best/easiest to make/fab a small adapter pcb, like for the CC mod, or to adapt a new/better relay for an old footprint.
Eagle & pcbway are perfect this sort of stuff.
Speaking of speaker relays, some have even been using SSR speaker relays.
I am of the opinion, for an amp of this size, that each speaker pair should have their own relay and do away with the switch passing the speaker load current. It would require some logic of sorts. All mods to improve on some short comings.
Cheers
Going to bump this up...Molex has apparently discontinued the TO-220 socket that I like so much, so I've ordered enough to last me a long while from Newark (Link). Once they are gone, you'd have to use some type of 3-position Molex with a screw terminal, but that may be problematic, given the height of those things. Might have to find some other mounting point for the transistor, which would make this a real PITA.
I hate when parts are discontinued. :thumbsdn:
I hate when parts are discontinued. :thumbsdn:
Teti
Pioneer hoarder
Great inspiration, thank you very much. Will mod my 1980 as well. Haven't restore it yet, just reflow PCB. Have you snip all wires off and separate PCB or have you left it hanging and did all soldering that way? Just wondering what you guys will recommend me... I'm generally really lazy person and want my job be as smooth and easy as possible ")
unsolder wire wrap pins on board's edge connected to wires from transformer, leave all other wires intact, work on it hanging in place - I work with it standing on it's side.
And, from your wording, I am worried and I will NOT be able to help sort out any messes.
And, from your wording, I am worried and I will NOT be able to help sort out any messes.
In this case, the soft-start and speaker relays were pristine and did not need replacement. But I noticed that Mattsd recently replaced the soft-start relay with either a LY1-DC24 or an LY1-0-DC24 (the latter having PC board pins). The original is 48V, so this would mean changing R102 from 3.3K 2W to 2.4K 5W. This resistor is pretty much right next to and under the 80V heatsink and with a 24V relay is going to run blazing hot (3+ watts dissipation) and will be transferring more heat then desired to the stock heatsink...another good reason to remove it.
This could all be avoided if you use a 48V soft-start relay. In yet another 1980 thread, I believe mattsd had a LY1F-DC48 relay. Odd, but it seems that the flange version is easy to find. Wish a PC-mount version were as easy to locate, so hacking on the solder tabs or the PC board (or both) might be avoided.
I do not replace the speaker relay unless it's hozed. The MY2 relay is awfully wimpy for a receiver that's outputting 300WPC, and in the event of a catastrophic output device failure will almost certainly fuse itself and take out a speaker (but most failures are with the regulator board, so the relay opens as intended). Unfortunately, the little MY2 is the only drop-in replacement out there, so unless you want to do a remote mount with a LY2F-DC48 relay (could use a socket in that case) or make some unreasonable modifications to the PC board, you're stuck with the undersized MY2 relay.
The substitution using a LY1-0-DC24 removed R102 completely and directly connects pin 2 to C203 (3300uf 35v) positive which has 26 to 24 volts on it, with R102 removed, and a jumper installed from the cold pad of the two R102 resistor pads (the HOT pad has 106 to 99v on it) , to the low voltage source. This feeds 24v out from pin 2, through the one power switch section, and back in to the relay coil from pin 1. NO heat at all.
mattsd
Super Member
The substitution using a LY1-0-DC24 removed R102 completely and directly connects pin 2 to C203 (3300uf 35v) positive which has 26 to 24 volts on it, with R102 removed, and a jumper installed from the cold pad of the two R102 resistor pads (the HOT pad has 106 to 99v on it) , to the low voltage source. This feeds 24v out from pin 2, through the one power switch section, and back in to the relay coil from pin 1. NO heat at all.
Correct, this is what I use now for any SX-1980 restore I do and I have posted it in the main parts list for my 1980 restore thread. Credit due to Mark, he originally posted this idea there and it worked so much better than having to mod the board to fit the large terminals on the LY1F-DC48. Less heat as well.

Parts:
HS300-ND Digikey 25.4mm x 16mm TO-220 heatsink
532-7721-8PPS Mouser TO-220 shoulder washer (necessary if using collector tab TO-220's)
94997A275 McMaster-Carr 2.9mm x 13mm sheet metal screw #1 philips drive
93475A210 McMaster-Carr 3mm stainless flat washer
WM2550-ND Digikey Molex TO-220 socket.
22ga stranded hook-up wire (recommended).
I would like to incorporate this mod on a set I have and include Q216 and Q217. The PS needs all the obvious components and CS work-a-round.
The trouble I'm having is finding a suitable Molex TO-220 socket. The WM2550-ND at Digikey is obsolete.
I found the Molex Part number but yet to find any disturbers with any left.
EW, have you found an alternative?
I would like to have the sockets for the ease of removing the heatsinks.
Never mind I just read the posts above.
Will report on what I end up with.
Last edited:

Zeb, just an idea/option, if you are to use a isolated TO-220 packaged bjt, thus not needing the insulator,shoulder washer, thus have the flange held/screwed to the HS, it would be easy enough to remove and not need the socket. for the highest of reliability, sockets are to be avoided. Kind of a moot point as this unit is not used in a aerospace application
Similar threads
- Replies
- 5
- Views
- 175
- Replies
- 15
- Views
- 422