Record Bin From single 4 x 8 Sheet of Plywood - Plans

100_2097.jpg

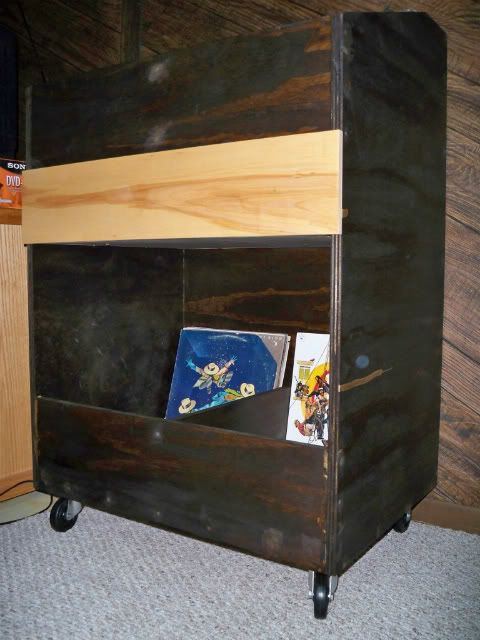
Finally got the casters installed, besides being able to wheel it around it got it about 4 inches off the floor and made it a little easier to access the bottom LP's. Not happy with the dark stain and plan on getting it outside in the spring and trying to lighten it up somehow. I think I'll trim the edges then.
 
First I want to thank all who contributed to this great thread. Does anyone have any thoughts on modifying this design to use for 45's? I think I saw a couple of comments along this line but I don't think there was anyone who posted about their attempts. Thanks.
 
First I want to thank all who contributed to this great thread. Does anyone have any thoughts on modifying this design to use for 45's? I think I saw a couple of comments along this line but I don't think there was anyone who posted about their attempts. Thanks.

How many 45's are you looking to store? I don't have any here but I'm thinking that if you only have 200 or so, you could likely fit them on one level. Maybe even in a draw added below the top level. If someone can get me a measurement of the width of a 45 sleeve I could take a few minutes and play with the original design to see how it adapts. I'm guessing 7.5" x 7.5" x .08"?

Thoughts on Draws...

If you have castors, use fixed position casters in the front, rotating casters in the back when using draws. If you have a heavy draw and the rest of the unit isn't full, opening a draw could end up with the weight tipping the unit forward onto you. Rotating casters in the front could make this more likely as they can end up further back when rotated. If the bottom shelf is full, it is less likely to be an issue. If you have multiple draws, open only one at a time. Units without casters may not have this problem. (wider footprint)
 
Ok, I took a quick look at the assembly. As you would expect, adding a draw will require more than one sheet of plywood. If we remove the taper at the top of the bin and raise the top shelf the 5 inches we gain from the removal of the taper that would leave room below for an 8.5" high draw (8" deep inside) that will hold three rows of 45 RPM records. That would be an estimated 500 - 600 45s in the draw. This is in addition to the 600 or so LP's the cab already holds. You would loose @ 3.5" of browsing room / access to the lower shelf.

Would anyone like me to work up the plans? Or a 45 only 1 or 2 sheet plan? A 2 sheet plan would allow for an open top and probably 3 draws. A 1 sheet plan would be situated much like the 2 shelf LP rack but configured for 45'.
 
Last edited:
Just an update: I made a second bin, and it's just about full as well. These record bins have improved my listening experience dramatically. I used to spin, maybe two times a week when I had them in boxes, now I do it pretty much every day. My family loves it too. They can easily find and pull a few things out whenever they want, and put them back when they are done without me having to worry about it. The accessibility of it had made vinyl a family activity now, and my sister likes it so much, she is shopping for her first TT.

Here's bin number two:

IMG_0950.JPG
 
Awesome Rat Fink. :)

How is your copy of Peter Gabrial's "SO"? Mine is quiet where it should be but the sound quality is horrible. SSSsSuper sssssssilibant. It is a shame too, I loved that album as a high school student when I had it on tape and cd.
 
Thanks.

It's funny you mention that because when I picked it up a few months back, I was really excited to have found it (and about 20 other choice albums). But when I got it home, I discovered that the edge was warped pretty bad, and didn't bother looking much further into it. The worst part was that I almost got both copies I found of that album that day, but I cheaped out and put one back even though they were only $0.75 each. Doh!
 
Here's mine, done with the iron on oak veneer with 3/4" oak ply. To bring out the grain, I did a quick brush and wipe with Minwax ebony, sanded with 220, then two brush n sit for 15 min, then wipe, with Minwax English Chestnut, and 2 coats of Satin Poly. The finishing took days. The build took 3 hours. I was trying to match some other stuff I had stained, and it came out pretty good. You can see one of my restored A-25s next to it. Same English Chestnut. I like it better than the brown Walnut. I very slightly modified how the cuts were made to avoid flush joining, and used cleats under each shelf. All joining was with wood glue and 16ga 2" finishing cut brads with my air nailer. A helpful hint if you use a brad nailer, is to nail only where the grain is then when you fill the holes and stain, it is dark like the grain and less noticeable. I bought for $11, a 4 "AA" cell LED under cabinet light with a wide angle to light the underside albums. It self sticks, or screws in place, and has a magnetic mount for easy removal. Works perfect. I bought the unlabeled mid thickness plastic dividers and some sleeves and covers from Bag Unlimited, and used P-touch labels to alphabetize. For non skid I have a bunch of leftover solid PVC vinyl garage flooring. Works perfect. I also put the thick narrow felt on the bottom runners for easy moving. Only a partial collection in there just to see how it looks. May have to build another one, I only seem to fit like 400 albums in the unit. Sound same for you all?
 

Attachments

  • IMG_3044.jpg
    IMG_3044.jpg
    77.5 KB · Views: 1,302
  • IMG_3045.jpg
    IMG_3045.jpg
    74.2 KB · Views: 1,021
  • IMG_3048.jpg
    IMG_3048.jpg
    71.2 KB · Views: 918
  • IMG_3047.jpg
    IMG_3047.jpg
    65.5 KB · Views: 885
Last edited:
Just an update: I made a second bin, and it's just about full as well. These record bins have improved my listening experience dramatically. I used to spin, maybe two times a week when I had them in boxes, now I do it pretty much every day. My family loves it too. They can easily find and pull a few things out whenever they want, and put them back when they are done without me having to worry about it. The accessibility of it had made vinyl a family activity now, and my sister likes it so much, she is shopping for her first TT.

Here's bin number two:

IMG_0950.JPG

Cheech & Chong. Haven't seen that one in years!
 
Only a partial collection in there just to see how it looks. May have to build another one, I only seem to fit like 400 albums in the unit. Sound same for you all?

That is a beautiful unit. :) I originally estimated @ 500 records but that was with the assumption that they are @ 1/8 of an inch thick. Even 1/32 or so over that would add up quick. So 400 albums with room to flip could be dead on.
 
I have to give some props to sxty8goats for making this available to everyone here at AK. I dropped the ball on my original plan. I intended to post some more photos and dimensions but, alas, life got in the way. This makes a fantastic record bin for about $50 total.

My record collection has far exceeded what a cabinet of this size can accommodate. I'm currently working on an 8.5 foot long bin that should hold in the 700 to 800 record range on top flip style and another 900-1,000 on the bottom, divided library style. I think I can do it with two 4x8 sheets, a single 2x4 handi-sheet and small number of 2x4's. I'm hoping to keep it under $100. If it turns out as good as this version did, i'll post some pics.

Looking forward to seeing your new record storage solution. It sounds great, but I have a feeling my wife would not approve of the 8 footer. :sigh:
 
All cuts by big box store?

Thanks for this great project plan! But, you offer 4 cuts to get it home, what about those of us that are table-saw challenged? I think with 5 more big-box store cuts, the angled sides not withstanding, you'd be ready to go home and assemble?

I annotated this to take to Home Depot and numbered what I believe would be all the cuts short of the angled cuts for the sides (I do not think they will do this for you).

If I have this right, I need to pay for 9 separate cuts, and I think I labeled them correct and in order to ensure I get home with all the right pieces.

At $.50 a cut, I'm happy to pay $4.50 versus struggling with a hand saw or circular saw. Do you see a flaw in this lazy-man's approach?

Thanks again for the collaboration and sharing these plans, and for any feedback on the viability of this option.
 

Attachments

  • SINGLESHEETLPRACK-REV2.1.jpg
    SINGLESHEETLPRACK-REV2.1.jpg
    56.4 KB · Views: 500
The only flaw is that the saw at Home Depot, may tear up the edges pretty good, and they are not known to be accurate at measuring. If all you want is a rough & tumble heavy duty storage, then that may be fine, but if you want a potential piece of furniture, find a better place to cut your plywood for you, or even a handyman to come to your house. All the cut edges that HD did on mine, I had to take a lot of time to sand, fix, or hide. This is more an issue with veneered oak or walnut, which splinters much much more readily than the poplar or maple veneer.
 
Last edited:
Back
Top Bottom