

You are using an out of date browser. It may not display this or other websites correctly.
You should upgrade or use an alternative browser.
You should upgrade or use an alternative browser.
Solvent for fossilized plumbers putty?
- Thread starter roger2
- Start date
faber12
Addicted Member
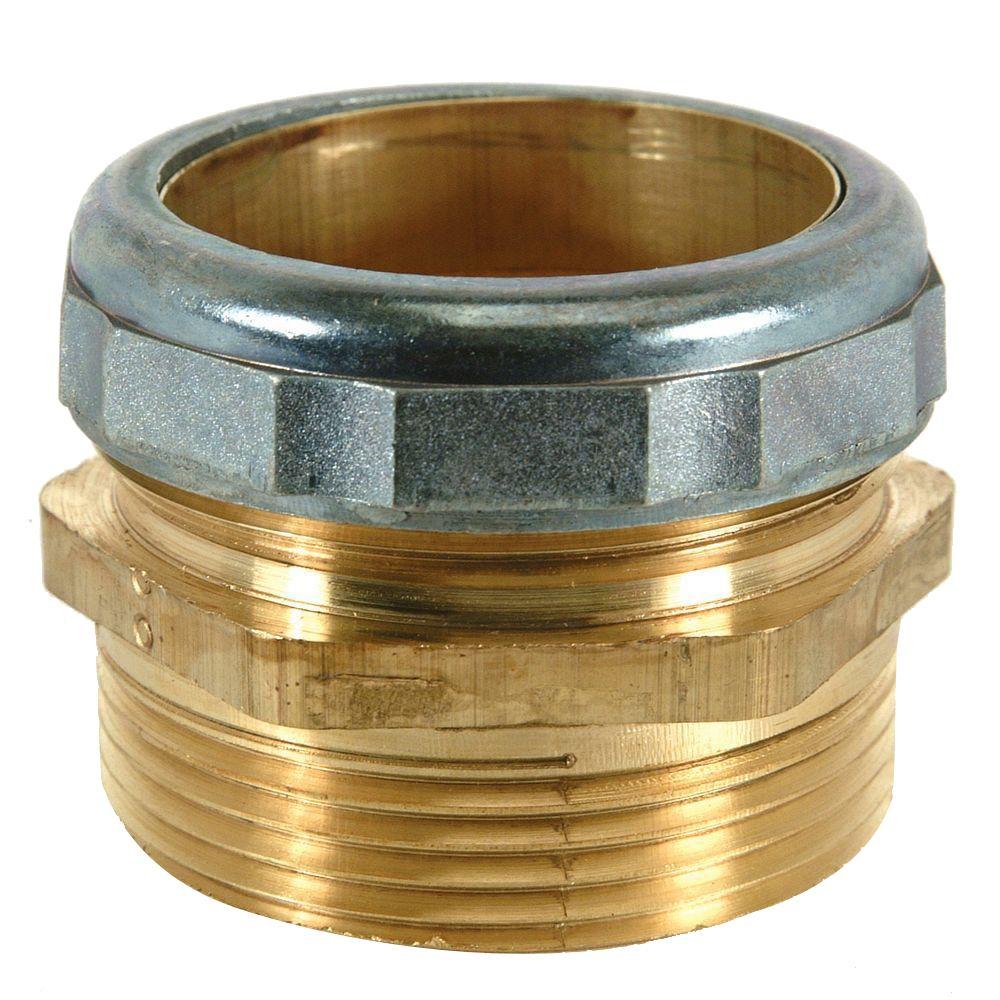
That is the right idea, but of course, a real tap is better. Applying oil will help too.I filed in 6 of these around the nipple to enhance cutting. Is this the right idea or should it be different?
View attachment 1127877
usedto
Lunatic Member
Yep, that works. I had a jar of plumber's putty that dried out, so I googled it. They suggested mineral oil or boiled linseed oil, which I had. Mixed a little in, let it sit, then kneaded if for a bit. Worked like a charm.Simple....
When they originally mixed the compound they used a solvent agent like mineral spirits in it and now it’s dried up and gone. By soaking a rag in mineral oil you are bringing back the substance to its original form....I’d just soak a rag and wrap it around the pipe right on top of the joint and leave it alone. Id’ll be fine after a few hours, if not continue the soaking and check back later. One, you don’t have to inhale any dust or harmful fumes and two the mineral spirits don’t have any nasty chemicals to give you ALS !!!
roger2
.
Update:
---Verdict is not yet in on the mineral oil. After one pass, it may have helped a little but was not a miracle fix. This stuff on these threads is seriously hard though. I gave it a second coating...
---My local True Value Hardware did not have a 1 1/2" tap, either for rent or for sale. There is tool rental place in my town, but I will have to wait until Monday to see if they have one.
---Probably won't be working on this project any more today. Possibly will do more Sunday, and for sure Monday.
Thanks to everyone for your input and suggestions so far
roger2
.
Doing anything like this involves a learning curve. I read the Wikipedia article on Dies & Taps, which said that when using a standard tap (or die) for repairing/cleaning threads, that some material is usually lost which results in making the threads looser. And that there are tools called chasers specifically designed for repairing threads.
The fitting I am working on already has some small areas of thread missing, and I would like to avoid, or minimize, doing any additional damage. So I am now considering the task-specific tool pictured below.
Anyone have opinions on this tool?

The fitting I am working on already has some small areas of thread missing, and I would like to avoid, or minimize, doing any additional damage. So I am now considering the task-specific tool pictured below.
Anyone have opinions on this tool?
Last edited:
roger2
.
@Dj
I applied the 3rd coating of mineral oil a couple hours ago. And will keep it soaked for the next couple days while deciding on and obtaining either a tap or a chaser.
But this material is definitely hard, when I referred to it as fossilized I don't think I was too far off. Giving the mineral oil every chance. And I am sincerely hoping it works. But if it doesn't work in this particular case, that would not mean that your suggestion does not have merit for other situations")
And I am also trying to approach this from two directions at once. Already have sunk 4 days into an unexpected project, lol. Trying to get 'er done without making things worse...
I applied the 3rd coating of mineral oil a couple hours ago. And will keep it soaked for the next couple days while deciding on and obtaining either a tap or a chaser.
But this material is definitely hard, when I referred to it as fossilized I don't think I was too far off. Giving the mineral oil every chance. And I am sincerely hoping it works. But if it doesn't work in this particular case, that would not mean that your suggestion does not have merit for other situations
And I am also trying to approach this from two directions at once. Already have sunk 4 days into an unexpected project, lol. Trying to get 'er done without making things worse...
Last edited:
Frankly, I think you're going to be waiting a long time for mineral oil to do anything. Pipe joint compound is what was most likely used, not plumbers putty, and pipe joint compound is made to be resistant to solvents and heat. Once it hardens, it needs to be removed mechanically by wire brush or a thread chaser. Looks like there's also some rust on those threads that rust remover might help with.
Since you're able to get 2 1/2 turns of a new pipe started, another turn or two with a large wrench should be fine. Just use plenty of pipe joint compound on it.
Since you're able to get 2 1/2 turns of a new pipe started, another turn or two with a large wrench should be fine. Just use plenty of pipe joint compound on it.
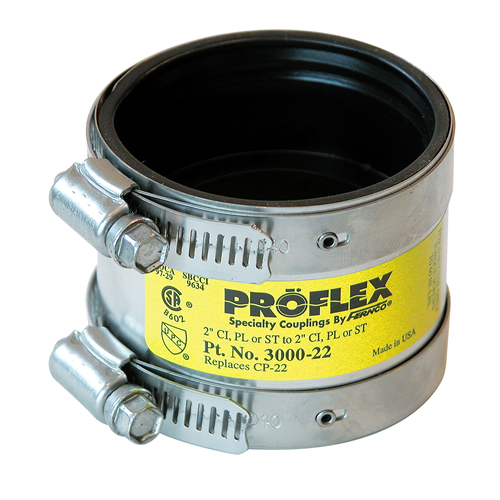
It looks like the outer diameter of the pipe in question is round. If so, just use an in-line rubber joint, like this: https://www.homedepot.com/b/Plumbing-Pipes-Fittings/Fernco/N-5yc1vZbqpfZ4hs
Fernco fittings come in various diameters on each end, adapting to make them work. Then, you don't need to worry about cleaning out anything from the threads.
Good luck,
Rich P
Fernco fittings come in various diameters on each end, adapting to make them work. Then, you don't need to worry about cleaning out anything from the threads.
Good luck,
Rich P
roger2
.
@pustelniakr
Good idea, thanks. But I don't think there is enough there for a Fernco to grab onto. You can't see it in my pic, but at 12 o'clock and 6 o'clock, the round protrusion of the Tee does not extend outward very far from its body. It is about 7/16" on the bottom, and maybe half that on the top. On the page you linked, the pics show the worm clamps situated further away from the edge of the fittings than I have to work with.
I could modify a Fernco by cutting away a small arc in those two locations. But it would also be necessary to cut away part of the back of the cabinet to gain access for tightening screws. Another factor is that the portion of the house I live in has no crawlspace access. If a leak ever developed, water could accumulate and I would have no way of knowing or removing it. I would have to periodically inspect the joint, and it is in an inconvenient location under the kitchen counter.
But the idea of possibly using a Fernco has merit and I will add that to the other ideas I am mulling over.
Last edited:
Here is plumbing rule: once you touch, whatever you touch...
I just re-plumbed my entire house (don't ask). You would be surprised what you would do, to not have to...
My house was built in '51. I have one wet wall (kitchen on one side bathroom on the other), and the wall in the back of all of my kitchen cabinets, and behind my electric range has all been taken out with a sledge (lathe and plaster). I replaced it with aluminum sheet metal covered with contact paper (or textured aluminum sheet metal with aluminum tape), and installed with screws, so I can remove it if needed. I don't have a crawl space since my house is on a concrete slab. I recently had to remove one of the sheet metal panels, to do drain work, and it was nice to be able to unload, un-screw and open up. If you have to cut clearance to put in a proper Fernco, it is better than having everything you touch turn to poo. The PVC drain to caste iron knuckle is now accomplished via Fernco. It works great and is reliable. I've got 20-year old Ferncos (or equiv.) in there, and they don't leak, but they are on drain lines and vents. Pressurized lines may be another matter.

Enjoy,
Rich P
I just re-plumbed my entire house (don't ask). You would be surprised what you would do, to not have to...
My house was built in '51. I have one wet wall (kitchen on one side bathroom on the other), and the wall in the back of all of my kitchen cabinets, and behind my electric range has all been taken out with a sledge (lathe and plaster). I replaced it with aluminum sheet metal covered with contact paper (or textured aluminum sheet metal with aluminum tape), and installed with screws, so I can remove it if needed. I don't have a crawl space since my house is on a concrete slab. I recently had to remove one of the sheet metal panels, to do drain work, and it was nice to be able to unload, un-screw and open up. If you have to cut clearance to put in a proper Fernco, it is better than having everything you touch turn to poo. The PVC drain to caste iron knuckle is now accomplished via Fernco. It works great and is reliable. I've got 20-year old Ferncos (or equiv.) in there, and they don't leak, but they are on drain lines and vents. Pressurized lines may be another matter.
Enjoy,
Rich P
Last edited:
Already have sunk 4 days into an unexpected project, lol. Trying to get 'er done without making things worse.
After 30 years of doing this kind of work i find that repairs on older buildings can often take a lot longer then just replacing something and can end up not working anyway. Many times i have and still do try to fix things because i didnt want to open up a wall or ceiling or cut out the back or move a cabinet, turn off the water to the whole building etc and ended up doing it anyway and wasting a whole day and money on parts on a repair that failed. But for everyone that fails probably 20 succeed, i have learned many tricks over the years some arent exactly code but they work. hopefully you wont need to replace that tee but if you do and want to do it yourself it is usually quite simple once the wall is open. i did one last week and it took less then an hour, a sawzall with a new metal blade is needed.
when you get it cleaned out putting a 1 1/2 brass trap adapter into the tee instead of the plastic will let you put a lot more torque on it, put pipe dope on both the threads and inside the tee on the threads. you can go to plastic again after that.
Chip Chester
Super Member
Harbor Freight probably has that pipe tap, and it'll be cheap and work at least once. Since it's a zero-pressure system, basic leak stoppage is all that's required. And the small amount of material removed will have no negative impact on the seal, since pipe threads are tapered. Tape or dope and move on.
For the grooves cut on your pipe nipple to be of benefit, they need to have a sharp leading edge. Cut with hacksaw or thin grinder at an angle so leading edge of each thread is sharp. Don't bother filing; any burrs will be sheared off by the mating of the two threads.
The above brass fitting looks like a good approach, because the brass will slightly conform to the existing iron, but not the pipe dope.
roger2
.
Here is plumbing rule: once you touch, whatever you touch...
Rich, I guess I'm not sharp enough to know the end of that sentence without some help
Is it something like this: once you touch, whatever you touch......will also require attention?
roger2
.
.............. Pipe joint compound is what was most likely used, not plumbers putty, and pipe joint compound is made to be resistant to solvents and heat.........
I think you are right about that. I initially assumed that the sealing compound (putty I believe) that I easily removed from the male fitting was the same as what was in the female threads. Now I think that the female threads may have had pipe dope applied sometime before the most recent joint was made. Also, there is damage to the female threads that I was not able to capture with my camera, and that could not have been done by plastic.
roger2
.
....
......hopefully you wont need to replace that tee but if you do and want to do it yourself it is usually quite simple once the wall is open. i did one last week and it took less then an hour, a sawzall with a new metal blade is needed.
@Chrisxo55441 Thanks for all of the great advice and suggestions. It is very much appreciated.
As of now, I don't think that I will have to replace that Tee. But it could be a project that I will undertake in the future. One thing that I have not mentioned yet is that the Tee is a bit high. There is very little fall in the drain pipe from the sink, and I have already raised the trap up as high as possible. The sink does drain but is not ideal. So if there are any other issues in the future with the Tee, this would be one more reason to remove/replace.
I have a couple questions regarding removal of the Tee in case it ever needs to be done. Would I be better off sawzall'ing it, or simply unthreading it?
The upper pipe (vent) is accessible in the attic and there is enough room up there to work. I could get a pipe wrench on it and pull it up and out. The Tee might be difficult to grab with a pipe wrench though. And I would be concerned that the lowest joint, the one in the (inaccessible) crawl space, could turn instead of the joint between the Tee and the lower (drain) pipe. Would there be a way to prevent that lowest joint from loosening while turning on the Tee?

Last edited:
faber12
Addicted Member
Use two pipe wrenches, one to hold the pipe, one to turn the fitting. Definitely do not sawzall it unless as a last resort as that limits your repair options to a pair of fernco fittings or a fernco tee.
If you can get a tap, that should open the fitting up enough to thread something into there enough that thread compound will seal.
If you can get a tap, that should open the fitting up enough to thread something into there enough that thread compound will seal.
he Tee is a bit high. There is very little fall in the drain pipe from the sink,
that is the reason i replaced the tee the other week to lower it on a kitchen remodel, older sinks appear to have been mounted higher than newer, you cut the pipe right above the tee then 6 inches or so below the tee, replace the section with ABS pipe and tee securing it with mission couplings i use a slip coupling on the top though to make it easier. i dont know what that picture is from but that looks like a leaded tee and not a threaded one, melted lead is poured around the fitting into the big cup around it to hold it in place and anyway if you try to unthread a 60 year old tee the threads on the pipe will probably crumble, if there are pipes or a stud by it you probably cant get a wrench on it enough turn it either and a lot of torque will be needed to free up 60 year old fittings, hard to do laying under in a cabinet with small wrenches.
mission coupling
Similar threads
- Replies
- 42
- Views
- 12K