Advent Legacy- Rebuild

Vulture

Broad-Spectrum Hobbyist
After five months of slowly buying parts and project holds,I finally finished recapping the first crossover! Because of the huge disparity in capacitor size between old and new, I ended up relocating the inductor off the back of the terminal cup where every else is. I now have 6-8 inches of solid copper bell wire as lead extensions. The plan is to use velcro to attach it to the interior floor of the cabinet.

DSC_9764.jpg


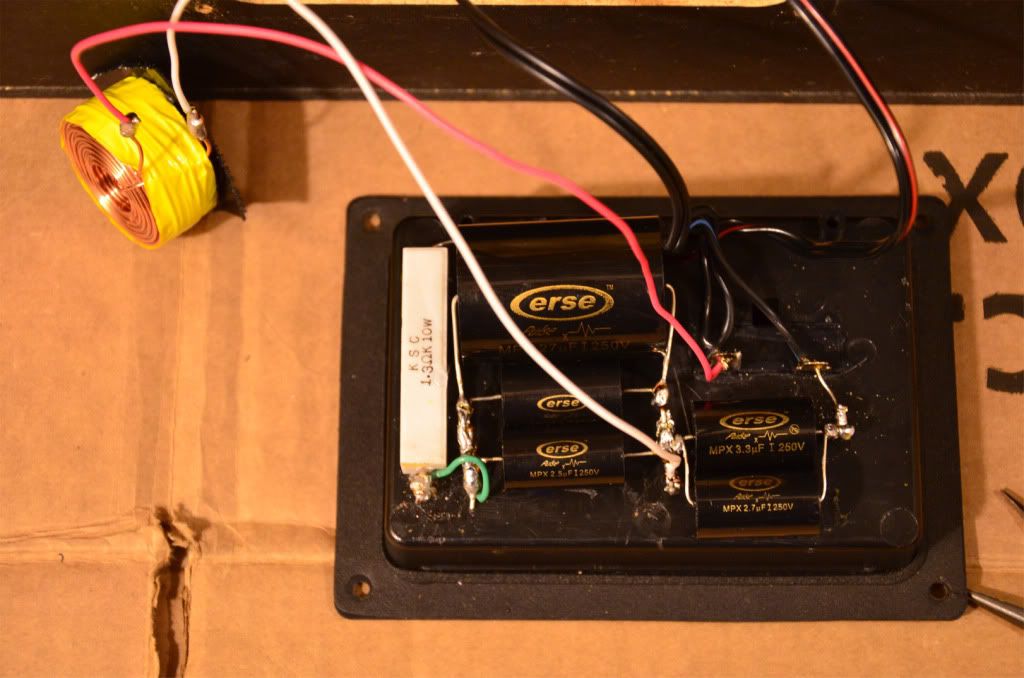
Because of the oddball values on the original capacitors; 32uF and 6uF, I ended up mix-n-matching Erse PulseX caps to match. I have a 27uF and two 2.5uF all wired parallel to make the 32uF, and a 3.3uF and a 2.7uF parallel to make the 6uF.

So far, I have two questions:
1) Would twisting the extension leads for the inductor cause interference of any type? It would certainly look better, but that isn't worth causing signal problems.

2) Have I messed with the XO mojo by using so many caps? I'm most worried about the three wired in parallel. I know the smaller ones will charge faster than the 27uF, but will that cause a significant and problematic change to the sound?

Also, I would like to enter a self-nomination in the category of "Worse Solder Job of 2012". :stupid: First time I've dragged that iron out in at least eight years!
 
Multiple capacitors in parallel are preferred by some and should not be a cause for concern.
I am not aware of problems caused by twisting leads in short runs You could also shorten those leads if you want to look neater. That is, if the mounting position of the coil will allow it.
 
Multiple capacitors in parallel are preferred by some and should not be a cause for concern.
I am not aware of problems caused by twisting leads in short runs You could also shorten those leads if you want to look neater. That is, if the mounting position of the coil will allow it.

I need the length to allow room to attach it while the XO is out so I can get my hand in.
 
They are done!

After 7 months of sporadic work on these speakers (hour or so a week usually) I finally finished the Advents! :banana: Not including new equipment, chemicals and such, the tallies are as follows:

Initial Cost
$15.00
Rebuild Cost
Capacitors- $30.14 w/shipping
Surrounds- $25.95
4-piece gaskets- $12.95
Used eBay Tweeter- $36.00 with shipping
Foam Gasket material- $5.00
Total $125.04

I wanted to try and keep it under a hundred, well so much for that!:D Are they worth that much? Who knows, don't really care. The amount of skill and lessons learned are invaluable. For instance:

1) when gluing down mesh dust caps, don't use a O'Reilly's irish cream glass to hold it down while drying. The glue oozes through the mesh and glues the glass to the cap! :lmao: That one freaked me out last night.

2) A raised-lip glass lid for a Caphalon 10" frying pan works great for holding down the outer surround edge while drying. The raised edge on these baskets made clamping darn near impossible!

3) 4" PVC pipe couplers make great workstands while working on drivers, the magnet fit right inside, and keeps the conical-backed magnet on these Advents from wobbling while on a lazy susan.

I have three more pairs of speakers left to rebuild, the knowledge will be put to good use. I also want to document the rebuild process better the next time around, especially on the next pair: Phillips HB815X three-ways. There is precious little information on these on the web. I had a devil of a time trying to find new surrounds to fit metric drivers. I hope to be able to contribute new info on these as a sort of thank you to everyone that answered my frantic newbie questions.
 
You know, I was so busy setting them up and listening to them, I forgot to pull out the camera and lights and get some after photos! :music: 
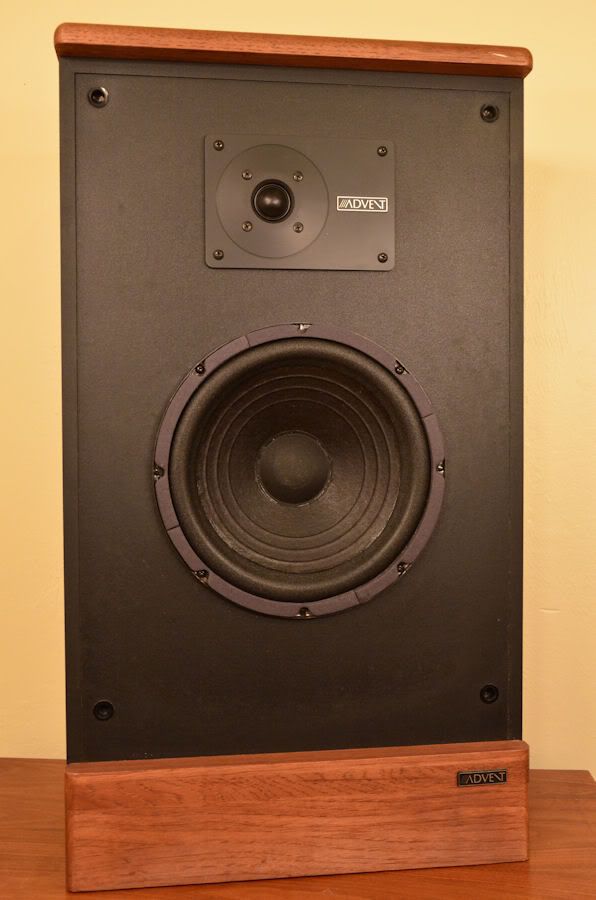
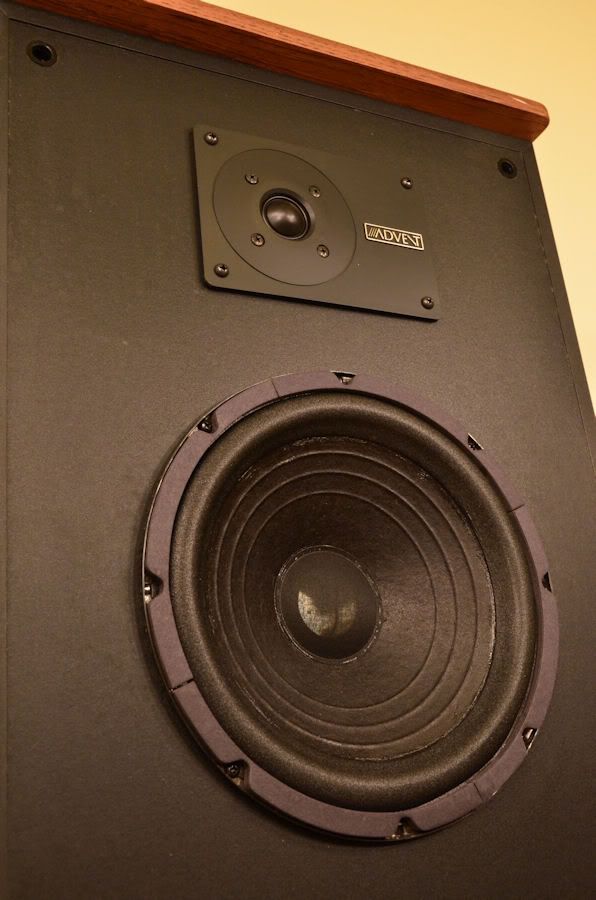
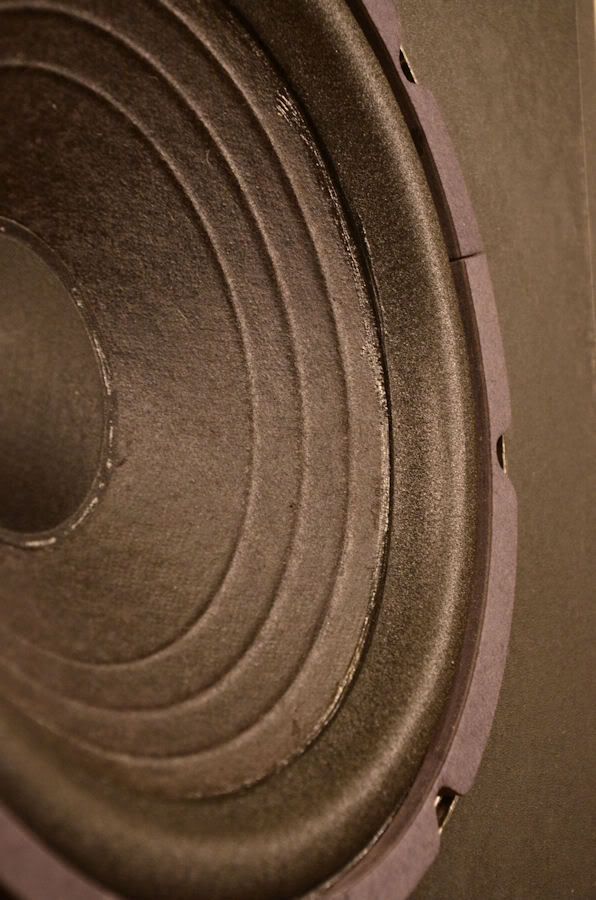
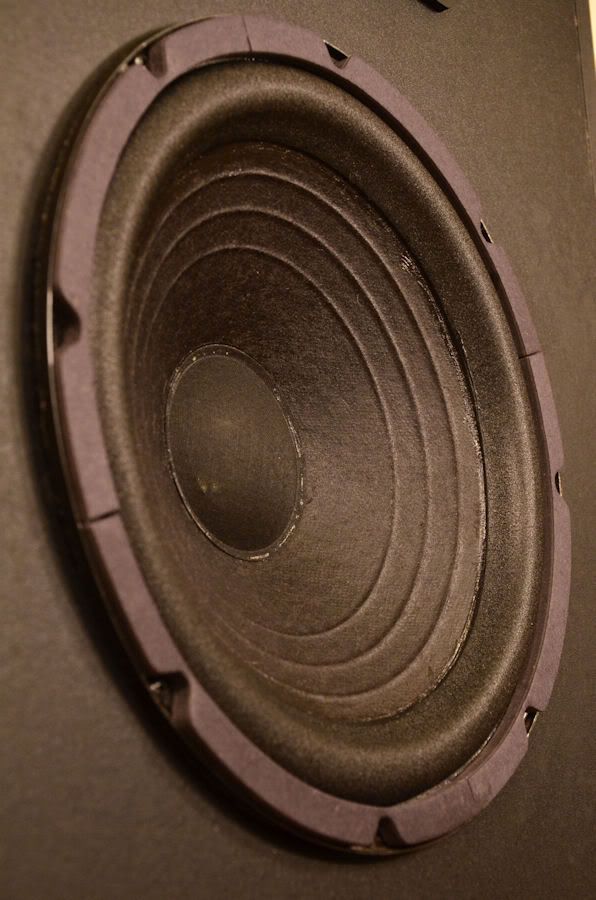
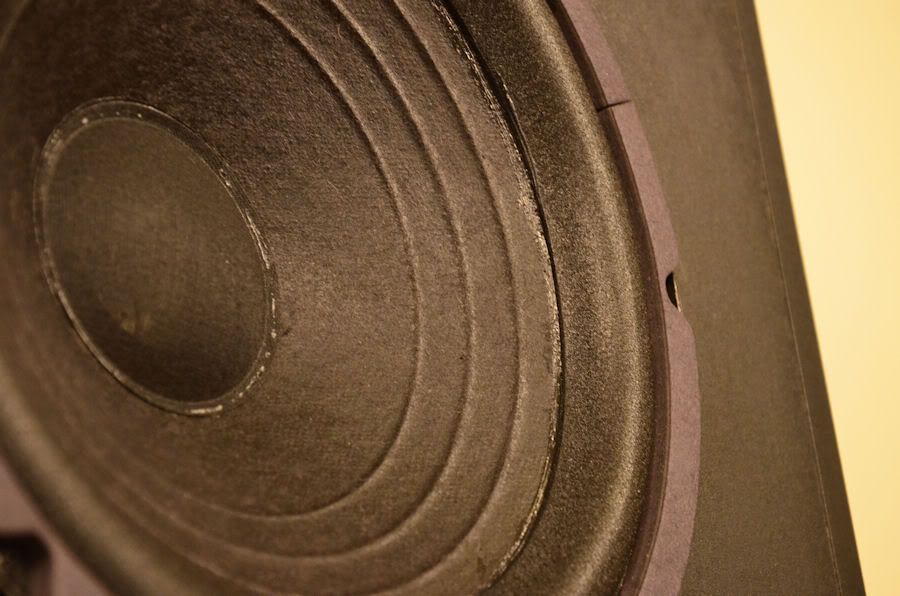
I'll set everything up when I get home from work tomorrow, see how good of a close-up photo I can get of the refoam work.
 
AdventLegacy-finished.jpg

AdventLegacy-finished2.jpg

AdventLegacy-finished3.jpg

AdventLegacy-finished4.jpg

AdventLegacy-finished5.jpg


I had a devil of a time with the color temp. Never did get it quite right. It's one of the things I have the most trouble with in photography.
 
Nice, how do they sound?
The Advents currently have around 7-8 hours on them since the rebuild. I have them hooked up to a Denon DRA-425r currently, 70wpc. I don't know why, but they sound "smiley". All highs, all lows, it's Anti-Bose. I suppose it has a lot to do with the fact that they have only a tweeter and a 10" driver. I would imagine it would be kinda hard to get mids out of something that big. Plus I think I read somewhere in AK that the more gap between the voice coil and the magnet rod inside, the more inefficient they are. If that is the case, I had to fit both the thick and the thin shims in there to get the cones aligned. I sometimes hear about cap break-in after rebuilding crossovers, I'm hoping that they mellow out a bit after time. One thing I did notice is that for the first 30 minutes of play, the bass was almost unbearable. It was like sitting in my friends Firehawk back in high school with the two 12" subs going epelectic. That has mellowed down, thankfully. I checked it after 4 hours with the same track the next day.

At some point in the future, I think I'm going to try restoring the pecan trim, it's pretty bad.
 
i did a "recap" on my /2's where i just added a dayton .1 bypass cap to them. brought out some more bass and midrange. they were very harsh for the first week or so and have calmed down a lot since then. now they are warm and friendly.
 
i did a "recap" on my /2's where i just added a dayton .1 bypass cap to them. brought out some more bass and midrange. they were very harsh for the first week or so and have calmed down a lot since then. now they are warm and friendly.

The midrange would be nice to have. I'm hoping with some play time they will mellow out and the mids will come through better. How many hours you think you played them that first week?
 
Nice job on the re-foam. I just did my Legacy's as per Rick Cobb and his approach centering the cones using the 30hz tone CD that he includes in the kit is just amazingly simple to do, I'm also a newbie at this.
I still need to recap the crossovers and the caps do need to burn in a little, can you tell the difference before and after recapping?
 
Just got my set of Legacy speakers today, they needed foams as usual and I have one finished and drying as we speak. Out of all the re-foam jobs I have done these are by far the easiest. The old foam and glue came off very easy, the last speakers I did (JBL 4410's) were the worst, that glue and old foam took a long time to come off. I will order my caps also and get these speakers sounding right. Yours turned out nice! :thmbsp:
 
2) A raised-lip glass lid for a Caphalon 10" frying pan works great for holding down the outer surround edge while drying. The raised edge on these baskets made clamping darn near impossible!

You can always use clothes pegs to clamp the outer surround.

One question though, any reason why you used new card gaskets? On these woofers, it's possible to pry the original gaskets off with a flat bladed screwdriver.

Nice work though!

Total $125.04

WOW! Which makes the set I have for sale for $100 priced just right.

Good luck.

Lee.

AdventLegacy2-1.jpg


AdventLegacy2-2.jpg
 
Nice job on the re-foam. I just did my Legacy's as per Rick Cobb and his approach centering the cones using the 30hz tone CD that he includes in the kit is just amazingly simple to do, I'm also a newbie at this.
I still need to recap the crossovers and the caps do need to burn in a little, can you tell the difference before and after recapping?

I can't really say what they sounded like before a recap, they were a basket case when I bought them. One of the caps had imploded a bit, fried a tweeter, and generally sounded like crap. The other speaker sounded tolerable, but both 10" drivers needed refoaming.

I noticed a drop in the bass after about 3 hours burn-in from initial start-up, which was a good thing. It was WAY overpowering. Music varied from classic rock station, Adele, to dubstep. I just moved last week(again), so they are currently parked along with most my gear in the spare bedroom. Once I get everything set up again, I'll be able to report more.

Just got my set of Legacy speakers today, they needed foams as usual and I have one finished and drying as we speak. Out of all the re-foam jobs I have done these are by far the easiest. The old foam and glue came off very easy, the last speakers I did (JBL 4410's) were the worst, that glue and old foam took a long time to come off. I will order my caps also and get these speakers sounding right. Yours turned out nice! :thmbsp:

Thanks! I keep thinking one of the foams looks off center, but there is no rubbing, so I'm leaving it alone. I also put a couple of coats (read 6-7) of diluted glue that came with the refoam kits on the cones. They looked horrible, so the treatment really made them look nicer.

These were my first refoam job, so I can't really comment on how hard it was compared to others. I do now it was a royal pain in the back and took a really long time. Hunching over those things scraping really bugs my spine. The dang glue Advent used did NOT want to come off.
 
You can always use clothes pegs to clamp the outer surround.

One question though, any reason why you used new card gaskets? On these woofers, it's possible to pry the original gaskets off with a flat bladed screwdriver.

Nice work though!


WOW! Which makes the set I have for sale for $100 priced just right.

Good luck.

Lee.

Thanks!

I tried the clothes pin idea, it didn't work well at all. The lip is just too tall. I suppose if you glued the gaskets back down at the same time, it might work.

I used new gaskets for a number of reasons. I had never pried gaskets like these off before, I didn't know if they were going to stay in one piece or not. Which they didn't, the layers separated in several places. Two, they looked faded (no longer truly black like they were originally), and once I treated the cone, it was going to look weird. Three; I am used to automotive gaskets. You NEVER reuse those unless you have no choice. Out of habit, if it's called a gasket, I replace it. :D But that's just me.

As far as your set goes, I would treat the cones, the overall look will definitely improve. Mine sure did. Do yours still have the grills?

My next step is to treat the pecan wood panels top and front. Mine are only marginally better looking than yours. I'm going back through AK Search looking for the best way to go about it. So far, the majority seem to like tung oil or Howard's Restore-a-Finish (I think that's what is was called).
 
I realize this is an old thread, but I just picked up a pair of Legacys that look exactly like yours. Are those Legacy II's?
 
I realize this is an old thread, but I just picked up a pair of Legacys that look exactly like yours. Are those Legacy II's?

Sorry for the late reply. Nope, Legacy Series I. Series II had the same cabinet, but vertically mounted tweeters. Series III had vertical mount tweeters, and a taller, skinnier cabinet.
 
Back
Top Bottom