The JE Labs/ Angela SE 2A3 amp done my way

Redboy

a few good watts
Subscriber
I've been talking about this project for a long time, and I imagine it will be a good while before it's actually done, but I think I've finally got all the parts together.

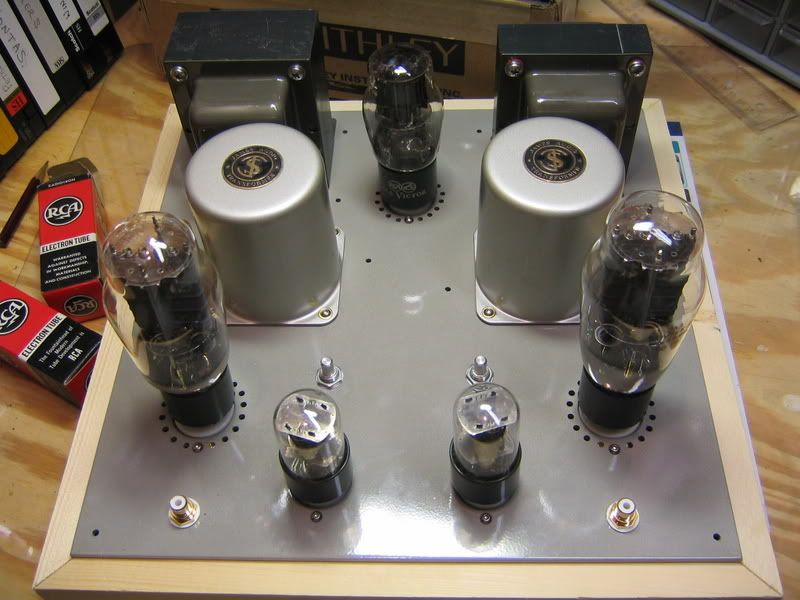
Here's a test fit of components. I had the transformer end bells and the aluminum plate sandblasted and painted. The colors didn't turn out quite how I expected, but I'm still pretty happy with the results. :yes:

IMG_6585.jpg


IMG_6588.jpg


IMG_6587.jpg
 
That amp will deserve better-sounding 2A3's than the Sovteks, you know? Perhaps they're just cannon fodder until the bugs are all worked out?
 
Looking real good so far.Have you started your point2point wiring, bottom side yet?:thmbsp:

Dave
 
mhardy6647 said:
That amp will deserve better-sounding 2A3's than the Sovteks, you know? Perhaps they're just cannon fodder until the bugs are all worked out?
Yeah, I know... the Sovteks are a budget compromise until I find that treasure trove of tubes in a dusty attic somewhere. I do have a few different old stock driver tubes to try, thanks mostly to Tom Bavis.
 
avionic said:
Looking real good so far.Have you started your point2point wiring, bottom side yet?:thmbsp:
Not yet. Right now it's just a fancy facade. :D
 
Thats cool! Take your time and do it right the first time.:thmbsp:

Dave
 
The wood base is a stand-in for something better later. I'm hoping to put something nicer together, or find someone with better woodworking skills than me. I know a guy, but I haven't talked to him about it yet...
 
Very nice and clean layout. I'm invisiong ivory colored chiken head knobs, on the hum? pots. I really like the looks of the paint color. Kinda classy lookin :yes:
 
jaymanaa said:
Very nice and clean layout. I'm invisiong ivory colored chiken head knobs, on the hum? pots. I really like the looks of the paint color. Kinda classy lookin :yes:
Ivory huh? :scratch2: The paint is a clear coat over the sandblasted aluminum. I really liked the look before the paint, but every fingerprint showed badly so I had it painted.
 
mhardy6647 said:
That amp will deserve better-sounding 2A3's than the Sovteks, you know? Perhaps they're just cannon fodder until the bugs are all worked out?

Hell for the money, I thought Sovtek 2A3's were pretty damn good sounding tubes....

What 2A3's do you suggest?

I still like my phony-assed 2.5 volt TJ 300B solid plate tubes, they have that rich robust sound that is quite addicting.
Except I don't trust the longetivity of the filament/cathode coating over time.
They still work however, though they aren't as strong as they used to be.

Maybe they are better off biased as a 2A3, I had them that way for a good year, then biased the TJ's for 300B voltage. That's when I started having problems with emission after about 3 months.

I have them biased right at the max dissipation for 2A3. I should re-bias a little lower and try my 5930's again.....

Nice job Redboy, my first 2A3 amp look's pretty cobbled compared to yours....

Man, this beer is good.......Kona Brewing Co. "Wailua" wheat ale brewed with passion fruit. I'd thought it might be poof beer, but it's not the case....num nums....strong too!
 
hey-Hey!!!,
That is one fine looking amp. Looking forward to hearing how you like its sound. When/if you want to roll some other tubes into the front end, let me know and I'll sift my stash. Remember: input section should be pins 4, 5 and 6 with the cathode follower on pins 1, 2 and 3. That way you can put *ANY* 8BD tube in there. 6SL7, 6SN7, 6DN7, 6EM7...:)
cheers,
Douglas
 
PakProtector said:
Remember: input section should be pins 4, 5 and 6 with the cathode follower on pins 1, 2 and 3. That way you can put *ANY* 8BD tube in there. 6SL7, 6SN7, 6DN7, 6EM7...:)
Thanks Douglas, I remembered that from another thread. I'll be doing that. :yes:

Thanks for the offer of tubes to try, too. I might take you up on that sometime! Now, if I could just find time to suck some solder fumes...
 
And so it begins...

I've started to tinker with the layout underdecks. This will be interesting! Not having done this before, it will be a slow exercise.

I've already found challenges. The first involves a 100uf/500V cap, which is pretty dang huge!

Something tells me this will be a rat's nest...

Pictures tonight, maybe.
 
The Unders

This will be more interesting than I anticipated. I think it was Pak that said he builds bigger than he thinks he needs and always wants more... :scratch2:

Below decks:

IMG_6738.jpg
 
Looking good so far! It'll be interesting to see how you do your grounding, it seems that is the area I need to do some learning in and it's great to see other's approaches (and successes? :) ) with it.

Just a suggestion as it's still early enough to consider it but have you thought about using grommets on the wire access holes under your power transformer? Guess I'm the paranoid type but line and high voltage wires packed tightly and running through a small raw sheet metal edge might not be so good if the amp gets moved around much.
 
Bill, I could use some pointers when it comes to grounding, too. I'd like to try to star ground everything, but I'm open to suggestions and pointers.

I was thinking about grounding the power supply to one of the choke bolts - it's obscured by the filament transformer in lower right of the picture - and the rest of the circuit to another more centralized location. I'm not sure where that will be yet.

I like your idea to use the grommets under the PT. I did smooth the edges of all the holes with a file before having the chassis painted, and the paint itself rounded them further so I think it's pretty safe, but you may be onto something there. Another stop at Ace is probably in order.
 
Back
Top Bottom