Army
Addicted Member
I had a couple of emim's go out on my RS 4.5's the other night, swapped a pair out of my RS 2.5's so I still have tunes, thankfully.
So today reread the emit repair thread and decided tonight I'd screw up my courage and at least try to see what was the problem. One measured 68Ω's and the other 45Ω's so I had a feeling they weren't toast since I still had some resistance.
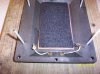
There are six screws that hold them together that use a cap type of nut with a shallow phillips head. I loosened them before I made a crude fixture out of a 2x10. I took the four screws on the sides completely out. Them grabbed some 16 penny nails and nailed the emim with contacts down to the board leaving about 1.5" roughly above the emim. Cut the nail heads off with a bolt cutter. Which gave me enough room to slide the emim up enough to get the last two screws out. I carefully lifed the top section off enough to see that there are two more brass screws that bolt into the board that holds the mylar in place and makes contact via a wire to the external leads see picture.
Lifting up enough to get the 1/4" brass nuts off the front came off with out problem. I cleaned up the bolts and nuts with brasso (took about an hour). Put the assembly back together which was a PITA to get the tiny nuts back on. I took a measurement a crossed the screws before I put it back together and got 3.4Ω's but once I put it back together it read 7.6Ω's Better but not good enough, should have removed the brass nuts that hold the external leads on and cleaned them I guess...
When I get another chance I'll tear it back down and go and find new nuts and bolts and try again. Corrosion is definitely the enemy...
I had more pictures but the camera was low on batteries so this is the only one that I got. More later...
Cheers
Army
So today reread the emit repair thread and decided tonight I'd screw up my courage and at least try to see what was the problem. One measured 68Ω's and the other 45Ω's so I had a feeling they weren't toast since I still had some resistance.
There are six screws that hold them together that use a cap type of nut with a shallow phillips head. I loosened them before I made a crude fixture out of a 2x10. I took the four screws on the sides completely out. Them grabbed some 16 penny nails and nailed the emim with contacts down to the board leaving about 1.5" roughly above the emim. Cut the nail heads off with a bolt cutter. Which gave me enough room to slide the emim up enough to get the last two screws out. I carefully lifed the top section off enough to see that there are two more brass screws that bolt into the board that holds the mylar in place and makes contact via a wire to the external leads see picture.
Lifting up enough to get the 1/4" brass nuts off the front came off with out problem. I cleaned up the bolts and nuts with brasso (took about an hour). Put the assembly back together which was a PITA to get the tiny nuts back on. I took a measurement a crossed the screws before I put it back together and got 3.4Ω's but once I put it back together it read 7.6Ω's Better but not good enough, should have removed the brass nuts that hold the external leads on and cleaned them I guess...
When I get another chance I'll tear it back down and go and find new nuts and bolts and try again. Corrosion is definitely the enemy...
I had more pictures but the camera was low on batteries so this is the only one that I got. More later...
Cheers
Army