• The move to the new server is done. There are some software and database maintenance updates in process. This has us passing the hat around to help out. We appreciate any donations. Seriously, even a dollar helps. The payment page may be found here - https://www.audiokarma.org/support.html

Fixed one of my borked Yamaha M-80 amps

brutal

YamaHoarder
Subscriber
One of my Yamaha M-80's developed a weak channel problem some time back and I finally got her up on the bench for a look.

Cap glue causing corrosive failures. The 220uF Rubycon was the only really munged component and the sole reason for the weak channel. Durn unreliable overheating M-80's...:rolleyes:

DSC_5897.JPG
DSC_5898.JPG


She got new caps where needed, the new 1000uF being 1/4 the size. The Rubycons are unobtanium so it got the best Nichicon audio grades I could find at Mouser. Most resistors in the corrosive area are getting replaced as well. The zeners in the area are unscathed and even though I have the parts available, I'm going to leave them be since it's working again.

UFW2A102MHD.JPG
 
Last edited:
Register to hide this ad
M-80's do run hot in class A, but that's the nature of class A amps.
 
Last edited:
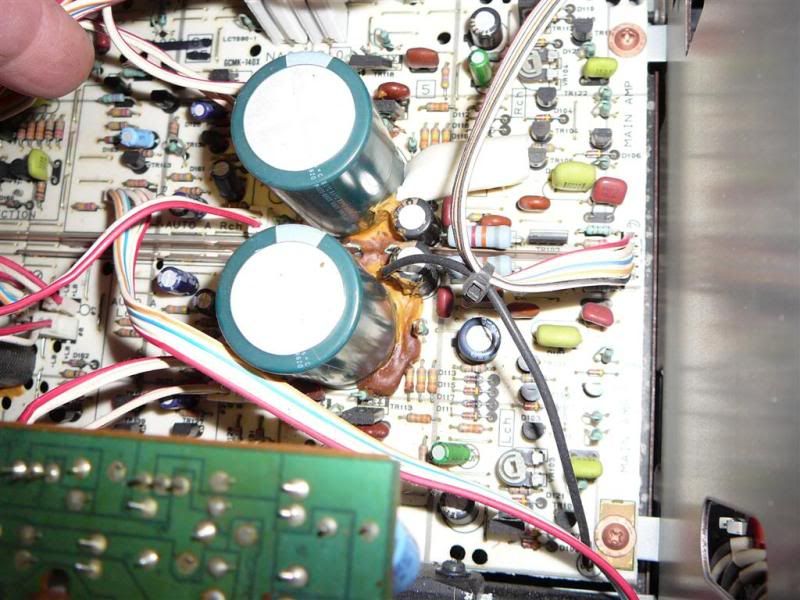
Just picked up a Yamaha M-85 for cheap..weak left channel...Hmm...looks like adhesive machine blew its nose on the main board!:D

Is there any reason this much cap glue was necessary? What's the best way to get it off?
P1170033Large.jpg
 
I bi-amp a pair of AR9s with an M-80 on the low end and an M-65 for the highs. Almost never use "class A". Both stay pretty cool unless the volume knob gets cranked for an extended period of time.
 
Just picked up a Yamaha M-85 for cheap..weak left channel...Hmm...looks like adhesive machine blew its nose on the main board!:D

Is there any reason this much cap glue was necessary? What's the best way to get it off?

They used glue to hold medium size components in place for wave soldering.

I use a combo of picks and surgical blades with a judicious application of MEK and industrial swabs. Just enough work to remove the glue while leaving the silk-screening in place.
 
a judicious application of MEK

Whoa MEK! Doesn't that dissolve plastic? Just scraping it off worked for me (on a 70's Yamaha). I used a needle to remove glue under the cap. Judging by your picture it looks that there's not enough space to do that, so I'd desolder the 2 big caps first.
 
Just picked up a Yamaha M-85 for cheap..weak left channel...Hmm...looks like adhesive machine blew its nose on the main board!:D

Is there any reason this much cap glue was necessary? What's the best way to get it off?
P1170033Large.jpg

Elbow grease.

Most of mine just flaked off once you get it going. I used small picks, akin to dental tools and a small jewler's type flat blade screwdriver.

Look closely for corroded resistor, diode, and transistor legs. I knew I was recapping all the electros except the main supply caps so I merely made notes and took pictures of what went where, then removed the components, started cleaning, then found more collateral damage on a few other tidbits.
 
Good info. I haven't started the glue removal and recap, I have a few others ahead of it inline. Wasn't sure how difficult it was to remove the glue. :thmbsp:
 
I had this on one amp whereby I used denatured alcohol(one time only experience) which seemed to harden/crystalize the glue whereby I was able to pretty much "chip" it away...kinda rudimentary but the amplifier seemed to run much cooler afterward.
 
Whoa MEK! Doesn't that dissolve plastic? Just scraping it off worked for me (on a 70's Yamaha). I used a needle to remove glue under the cap. Judging by your picture it looks that there's not enough space to do that, so I'd desolder the 2 big caps first.

Considering I started the thread showing removed caps, I didn't think it necessary to again mention the need for parts removal. The DSBG threads abound on AK and are blatantly clear that there are a handful of parts in the debris field that need to be R&R. MEK will dissolve certain kinds of plastic, it's a standard around here as a glue remover. I don't see any of that plastic on a circuit board and the work is localized so what's the harm? The components themselves are all solvent proof so unless you go crazy and rub the crap out of the silkscreening with too much MEK applied, it comes out great. I also remove the bus bars, polish off the corrosion and buff them with a Dremel and coat with spray lacquer. I guess my standard of repair is more anal than most, but it's my time and off the clock, so why not?

As with everything in life, YMMV and use with adequate ventilation and no open flames nearby. :D
 
Thank you for explaining. No offense meant, I am new to this stuff and was wondering about using small amounts of MEK near (on) PCBs.
 
Thought I'd keep this thread going with my findings. Got into my M-85 tonight. Removed C-162,163, 111 and 112 and have replacements handy. Looks like the debris field includes TR113 and TR124 and the film caps in the vicinity may have to get removed and cleaned up. D119 got some too.

I'm assuming the glue corrodes the conductors and shorts them out? Is removal, testing and cleanup the best course on the TR's and film caps? What about that diode? Don't really want to shotgun this repair.:scratch2:
P1170108Large.jpg


P1170107Large.jpg
 
I replaced all that sort of thing that was corroded, except the bus bars which I cleaned and might have cleaned one leg of one transistor that caught some flack.

For the few pennies the diodes and resistors cost I figured it wasn't worth trying to rescue them.
 
I replaced all that sort of thing that was corroded, except the bus bars which I cleaned and might have cleaned one leg of one transistor that caught some flack.

For the few pennies the diodes and resistors cost I figured it wasn't worth trying to rescue them.

Ditto.

If it can be safely cleaned so there is no trace of corrosion, it's fine. The film caps can be replaced by some modern WIMA or panasonic poly or pps caps.

I think the diodes there are 3V zeners, but consult the schematic, don't take my word for it. I would considering replacing those VR's with some nice Bournes multiturn units. 3299Y is the lead number for the vertical ones. http://www.mouser.com/Search/Produc...virtualkey65210000virtualkey652-3299Y-1-102LF
3299.jpg


There are smaller 3262 series, but I've had better luck using these. The leads on either have to be re-bent to fit the larger hole spacing.
 
Last edited:
These are the zeners I used in my M-80 DSBG fix.

DigiKey P/N:
1N5225B-TPCT-ND
DIODE ZENER 500MW 3.0V DO35

There were also some other diodes I replaced that were not zeners. I didn't look closely at the picture to know if your damaged ones are the zeners or the other ones.

All told, I think I had $25-$30, roughly, in parts before I was satisfied with the cleanup on my M-80. This included replacing all electrolytic caps on the audio boards. Did not include/replace the main PS caps. Wish I would have replace the bias trimmers as brutal has suggested, and may yet do that at some point.
 
Last edited:
Back
Top Bottom