Wigwam Jones
Caesar non supra grammati
PART ONE OF TWO
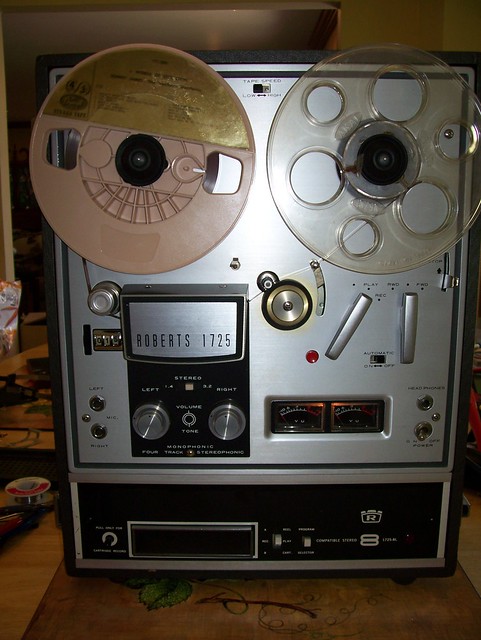
I bought a vintage 1967 Roberts 1725-8L (not the more popular 1725-8L III) on eBay the other day from a local seller. This was one of the last units that Robers (actually, Akai) built with vacuum tubes. It has a built-in 8-track tape player/recorder in the base (not on the side like some later units). The 8-track unit was built in the USA by auto parts maker Lear in Detroit; the rest of the unit was built in Japan, of course. The tube lineup is NEC 6CA4, NEC 12AT7 (x2), and Telefunken ECL82 (6BM8) x 2. It has two internal 5x7 speakers, quarter-inch jacks for external speakers, and pre-out / record in RCA jacks.

100_4051 by Wigwam Jones, on Flickr
Worked great for a couple hours. I noticed that the volume and tone controls were very scratchy (not uncommon), and then in the morning when I went to turn the unit on, the power came on but the motor for the reels was not running. This is not uncommon. I opened the back access cover and noticed that when I put the unit in fast-forward or rewind position, the fan 'tried' to start and did not start spinning. That is also a common indicator of a failed motor-run capacitor. Another common symptom is when the tape plays but the motor really seems to drag, or it speeds up and slows down. Sometimes this is thought to be a bad belt, when it is really the motor-run capacitor. Fortunately, they can be pretty easy to replace.
A motor-run capacitor is used on many single-phase motors such as refrigerators and washing machines and overhead fans. They require a special kind of capacitor to keep them going; if the capacitor fails, the motor won't run.
Fortunately, I had ordered a couple replacement caps for another reel-to-reel that I have, and I had not yet used them. I determined that the old capacitor was a 2uf unit, and I had two 1uf and one 3uf motor run capacitor. I could have put the 3uf in series with a 1uf and gotten 2uf, or I could have put the two 1uf capacitors in parallel and gotten 2uf; I elected to do the latter. The important thing is to try to get as close as possible to the original value. If necessary, go over slightly, but not under. Also, have at least the voltage value of the original; it is better to go over, but not under. Mine are rated at 400VAC, which is nearly double the original rating. That's fine. I got them off eBay, they were very cheap. Couple bucks.
You will need a few tools, besides the replacement capacitor. A couple screwdrivers to remove parts, a soldering iron and solder, some electrician's tape to make the new solder joints insulated from short-circuit. Needle-nose pliers are good to have handy, as well as something magnetic to pick up tiny parts. It's a good time to do other maintenance work like cleaning the heads and capstan and other metal parts in the tape path, so you'll need alcohol and swabs for that. The faceplate of the unit has to come off, and you'll want to clean that up too; great time for it.
Observe safety precautions, of course. Unplug things. Use safe practices, remember that enough voltage lurks inside this unit to kill you stone cold dead. Large capacitor store energy. That means they can zap you and murder you and then your widow has to sell your crap for next to nothing at a garage sale and your neighbor whom you hate will be flipping your stash of Telefunken tubes on eBay while your widow eats cat food and who wants that? So be careful, goofy.
First you have remove the inspection panels on the back.

100_4052 by Wigwam Jones, on Flickr
The motor-run capacitor is located next to the motor, labeled 'MP'.
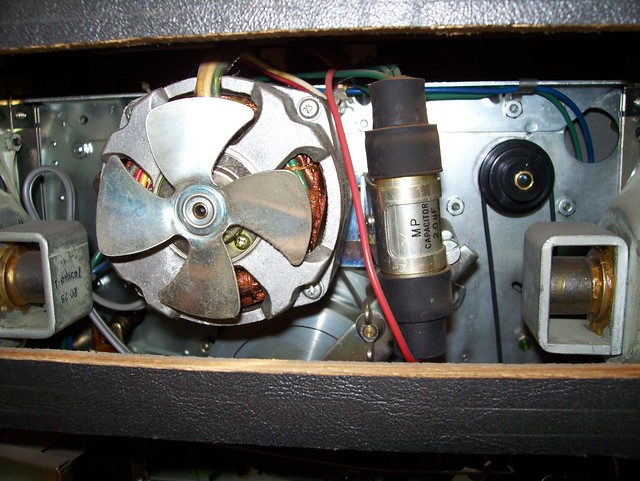
100_4053 by Wigwam Jones, on Flickr
Here are the tubes, ain't they pretty? And Telefunkens? SWOON.

100_4054 by Wigwam Jones, on Flickr
Another view of the motor-run capacitor.
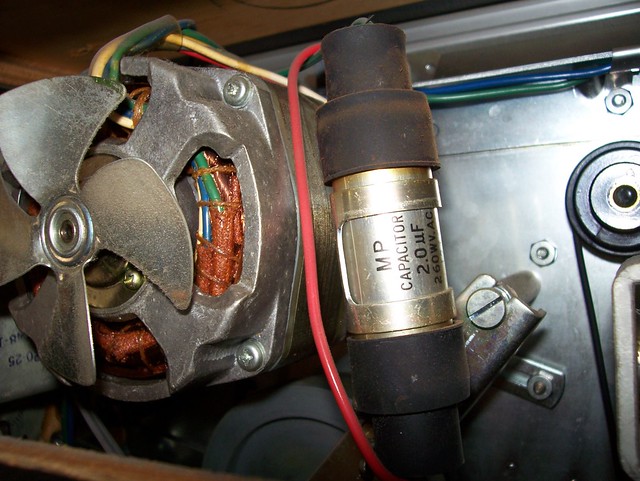
100_4056 by Wigwam Jones, on Flickr
The front panel has to come off to get access to the bracket that holds on the motor-run capacitor, so first I have to remove all the knobs and the plate over the heads and the pinch roller. Don't worry, none of the parts are spring-loaded, nothing flies off and runs under the damned sofa or gets eaten by the dog.

100_4057 by Wigwam Jones, on Flickr

100_4058 by Wigwam Jones, on Flickr

100_4059 by Wigwam Jones, on Flickr
Here is what it looks like all naked. Don't worry, you don't have to deal with any of this stuff.

100_4060 by Wigwam Jones, on Flickr
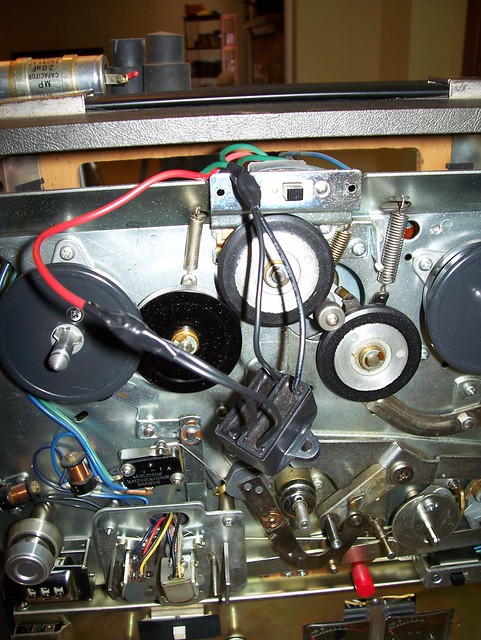
In the four corners of the frame are four screws. Remove those, and the whole unit tips out. Don't try to remove it entirely, it is attached with some wires (the are plugs, you could pull them out and replace them later if you wanted to, but there is no need) and a mechanical linkage (I think for the record setting). I could have removed the plugs and the linkage, but that's a hassle I did not need. Once I removed the screws, I just carefully tip the unit forward to expose the bracket for the motor-run capacitor.

100_4064 by Wigwam Jones, on Flickr
So there it is, that rat-bastard. Again, be careful here. This thing can hold a whole lot of charge and could end you fast and easy. Don't be a dead guy, it's not really any fun.
Here are my replacement caps. Not really the same form-factor, but they do the same thing. Remember, I'm going to put them in parallel to create a total of 2uf value.

100_4066 by Wigwam Jones, on Flickr

100_4067 by Wigwam Jones, on Flickr
Old dead cap.

100_4068 by Wigwam Jones, on Flickr
Continued on PART TWO
I bought a vintage 1967 Roberts 1725-8L (not the more popular 1725-8L III) on eBay the other day from a local seller. This was one of the last units that Robers (actually, Akai) built with vacuum tubes. It has a built-in 8-track tape player/recorder in the base (not on the side like some later units). The 8-track unit was built in the USA by auto parts maker Lear in Detroit; the rest of the unit was built in Japan, of course. The tube lineup is NEC 6CA4, NEC 12AT7 (x2), and Telefunken ECL82 (6BM8) x 2. It has two internal 5x7 speakers, quarter-inch jacks for external speakers, and pre-out / record in RCA jacks.
100_4051 by Wigwam Jones, on Flickr
Worked great for a couple hours. I noticed that the volume and tone controls were very scratchy (not uncommon), and then in the morning when I went to turn the unit on, the power came on but the motor for the reels was not running. This is not uncommon. I opened the back access cover and noticed that when I put the unit in fast-forward or rewind position, the fan 'tried' to start and did not start spinning. That is also a common indicator of a failed motor-run capacitor. Another common symptom is when the tape plays but the motor really seems to drag, or it speeds up and slows down. Sometimes this is thought to be a bad belt, when it is really the motor-run capacitor. Fortunately, they can be pretty easy to replace.
A motor-run capacitor is used on many single-phase motors such as refrigerators and washing machines and overhead fans. They require a special kind of capacitor to keep them going; if the capacitor fails, the motor won't run.
Fortunately, I had ordered a couple replacement caps for another reel-to-reel that I have, and I had not yet used them. I determined that the old capacitor was a 2uf unit, and I had two 1uf and one 3uf motor run capacitor. I could have put the 3uf in series with a 1uf and gotten 2uf, or I could have put the two 1uf capacitors in parallel and gotten 2uf; I elected to do the latter. The important thing is to try to get as close as possible to the original value. If necessary, go over slightly, but not under. Also, have at least the voltage value of the original; it is better to go over, but not under. Mine are rated at 400VAC, which is nearly double the original rating. That's fine. I got them off eBay, they were very cheap. Couple bucks.
You will need a few tools, besides the replacement capacitor. A couple screwdrivers to remove parts, a soldering iron and solder, some electrician's tape to make the new solder joints insulated from short-circuit. Needle-nose pliers are good to have handy, as well as something magnetic to pick up tiny parts. It's a good time to do other maintenance work like cleaning the heads and capstan and other metal parts in the tape path, so you'll need alcohol and swabs for that. The faceplate of the unit has to come off, and you'll want to clean that up too; great time for it.
Observe safety precautions, of course. Unplug things. Use safe practices, remember that enough voltage lurks inside this unit to kill you stone cold dead. Large capacitor store energy. That means they can zap you and murder you and then your widow has to sell your crap for next to nothing at a garage sale and your neighbor whom you hate will be flipping your stash of Telefunken tubes on eBay while your widow eats cat food and who wants that? So be careful, goofy.
First you have remove the inspection panels on the back.
100_4052 by Wigwam Jones, on Flickr
The motor-run capacitor is located next to the motor, labeled 'MP'.
100_4053 by Wigwam Jones, on Flickr
Here are the tubes, ain't they pretty? And Telefunkens? SWOON.
100_4054 by Wigwam Jones, on Flickr
Another view of the motor-run capacitor.
100_4056 by Wigwam Jones, on Flickr
The front panel has to come off to get access to the bracket that holds on the motor-run capacitor, so first I have to remove all the knobs and the plate over the heads and the pinch roller. Don't worry, none of the parts are spring-loaded, nothing flies off and runs under the damned sofa or gets eaten by the dog.
100_4057 by Wigwam Jones, on Flickr
100_4058 by Wigwam Jones, on Flickr
100_4059 by Wigwam Jones, on Flickr
Here is what it looks like all naked. Don't worry, you don't have to deal with any of this stuff.
100_4060 by Wigwam Jones, on Flickr
In the four corners of the frame are four screws. Remove those, and the whole unit tips out. Don't try to remove it entirely, it is attached with some wires (the are plugs, you could pull them out and replace them later if you wanted to, but there is no need) and a mechanical linkage (I think for the record setting). I could have removed the plugs and the linkage, but that's a hassle I did not need. Once I removed the screws, I just carefully tip the unit forward to expose the bracket for the motor-run capacitor.
100_4064 by Wigwam Jones, on Flickr
So there it is, that rat-bastard. Again, be careful here. This thing can hold a whole lot of charge and could end you fast and easy. Don't be a dead guy, it's not really any fun.
Here are my replacement caps. Not really the same form-factor, but they do the same thing. Remember, I'm going to put them in parallel to create a total of 2uf value.
100_4066 by Wigwam Jones, on Flickr
100_4067 by Wigwam Jones, on Flickr
Old dead cap.
100_4068 by Wigwam Jones, on Flickr
Continued on PART TWO