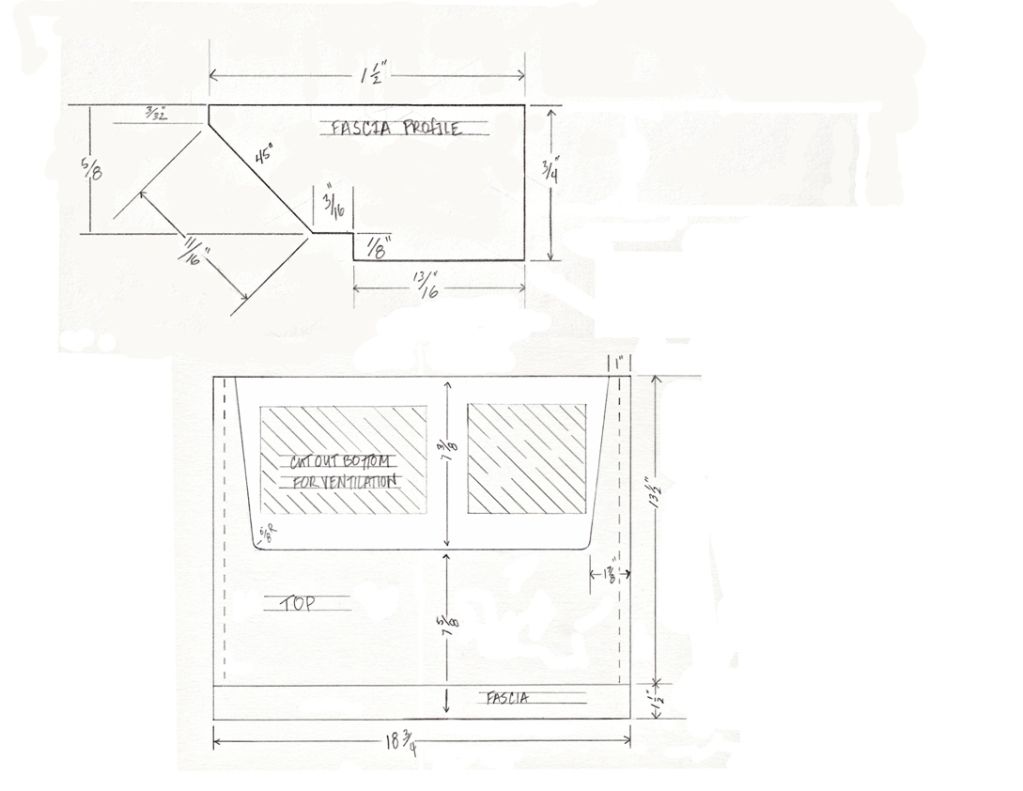
decorative detail. It's a very small gap between the main cabinet and the fascia. Serves no purpose other than to serve as a transition from the cab which is made up of plywood and veneer, and the fascia which is a solid piece of walnut.


-
Feeling lucky? Check out the AK 24th Anniversary Giveaway thread and join in the fun!
You are using an out of date browser. It may not display this or other websites correctly.
You should upgrade or use an alternative browser.
You should upgrade or use an alternative browser.
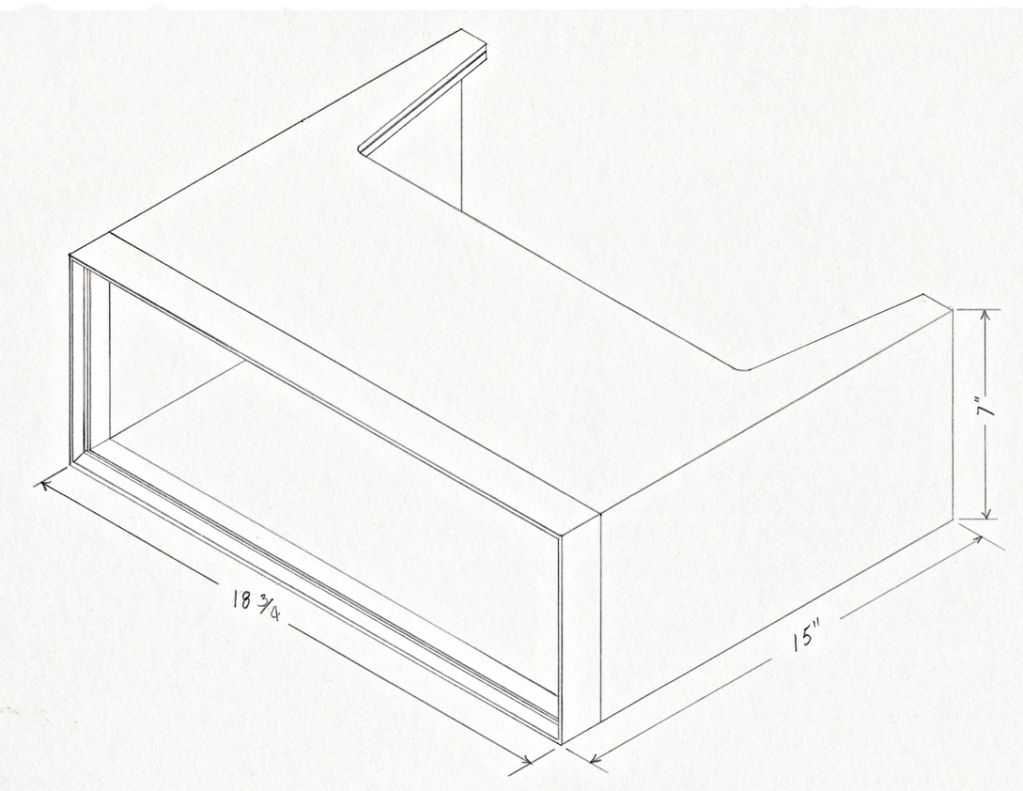
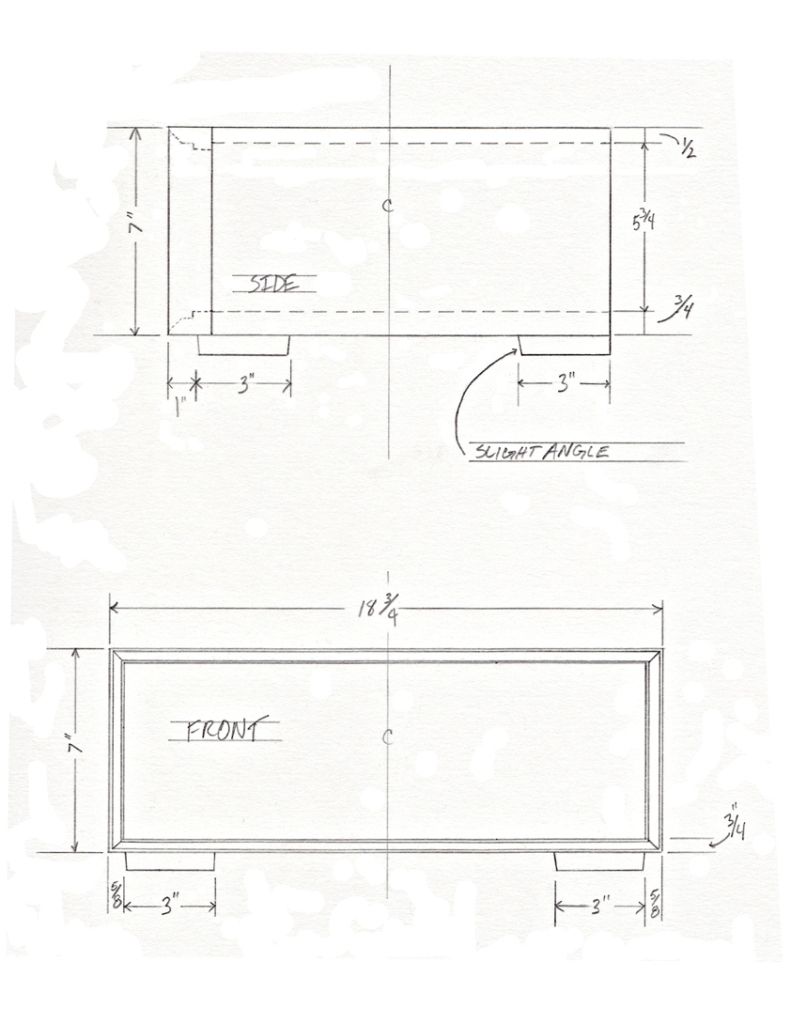
Cabinet Plans From My 800c
- Thread starter marloubow
- Start date
Arthur Minor
New Member
Yeah that's what I thought. I will be attempting to do one this week. Just wanted to know how they put that there and why haha. But it does look better with it theredecorative detail. It's a very small gap between the main cabinet and the fascia. Serves no purpose other than to serve as a transition from the cab which is made up of plywood and veneer, and the fascia which is a solid piece of walnut.
Yeah that's what I thought. I will be attempting to do one this week. Just wanted to know how they put that there and why haha. But it does look better with it there
Solid wood also tends to expand and contract with the seasons whereas veneered plywood is more dimensionally stable. Even a slight change in moisture and temperature can affect it. By leaving a gap, you will not notice any seasonal movement between the solid fascia and the plywood cabinet. If they designed it to be flush without a gap, you would notice the seasonal movement a little.
Arthur Minor
New Member
ok makes perfect sense. So how did you join the front to the body?Solid wood also tends to expand and contract with the seasons whereas veneered plywood is more dimensionally stable. Even a slight change in moisture and temperature can affect it. By leaving a gap, you will not notice any seasonal movement between the solid fascia and the plywood cabinet. If they designed it to be flush without a gap, you would notice the seasonal movement a little.
Arthur Minor
New Member
Sorry. I just read the answer. Thanks! I will try mine this weekSolid wood also tends to expand and contract with the seasons whereas veneered plywood is more dimensionally stable. Even a slight change in moisture and temperature can affect it. By leaving a gap, you will not notice any seasonal movement between the solid fascia and the plywood cabinet. If they designed it to be flush without a gap, you would notice the seasonal movement a little.
... So how did you join the front to the body?
In my case I had a roll of iron-on edging that I put on the box opening. That gave me the perfect gap. I used biscuits to attach the fascia.
Arthur Minor
New Member
Yeah I think I will use dowels and maybe a credit card. I just have to get started...
Arthur Minor
New Member

Finally freakin done!!!
Arthur Minor
New Member

This is Day 1
Last edited:
Very nicely done!!!
Arthur Minor
New Member
Thanks!Very nicely done!!!
Reyhifi
Well-Known Member
Nice, and awesome work in here. I been practicing my freecad skills, I did and exact replicas of the 500T and RS 2015, I plan to do some changes easier to do since I'm doing it using parametric. I would have done at least one this year, but my woodworking class went into caos, covid. But we'll be back.
Attachments


Hi all!
I've been meaning to do this for quite some time and now at the 1st "birthday" of my 800c, I thought it as good as time as any...Happy Birthday!
The facia (front trim) was the most difficult and suggest practicing on some lesser wood stock until your Fisher faceplate fits just right. Mastering the miter joints is critical...unless your fond of wood putty.
I hope someone gets some use out of these.
If there is enough interest, I documented (with photos) the approach I took to build mine and would work up some sort of presentation.
It would be long and not for the faint of heart.
Thanks again for all the help.
Martin
P.s. I just took a bias reading the other day for the first time since last august...only V10 was off and just a tad at that. :thmbsp:


Hi, I have a H.H. Scott 340B that I'm in need of a case. It would be great if someone has done this same type of blueprint for that receiver and post it here. Thanks.
Mark