• The move to the new server is done. There are some software and database maintenance updates in process. This has us passing the hat around to help out. We appreciate any donations. Seriously, even a dollar helps. The payment page may be found here - https://www.audiokarma.org/support.html

Sony PS-X7 speed problems

Blue Shadow

Waiting for Vintage Gear from this century
I CLed this tt years ago about the same time my brother expressed an interest in owning a turntable, darn. Dust cover was perfect, never had the clinging plastic removed. Oh well, I'll check it out and I ended up giving it to him for a BD present. But it first needed to have an erratic hitch in its speed corrected and of course some old dried greaseglue replaced with a lubricant.

I thought the speed issue was corrected with a recap but it came back. Of course, my brother didn't use the table much and stored all sorts of things on top of it but he is about to set it up again and while I was there tonight I looked it over. Seems to operate, needing a bit of moisture on your fingers to cycle the capacitance switches but it has a fairly quick blip to the speed, dropping out and quickly returning.

I didn't clean the VRs in the unit and reset them previously and have read that this is a solution to the problem so I'll give that a try and see if it helps. Table is worth the work as it is a good one. Maybe I can learn enough to get a PS-X5 I have here fixed, too. Its issue is the arm has a mind of its own and it swings wildly when the table is activated in an automatic mode.
 
Register to hide this ad
Just checked and he got the table for Christmas in 08 and added a Denon DL-160 when they were cheap. Low hours on that one and I have a Shure V-15 II with a low hours SAS stylus to compare and see what he likes. He did mention he liked the sound of the Shure cartridges. I might have to swap with him.
 
Looked at this table today and checked the hitch in its speed. Both speeds, consistent bump in the strobe indicating bad speed. Fairly rapid and even. Pulled the lower panel looked at the manual and thought about going through the set up procedure for the electronics. But I had done some of that previously when the table was recapped. Since I didn't clean the pots, figured I would do that and well that one shot of DeoxiT did the trick so far. I'll put it in the main rig and give it a listen for a while and see what is up. Hopefully that quick cleaning of the speed pot was all that is needed to make this one good again. Damn home-techs no doing the whole job the first time. But I do get a chance to listen to the DL-160 that is near new.
 
That sounds encouraging. Hey since you have an X5 and worked on the X7 I have to ask if you know, can the tonearm wires be changed without pulling the tonearm off the board ?
 
A blip in the speed is typical of the head gap/placement for the magnetic strip not being correct. Adjustment is easy as per SM. Basically cut a folded business card into a strip and place it between the head and the platter mag strip, loosen the head screws and slide it against the card. Remove the bit of card- the spacing will be perfect.

I just did another two of these units and I always pull the touch contacts (power/size/touch plate has 2 screws underneath and 1 under the right screw-in foot) lift the panel up and out out and remove (unscrew) the touch plate. The wires are long enough to do this easily. Polish the touch plate exposed contacts with metal polish. They will never need a 'moist' finger again.

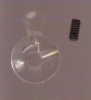
While you are in there, check the clear plastic record size cam for cracking damage- it is secured by one tiny grub screw and it cracks. Once it cracks all the way through, you have no auto-positional cueing function. Don't tighten it if it is cracked.

This is typical of what happens- see the bubble flaw in the molding? The single grub screw presses against the brass shaft, which is round and the force of the grub screw over the years, creates a crack and it skids. People tighten it to stop the skidding and it cracks all the way across.
IMAGE0001.JPG

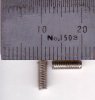
The fix involves making some tiny grub screws from small machine screws and tapping them in across the crack.

grub_screws.JPG


If all is OK, place the pin of the record size cam in line with the knob when you place the plate back in the deck and cycle it to make sure it has latched correctly.

This is the contact plate after a polish:

IMAGE0002.JPG
 
Last edited:
Why did you recap?
It is what we do. Did it so long ago to fix the inconsistent hitch in its giddy up and it worked fine. This speed inconsistency was completely different. Now it holds speed just fine.

The issue right now is setting the 30cm set down point/end of record pick up point and such. The white collar on the tonearm with two set screws is cracked completely at one screw making adjustment difficult but it seems to be associated with the set down/pick up locations. This table is close and I'll look at it some more and maybe come up with a game plan to resolve the cracked issued. With the system the way it was the set down was just outside the record lip and the control was fully adjusted to put the set down closer to the spindle. Messing with that double set screw thing changed that completely, more adjustment needed I guess.

Too damn much auto crap in there. One reason I like manual tables. But I'll keep working on it.

Might have to address the contact plate, too since I'm there.

@Rog50, I'll look at the wiring and see if it is something simple.
 
While you are in there, you should check out the thrust bearing. Most people ignore this but the whole platter spins on it. (not the cause of your problem, but can become a problem of its own). Remember, this table is 30 years old (I have one, too).
 
Agree with WaynerN- pull the bearing thrust plate and clean/lube the shaft. Quite a fiddly job however as the motor needs to come up from the top before you can get to the thrust bearing. Not for the faint hearted.

Sony's spindle bearing sleeves on that series (PS4300/PSX5,6,7) were in my opinion not hard enough. Every one I've seen has had lateral play in it. A viscous synthetic motor oil goes a long way to preventing bearing rumble in those units.

Oh, another common issue is a random flickering strobe. The speed is spot on, but the neon flickers, the platter markings showing stationary lines in between the flickers- it also seems a bit dim.

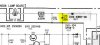
It is not a dying neon, it is a dying capacitor. C106 is a 2.2uF 250v capacitor that smooths the half wave rectified supply to the strobe indicator neon. That smoothed supply is in turn switched at a high frequency by the quartz divided drive signal.

When the cap dies, the strobe is only lit at semi random times in the 50/60Hz cycle.

As it is a small, low value, but high voltage electrolytic cap, time has not been kind to it.

c106.JPG
 
Last edited:
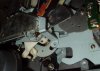
Let's address all these mission creep situations mentioned. But first for your viewing pleasure, we all like pictures, here is the cracked ring on the tonearm.
X7-cracked ring.jpg

Setting the position of that ring on the tonearm is the primary issue with getting this table up and running properly as far a set down in the lead groove area and end of play return being in the lead out groove area instead of in the middle of the last song. but then I don't know about all those rube goldberg contraptions bolted into the unit. Little steps.

But I would like to fix the cracked ring and thinking of a way to do that.

The mission creep issues, the bearing and lube. I do not think this table was use a lot. I picked it up and the original plastic on the dust cover was still on the unit and only a bit loose in some areas. It would have been a lot worse if this table had a lot of use. I'll consider this.

The strobe light. I have one that flickers. The 2.2µF/250V cap was replaced less than ten years ago and I used a fantastic, high quality, perfect replacement for the original available from a reliable supplier, Mouser. Then my brother didn't use the table much since he doesn't use the stereo too much anyway. I swapped the lamp for one in another PS-X table and the flicker stopped. This was easier than a cap change. But this does not mesh with my idea that this table is a low wear unit. But the lamp stays on whenever the table is on and powered not just when the platter is turning.

I think what we need to do is determine how to replace this Neon with a new neon bulb to maintain the performance of the strobe. I don't want to put an LED into this system and the replacement neon bulbs seem to be low output compared to this one. I haven't tried putting a regular bulb into the unit, yet, happy with the 'original' replacement.

Now on to the clear disc and its cracks. It is still solidly affixed to the record size shaft but I have the Allen bolts needed for the repair. Seem to be 1.5-2mm x 7mm and I have the right allen key to use them. Guess I should install one before the piece cracks completely.

Since we have a good size selector so that is not part of the set down position and that is related to the cracked white ring on the tonearm, any hints as to what I'm trying to rotate and how to properly locate it when I get that ring fixed into position?

Guess I gotta polish the switch contacts, too since that is part of this discussion.
 
So to clarify:

You have an intact 'clear disc' (the one attached to the record size rotary switch under the operational panel) Named 'size selector' in the S/M)

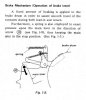
But you have a cracked white nylon shaft sleeve piece in the brake drum assembly.

The brake drum isn't under much force IIRC, I think you could release the grub screw's force, clamp a small nylon zip tie right right around the collar, run some epoxy on and around the zip tie, let it set and then tighten the grub screws again.

You can hunt for larger neons for TT strobes. It is becoming increasingly difficult to find the bigger, brighter variety as the tiny Chinese ones are now dominating the market. I used to fish through the parts drawers for old stock at electronic retailers to find them. Back in late 80s, Radio Shack had twin packs of decent sized neons- I'll dig out the part number for you. It would be possible to use a nice high intensity LED/s and power it from the 5v line- disconnect the neon supply altogether.

I've sent the PS-X6 and PS-X7 back to their owners, so i can't test the LED strobe idea.
 
Last edited:
I need to look at the clear disc in the daylight, but have have grub screws to fix it if necessary. Right now it is holding properly to the size selector.

I have been thinking about how to handle the cracked white ring on the tonearm. Thanks for those hints as I didn't know they force needed on the screws to hold it in place. It does seem to be the key to the set down, lift off positions with the additional adjustment of the set down point. But one must put these parts in the proper place to allow the adjustment to work. Should be sunny tomorrow for a good look at what is going on.

Happy Boxing Day.
 
I have reinforced a good record size selector 'clear disc' and will advise careful use of the selector.

I have used your idea of a zip tie and gluing that in place on the brake lever assembly where it attaches to the tonearm. I was not able to shrink the crack but maybe the added support won't flex the part as it did previously and it will hold position.

Question is where to position the brake drum assembly for proper operation. It seems to determine the lead-in set down and the lead-out lift points, with a fine adjustment of the lead-in done with its adjustment adjacent to the tonearm. I'll check the manual for info on this but if someone knows or has pics that info/image would be a good start.

Touch switches cleaned. Watching glue react until hardened.
 
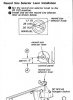
I'm sure you're familiar with the S/M for this unit, but I can confirm the initial setting of the clear-disc on the size selector shaft is pretty critical to enable a full range of adjustment on the brake drum for set-down points.

Capture.JPG

It's virtually impossible to estimate 5 degrees on that piece. I just shifted it down slightly from horizontal, then added a bit more. Scientific, I know...
 
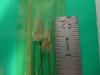
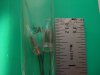
These are the larger Neons I got decades ago from Tandy (Radio Shack). They changed the cat number and they became smaller. Those old ones are still bigger than most you can buy these days.

IMG_1893.JPG
IMG_1892.JPG

IMG_1894.JPG

IMG_1895.JPG

These are just average size I reckon, but still bigger than the Chinese ones which have very short non-parallel internal electrodes and are not bright at all.
IMG_1896.JPG
 
Thanks John, The record size clear disc has not been moved, reinforced in situ. That one will be fine but that info might help with the X5 that has a mind of its own when started. The arm shoots back and forth before it lowers somewhere. I'll be learning on the 7 and maybe put some of that knowledge to use on the 5 and see if I can save that one. I guess I'll try to put the brake drum so that the lead-in adjustment is centered when correct. Probably closest to factory doing that.
 
Back to report the clear disc has JBWeld and some fiberglass smeared on it to hold it together and a note in the operations manual addendum about take it easy with that control. Should be fine.

The crack in the white plastic, part of the brake drum has been zip tied and JBWelded in place, thanks for the idea to use a zip tie, @restorer-john. This did not shrink the crack in the unit but I believe it will not allow the crack to widen as the set screws are installed. The brake drum has been adjusted and after a few tries with the position of the brake drum and the position of the lead-in adjustment we are getting close. I'll try it tomorrow for lead out lift off and see if the position of the brake drum is correct. Lead in was adjustable within the scope of that particular adjustment control.

I think we are getting somewhere.

Let's talk about those neon bulbs. They say they are NE-2H and those have specific specs. I guess they are larger than the replacement for the NE-2H but why won't the new bulbs work in this circuit? I know that with 120VAC going to the lamp, one needs a much higher resistance, 20-40KΩ instead of the 8.2k 1W resistor in the circuit. Do the shorter bulbs put out way less light? I have one I put in a plastic tube to use as the light source for my HK record weight with its strobe markings and it works fine. Haven't checked light output. Be nice if we had a solution to the lamp issue, maybe even getting some vintage new indicator lamps where the neon is installed in a colored housing and cannibalize these for the proper bulb if new bulbs are going to work well for this application.
 
Last edited:
Got the table hooked up to the rig and it works just fine. speed is dead on (based on the non-flickering, steady neon lamp, lead-in set down is great, after the steep slope of the record rim right in the sweet spot of the groove and end-of-record lift is fine as it plays the whole record and stops after the play.

This has given me some confidence to take another look at the PS-X5 I have here that belongs to a friend. When automatically started the tonearm acts like it is swatting flies, whipping back and forth from rest to spindle and back. Something has to be out of place for that to happen. Be nice if the manual steps me through getting it set up to work again.
 
Sounds like it could be the brake. Perhaps it is binding just enough to stretch the plate spring and causes it to 'let go' and the arm to shoot across the record?

Check the pivot shaft of the brake arm and slide plate for grease that has become sticky. Sony's grease turns into the equivalent of the cassette deck 'soft eject' plunger grease.Evil stuff.

psx6-7.JPG

I've got a PS-4300 here in pieces, but I won't be doing it for a few weeks. (same mechanism IIRC). I can have a look it for you if you like. I have to re-familiarize myself with the brake drum function. I had to clean and re-grease the X7 to ensure smooth arm travel- it was jerky. At first, I blamed the cueing lift rubber on the underside of the arm. That was half the problem, the rest was in the brake assembly.
 
Back
Top Bottom