

You are using an out of date browser. It may not display this or other websites correctly.
You should upgrade or use an alternative browser.
You should upgrade or use an alternative browser.
Yamaha PX-3 photointerrupters and other issues causing problems
- Thread starter Fishead
- Start date

The parts list shows the resistor as 10W 56 Ohm. I can't seem to find it on the schematic. As I said, after playing it a few days, the heat has gotten much less, can barely feel it now. Of course no telling the last time it was played. Should I try to find a replacement?


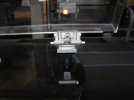
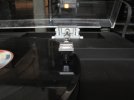
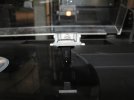
So doing what you said about leveling the Yamaha shell I used a tonearm I'd pulled off a table. Put the shell in and put pressure going clock-wise. Also put another cart on. Looks like it's 90 degree vertical, horizontally level now. Not sure if it was the twisting or the cart.
Last edited:
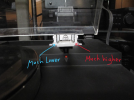

Maybe a little of both? Hard to tell from these pictures so it is difficult to say for sure, but I think I see the headshell is still very slightly higher on the right after doing the twist on it. I also notice from your pictures that the cartridge in the second picture looks ever so slightly higher on the left in relation to the headshell. The combination produces a nicely perpendicular geometry between the record surface and the cantilever, and most likely with the stylus. It might just be worth doing a slight bit more of the twist to see if you can't get the top of the headshell perfectly parallel with the top of the tonearm so things might look like this:

Instead of this:
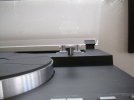
Then, should your cartridge still be a bit higher on the left side, you can get that sorted without too much trouble.
That was good work, amigo, and it left me wondering what I can use to hold the cartridge while turning it to ever so slightly to move that small pin a bit counterclockwise. I don't want to cause any blemishes on the headshell, so it has to be carefully done and your spare tonearm would seem to be just the ticket!
Now, let's turn to why this condition presents with these tables/tonearms to begin with. Since we both seem to be seeing something similar it makes for an interesting situation......wonder if other PX owners might also have seen this??? Giving it a little thought, I suppose it could happen during the affixing of the headshell when turning the knurled nut on the tonearm that "grabs" the headshell and pulls it in. Should one get a little too aggressive (me, when I was 30 LOL), it could happen that the whole headshell might turn counterclockwise, forcing that pin to subsequently lean clockwise, hence the need to move it back a bit counterclockwise to get it to set straight. I'll do a little examining of things and get back to you......carry on, amigo
Hold everything......I would not advise trying to twist that headshell any further as I have now more carefully examined the apparatus and am of the opinion that while the post at the rear/top does "guide" the headshell on to the tonearm, it does have a slight bit of play in it and should allow movement one direction or the other to adjust a very small bit. However, it is the connector itself, the four pins on the back end of the headshell that seat into the receptacle that determine the position and twisting further or harder may very likely do damage to that, so stand down with the twist. That piece with the connector appears to be a separate piece that is stamped in and then looks to be crimped, which makes it nearly impossible to alter the position without doing damage. I'm afraid the only way to get the thing to be perfectly level and perpendicular might be a shim, which is what I believe an AKer suggested when I first posted this issue a while back. There is the possibility, one I haven't examined closely, that removing the tonearm and loosening that screw that holds the receptacle in place might be a way to change the angle, but then you are stuck with it not being right for the headshell that is straight!! Decisions, decisions......think I'll just use a shim if I want to use the other cartridge or just call it good as it is.
That's what I noticed, the crimp, too. So I did not push it any further. As is, it is very close. Sounds fine. I will leave it be. As for now everything is working. Only slow speed advance button to the left does not work, fast speed does. To the right both slow & fast work. But unless I need to open it again, then I will address that. I'll just enjoy a unique TT.
There you go, exactly what I would suggest and when you do go back in, given your description, I might pay a little special attention to the button itself since the sensors seems to be working properly if the 30, 17, and return functions are all working as they should. You can try some Deoxit D5 in there and work it a bunch as a start. From what I understand, those buttons may not be easily available, the double-touch ones, where the single buttons apparently are. You'll just have to do a search on that one amigo. I think it was @Dr. Ear who said this, so might wait for him to chime in but it appears he has dropped out of this thread for now.....
Update: Well, 13 days later (tax day on top of the unlucky number as well...... ) and the PX-3 is still working perfectly!!! I'm knocking on every piece of wood in my immediate proximity!!! Aside from reporting this good news, I also wanted to update this thread in the interest of providing others further information that I have since gleaned through a contact with the good Professor Bizzt, who has been very kind to reply to several emails back and forth on the nature of the PX-3 dilemma. First, it would seem that the photo interrupters for some reason are much more likely to fail in the PX-2 than the PX-3......something to do with having different arms but more than that, I am not certain. Next, for those so inclined to try to DIY as I have done, he does NOT sell the photo interrupters individually but will, as I understand him, when he has the time, replace them for you should that be required and I believe all that you would need to send him is the C Sensor board, which is easy to remove and light as a feather so shipping should be very affordable. I found it enlightening that the sensors in the PX-3 were not as likely to fail, which tends to reinforce my experience because all three are working as intended now so I'm guessing that there was something else, perhaps a bad solder joint after 44 years??? Stuff happens, and as much as I would like to know exactly what the cause was for the malfunctions I'm very content at the moment just to have a fabulously behaving and beautiful turntable!
Some takeaways:
1) Should you be having similar issues with your PX-3, and providing you have the necessary mechanical and soldering skills, remove the C Sensor board and the three photointerrupters. Move the one that is not functioning properly to a position that you either don't use as often, in my case the 45rpm (17) button one, and put the one that IS functioning properly in the position that you do use frequently, in my case the 30 button. I actually did a total swap, moving everything to a new position. I'm pretty sure that this is what rejuvenated things back to working condition as that was the final maneuver resulting in the good outcome.
2) Consider the recapping even though it did not restore the functionality of the table. Others who know far more than I have strongly recommended it and I trust their wisdom. If you are considering this, do a search and you will find information posted by @dlucy giving you a parts list and just follow the directions. You will likely get a bit confused, but just study it and you'll be fine. I also suggest getting on the phone with Mouser, which is where I acquired the new parts, as I was pleasantly surprised to speak with a tech who took all the time needed to go over the list with me, making sure that I was ordering the proper parts and replacements for those that might have been out of stock at the time or no longer available. Their service was super, at least in my experience!
3) Take some time to examine the switch in the rear of the tonearm that has two points and make sure it is opening fully and closing fully as this is what triggers all automated functions on these tables. If that switch somehow remains open, even though it may appear closed, none of the buttons for automated play will work properly. I think that, in part, my issues were somehow related to this switch and after cleaning the points with Deoxit D5 and a bit of fine sandpaper, things suddenly sprung back to life.....although the 30 button was still not working. Previous to this, and after the recap, nothing at all was working!!! It will be well worth your while to insure that this switch is working as intended.
4) Do not assume you have bad photointerrupters out of the gate......they are not always the cause of these kinds of problems and besides, they are no longer made as a drop-in replacement. Yes, you can buy others that can be modified to work, but that is not something I was able to do without further and very detailed instruction. There is a video and some pictures that folks have posted to assist in the process, but nothing that I felt was detailed enough for me to follow......just not that bright or knowledgeable in these matters. Member @Dr. Ear has evidently devised a method of replacing just the LEDs and receptors using the original casing but I was unable to get further clarification from him on how to do this.....he did mention that it was not all that difficult but I suppose that depends on skill level of the operator! I'd still love to hear back from him on how this is done as I'm the curious sort by nature.
That's a wrap, for now, and along with being a very happy camper I'm hoping the next PX-3 owner who has these kinds of problems will be saved some of the long hours (just look at this thread!!!!) to get things going properly again. Carry on, amigos.....
) and the PX-3 is still working perfectly!!! I'm knocking on every piece of wood in my immediate proximity!!! Aside from reporting this good news, I also wanted to update this thread in the interest of providing others further information that I have since gleaned through a contact with the good Professor Bizzt, who has been very kind to reply to several emails back and forth on the nature of the PX-3 dilemma. First, it would seem that the photo interrupters for some reason are much more likely to fail in the PX-2 than the PX-3......something to do with having different arms but more than that, I am not certain. Next, for those so inclined to try to DIY as I have done, he does NOT sell the photo interrupters individually but will, as I understand him, when he has the time, replace them for you should that be required and I believe all that you would need to send him is the C Sensor board, which is easy to remove and light as a feather so shipping should be very affordable. I found it enlightening that the sensors in the PX-3 were not as likely to fail, which tends to reinforce my experience because all three are working as intended now so I'm guessing that there was something else, perhaps a bad solder joint after 44 years??? Stuff happens, and as much as I would like to know exactly what the cause was for the malfunctions I'm very content at the moment just to have a fabulously behaving and beautiful turntable! Some takeaways:
1) Should you be having similar issues with your PX-3, and providing you have the necessary mechanical and soldering skills, remove the C Sensor board and the three photointerrupters. Move the one that is not functioning properly to a position that you either don't use as often, in my case the 45rpm (17) button one, and put the one that IS functioning properly in the position that you do use frequently, in my case the 30 button. I actually did a total swap, moving everything to a new position. I'm pretty sure that this is what rejuvenated things back to working condition as that was the final maneuver resulting in the good outcome.
2) Consider the recapping even though it did not restore the functionality of the table. Others who know far more than I have strongly recommended it and I trust their wisdom. If you are considering this, do a search and you will find information posted by @dlucy giving you a parts list and just follow the directions. You will likely get a bit confused, but just study it and you'll be fine. I also suggest getting on the phone with Mouser, which is where I acquired the new parts, as I was pleasantly surprised to speak with a tech who took all the time needed to go over the list with me, making sure that I was ordering the proper parts and replacements for those that might have been out of stock at the time or no longer available. Their service was super, at least in my experience!
3) Take some time to examine the switch in the rear of the tonearm that has two points and make sure it is opening fully and closing fully as this is what triggers all automated functions on these tables. If that switch somehow remains open, even though it may appear closed, none of the buttons for automated play will work properly. I think that, in part, my issues were somehow related to this switch and after cleaning the points with Deoxit D5 and a bit of fine sandpaper, things suddenly sprung back to life.....although the 30 button was still not working. Previous to this, and after the recap, nothing at all was working!!! It will be well worth your while to insure that this switch is working as intended.
4) Do not assume you have bad photointerrupters out of the gate......they are not always the cause of these kinds of problems and besides, they are no longer made as a drop-in replacement. Yes, you can buy others that can be modified to work, but that is not something I was able to do without further and very detailed instruction. There is a video and some pictures that folks have posted to assist in the process, but nothing that I felt was detailed enough for me to follow......just not that bright or knowledgeable in these matters. Member @Dr. Ear has evidently devised a method of replacing just the LEDs and receptors using the original casing but I was unable to get further clarification from him on how to do this.....he did mention that it was not all that difficult but I suppose that depends on skill level of the operator! I'd still love to hear back from him on how this is done as I'm the curious sort by nature.
That's a wrap, for now, and along with being a very happy camper I'm hoping the next PX-3 owner who has these kinds of problems will be saved some of the long hours (just look at this thread!!!!) to get things going properly again. Carry on, amigos.....
Point 4 was the issue I had. Turned out the PI's were good. The arm lift mechanism was stuck in the lowered position. Arm would not stay up. When I manually worked the lift, it closed the switch and all button functions worked. I kept spraying deox and working the mechanism till it came unstuck and everything worked.Update: Well, 13 days later (tax day on top of the unlucky number as well......
Some takeaways:
4) Do not assume you have bad photointerrupters out of the gate......they are not always the cause of these kinds of problems and besides, they are no longer made as a drop-in replacement. Yes, you can buy others that can be modified to work, but that is not something I was able to do without further and very detailed instruction. There is a video and some pictures that folks have posted to assist in the process, but nothing that I felt was detailed enough for me to follow......just not that bright or knowledgeable in these matters. Member @Dr. Ear has evidently devised a method of replacing just the LEDs and receptors using the original casing but I was unable to get further clarification from him on how to do this.....he did mention that it was not all that difficult but I suppose that depends on skill level of the operator! I'd still love to hear back from him on how this is done as I'm the curious sort by nature.
That's a wrap, for now, and along with being a very happy camper I'm hoping the next PX-3 owner who has these kinds of problems will be saved some of the long hours (just look at this thread!!!!) to get things going properly again. Carry on, amigos.....
Last edited:
Well only that the arm would not lift and then close the switch. Thanks for the help.@gary7 Point 3?
Hi FH. Hope you had a good Easter. So, I picked up a Technics SP-25 couple weeks ago and been playing with it. Hooked my PX-3 back up. Noticed a couple things. 1. The arm, if moved by my hand R&L is pretty stiff. I can move it back & forth, it loosens up some and moves the arm back & forth. Is it supposed to be stiff? 2. If has been sitting down on lead in groove and lifting at lead out groove ok up to about 1/2". But if the lead out groove is around an inch the arm will lift and then drift inward over toward the spindle before moving right back to stop position. What you think?
Hi @gary7. I'm not absolutely clear about your question with regard to moving the arm by hand because that is not how this deck is designed to be used. If you are to move the arm left and right, you would use the << and >> buttons and these, once depressed, should cause the arm to lift up and then in the direction of the arrow you have chosen. The movement should be crisp going up and then, depending on which speed you have selected by how far down you have pressed those buttons, the arm should move either slowly or more quickly in that direction. As far as the pick up at the end of the record is concerned, my deck does the same thing.....it moves into the deadwax and then picks up at a slight angle inward toward the spindle before it stops and then moves right back to the rest position. That, as far as I know, is the usual and expected behavior of the arm when it lifts at the end of the record.
Well, on my Pioneer PL-L1000 you can barely touch the arm and it moves the arm in that direction. It does have a dial type control to manually move the arm. but it's not stiff as the PX-3 pivot. The Pioneer also has a finger lift on the headshell. The PX-3 does not. Just wondered if the arm pivot was suppose to be stiff.Hi FH. Hope you had a good Easter. So, I picked up a Technics SP-25 couple weeks ago and been playing with it. Hooked my PX-3 back up. Noticed a couple things. 1. The arm, if moved by my hand R&L is pretty stiff. I can move it back & forth, it loosens up some and moves the arm back & forth. Is it supposed to be stiff? 2. If has been sitting down on lead in groove and lifting at lead out groove ok up to about 1/2". But if the lead out groove is around an inch the arm will lift and then drift inward over toward the spindle before moving right back to stop position. What you think?
Ok. I lowered the arm in the rest position. The arm is loose now. You can move the arm R or L and the arm base won't move. You can hold the arm base & move it R or L but it's not loose like the L1000. I guess it's made that way. Of course I know it's the tiny offset that moves the arm carriage. I only noticed it because I've had the L1000 for so long.
Last edited:
Here's how mine works, and I believe this is the way it is supposed to be. If you try to move the tonearm at the rest position manually left or right, it is very rigid and will not move. If you use the << button and move the tonearm out of the rest position towards the platter, it will still be rigid UNLESS you push the DOWN button and let the tonearm drop until it stops.....this will be short of the platter, and then if you move the tonearm left or right, it will respond, moving in the direction that you push it in and stopping as soon as you stop pushing it. This is a bit of a tricky maneuver though as you don't want to endanger your stylus, so be cautious and make small movements. Remember that you can press CUT any time and the arm will raise up and return to the rest position.