• The move to the new server is done. There are some software and database maintenance updates in process. This has us passing the hat around to help out. We appreciate any donations. Seriously, even a dollar helps. The payment page may be found here - https://www.audiokarma.org/support.html

Recap parts list for an MX-110 Z??

scootchu

Dear Sir or Madman
Is there a general parts list for a basic recap of a 110? I have the mechanical skills to do the work, but I would not want to screw things up by using the wrong parts. I have read some of the threads relating to the rebuild and they are a great reference. I just need to know what to purchase and where to buy it from.
I am not lazy, I just don't want to do search find a source, order and then find out I should have gone down a few more posts to find the right source. :)

This seems like a good winter project.
 
Register to hide this ad
Its probably a good idea to have a list but the problem is that there were a number of minor production changes made to the MX-110 along its runs in the 60s. This, plus the size of some caps, makes it harder to just spec a bunch of caps in the audio chain in some sort of spreadsheet.

The good news is, though, that there are a few recommendations spread throughout the threads here and in the Hints and Kinks sticky. It will take some research, though.

There are a couple of items that come to mind but you'll need to verify them with others:

- The 2 big can caps are a low-height version made so that they clear the walnut cabinets. That is, pay attention to any replacements you may get that they're not too tall. Also, the customer builder we once had, Zack Engineering, is no longer around. Check the Marantz Model 8 rebuild thread over in Tubes at AK for an alternative way to restuff the old cans. This appears to be an alternative but you'll need to find small enough replacement caps to do the job with the MX-110.

- C93 and C94 can be replaced with a 3.3mf cap with no problems.

- The brown 'dog bone' caps don't usually need swapping out. You can if you want.

There are other little details like that but read through other posts for more details. I forget who did a really good photo job of his restoration in a thread here. This will really help you.

Cheers,

David
 
Thanks David. I read through wcarroll's thread in which he replaced many of the caps on his MX-110 and found it nice to have a fallback reference.

Now were there different verisons of the Z series? How will I know which one I have and which schematic to go by? Take note that I have not even taken the bottom off yet. I don't want to make a false move and destroy something because i had no idea as to the protocol.

I have been searching and gathering, but as of right now I don't have the confidence going into the project that I would like.

As I said I have the mechanical skills, but don't have the technical theory level that many of you do, which can be quite intimidating. After completion of any unfamilar repair it is always easy to look back and ask oneself what was so hard about that, but until that point the unknown is actually quite frightening. :)
 
The two 1 mf lytics at the front are important to replace, they are in the signal path. I used solen's because of the space restrictions, the improvement in sound is very noticable. ceramics at the 6D10 should also be replaced, there were production differences in the types of caps used there, and of course rehabing the power supply. No matter what amp I use with my 110 the synergy is fantastic. I love my MX110.
 
Thanks David. I read through wcarroll's thread in which he replaced many of the caps on his MX-110 and found it nice to have a fallback reference.

Now were there different verisons of the Z series? How will I know which one I have and which schematic to go by? Take note that I have not even taken the bottom off yet. I don't want to make a false move and destroy something because i had no idea as to the protocol.

I have been searching and gathering, but as of right now I don't have the confidence going into the project that I would like.

As I said I have the mechanical skills, but don't have the technical theory level that many of you do, which can be quite intimidating. After completion of any unfamilar repair it is always easy to look back and ask oneself what was so hard about that, but until that point the unknown is actually quite frightening. :)
The critical caps are the 2 can filter caps on top and all of the 'lytic caps underneath. AES (tubesandmore.com) has pretty much everything that you'll need with the exception of perhaps some of the axial 'lytic caps underneath which you can get from Mouser or Digikey.

Like Doug said, inventory the caps that are there and get started. :yes: There are several guys here that have done this so there's plenty of "supervisors" :D , and Terry and David will keep everyone headed in the right direction.
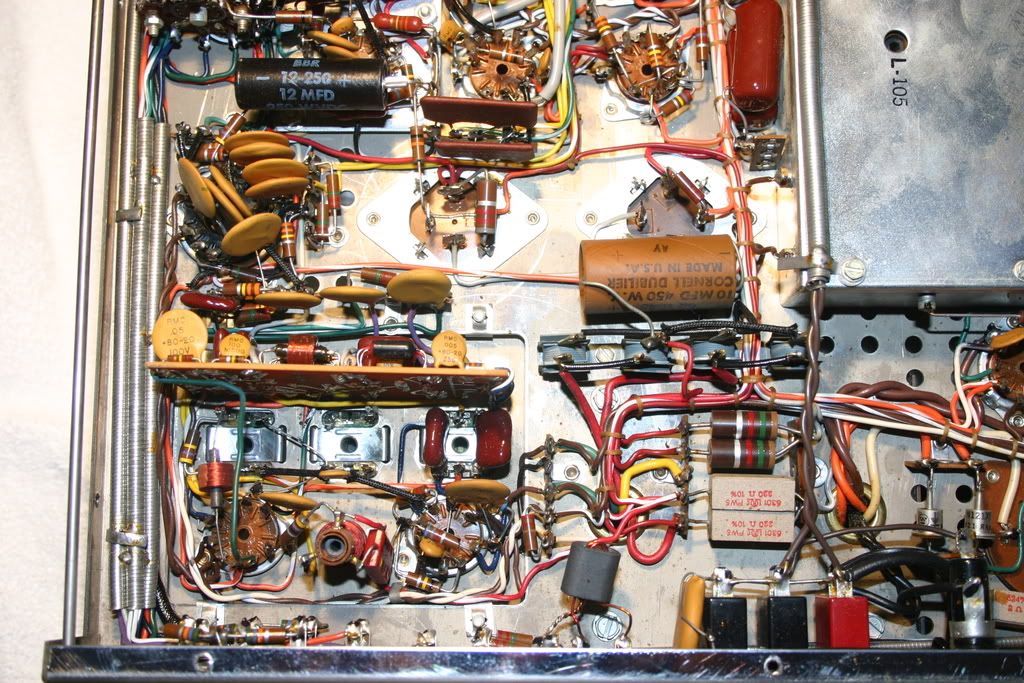
Snap a pic of your unit and post it so everyone knows what's what.

Murray
 
Thanks guys. The first step was finding a good place that I could work on it undisturbed. I have the spot and while I am geing ready for work, just wanted to see what was going on underneath as far as screws go and found a sticker. The white round sticker is dated 1/8/07, code 10893 and an initial that is either a K or and R. The previous owner said that is was sent "through" World Wide Stereo in Pennsylvania to a McIntosh Service Agent to have it gone over and brought into spec.

Not having time right now to undo the bottom and check to see if anything has been done I was curious as to if anyone has a clue about the secret "code" and who is the service company that World Wide Stereo uses for the McIntosh components. Tonight I will get the bottom off and snap a pic.
 
I'd give them a call and ask - www.wwstereo.com. Looks like they're a McIntosh dealer.

Also, if you think you may have to leave this setup and work on it across a period of time, this will mean that you need to plan your work in some way so that you can remember where you left off. This is ok, but just take _lots_ of notes, make drawings, and take pictures.

Do post a few pictures of the innards when you do get it open and us 'armchair' techs can help you further.

Cheers,

David
 
Yes I will take pictures and take notes. I can assure you of that.
This is what I got back from World Wide Stereo:

1/11/2007 DON front end. Checked out.
1/11/2007 DON Lubed tuning mechanism. Aligned FM
1/11/2007 DON trim. Properly rebuilt light baffles.
1/11/2007 DON switches, tuning capacitor, interior &
1/11/2007 DON Disassembled unit. Cleaned all controls,

Don is the tech. LOL I thought it was a service code.
 
I got my bottom off

and here's my pics
IMG_3569.jpg

IMG_3574.jpg

IMG_3575.jpg

IMG_3573.jpg

IMG_3572.jpg
 
Cool. Looks pretty much original throughout. That's not to say that WW Stereo's work was good remedial stuff to be done but not a full electronic restoration.

Yours will have been built before about 1965 from the looks of the ceramic coupling caps around the 6D10, among other places.

If you can, print out some of the other restoration pics and see which caps have been replaced. The ones around the 6D10 are a good example. The power supply caps and selenium rectifiers are another. Then those black-banded caps connected to the Input Selector switch will need to go. The good news is that those brown "dog bone" caps do not need to be swapped.

So, I'd recommend your priorities:

1) Power supply rebuild. Caps, selenium rectifier and a thermistor at the AC input.

2) Coupling caps in the preamp. This would include caps around the 6D10, the 12AX7 and the 6U8s. Follow the signal flow through these tubes starting from the outputs and working backwards from the 6U8s back through the 12AX7 and then back to the 6D10. Then find them in the chassis and label them. Inventory them and order accordingly.

Cheers,

David
 
I would start with replacing the 2 can filter caps (C115,6) with 50/50/50/50 350v and the 2 paper sleeved caps (C114 and C126). The 2 "bees" that connect to the 12AX7's should also be replaced along with the 2 that are towards the rear of the unit, on the right had side. I'm pretty sure all of those are .1µf.

Then, the 2 1µf caps that are on top of each other (orange paper covered) towards the front, left (in front of the 12AX7's) should also be replaced.

I'm gonna suggest that you do this stuff first (or, at least the ones in the power supply) and then go on to the rest. There's a bunch of them.

tubesandmore.com is a good place to get this stuff.

Here's a pic of mine, which kinda shows all the caps that are usually replaced.

Murray

Edit: I didn't see David's post before posting mine but it looks like we're basically on the same page.
 

Attachments

  • mx-110 bottom-1.jpg
    mx-110 bottom-1.jpg
    88.2 KB · Views: 678
After rebuilding the power supply on my 110 I noticed more punch, so far I've left the phono section alone on mine, most of the work shown in the photo I've also done on mine and the results are stunning. I use mine with a 300B SE amp, or AES Superamp and currently with my 1990's production ST70 Series II (with cap upgrades). I also occationally use it with my MA230 amp section (bypassing the pre). There are a few tight spaces in there but the effort is worth it.
 
Last night I took inventory of the caps I was going to replace and then looked to the AES site to see what to order. Now this is where I thought I would get confused. I was going to follow wcarroll's rebuild thread and go with IC MPW's to replace the ceramic discs, but they don't have the same values/models that I see in his pics. Soooooooooo what are the differences in using Orange Drops, which I have seen people do, and the others??? Sorry if that seems obtuse. :(
 
Allied (allied.com) has IC caps too although Wes has some unusual value IC caps in his that I've never found. So, I used OD's (I think all of them are 716P).

Perhaps others can ofer some additional info.

Murray
 
Allied (allied.com) has IC caps too although Wes has some unusual value IC caps in his that I've never found. So, I used OD's (I think all of them are 716P).

Perhaps others can ofer some additional info.

Murray

Exactly! My head starts to spin when I have to go site to site. So theoretically I could replace all the ceramics with OD's and be fine. I don't mind buying the multi-section caps separately, but I would like to keep at least groups together.
 
Rebuilding the power supply is probably your first step and don't forget the caps for the heaters, C117A/B (the paper covered cap on top). Let some of the others post with some info for the caps on the 6D10 to see what they have to say before ordering.

There's a lot of stuff to do and it's my suggestion to do it in stages so that you ahve the opportunity to check your work as you go along.

Murray
 
Xicon poly's I've also used when I couldn't find others the right value and size, they are cheap caps but when I've used them I've had good results. I usually use OD 716P's. Because of values and space limitations you may have to use different brands.
 
Back
Top Bottom