• The move to the new server is done. There are some software and database maintenance updates in process. This has us passing the hat around to help out. We appreciate any donations. Seriously, even a dollar helps. The payment page may be found here - https://www.audiokarma.org/support.html

1963 Bogen BP51HPmod_stacker on soapstone plinth

Hi Mike,
Absolutely gorgeous work, once again! Just love that terracing for the tonearm. You've become the preeminent builder in our expanding Lenco community. And Kudos for taking on the Admin tasks at Lenco Heaven! :thmbsp:
A couple of questions on this exciting build:
Did this older Bogen topplate have a shorter mounting distance (211mm?) than later Bogen/Prestos - i.e. B-61/B-69/B-70 (225mm)?
You identify the arm as a Jelco. Did Jelco build the Sumiko line which is what it sure looks like…. (What's the mounting distance?)
What cart is strapped to the "scratch" (Nuemark?) headshell?
And finally, with all that platter weight, have you been tempted to splurge on a new bearing upgrade?
All best,
Mario

Hi Mario,

I'm flattered by your kind words; and still humbled by your legacy at LH. I mostly just sit on my thumb there, and watch the good works of the other Admin over there. I'll eventually feel qualified to do something.

The mounting distance for this decks original arm is the same as the L70, I believe, though its been a long while since I looked it up, measured it. I'll have to measure it again.

The Jelco is similar to the Sumiko, and I do believe manufactured by Jelco.
Its the 12" arm, with a 290 p-to-s distance. Its also the same as the cherry arms by tonearmaudio.

The scratch headshell is a Stanton that I got to experiment with mounting an RPX/VRII on.
I was using it to try to get an idea of total length, and didn't want to mount a shell with a cartridge/stylus in it (didn't want to tear anything off). So I grabbed that for the stand-in.

Platter weight:
I'd love to get an aftermarket bearing for it, but, its not in the cards right now, until the economy turns around. I do have a Joels kit in it, with the hardened thrust plate, and have also installed a ruby ball bearing.

Its spinning records right now, and, it sounds fantastic, right off the finishing bench!

Thanks again, Mario, for everything!
 
Holy....well, you know what. What an incredible project! If that doesn't sound amazing, I'd be completely surprised.
 
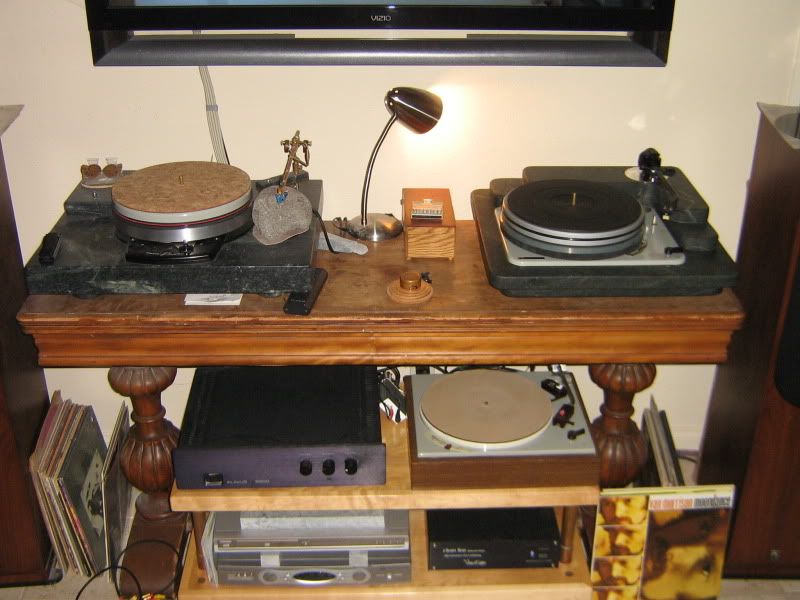
Here is a comparison to my other soapstone plinth on my Presto T18_DC hot-rod (on the left):
IMG_1164.jpg~original


Got strong table?
 
Last edited:
Washed Up

Well, I got an estimate back from one of the online suppliers. For two 18" squares, they want $250 for the stone and $230 for shipping. Yikes!

I'm still on the hunt. I probably will go with clear acrylic. I love the look and I've found a supplier that sells 18" squares for ~$45 for 3/4" and $65 for 1".
 
Holy moley, Mike!

You've set the bar a lot higher, now! This thing is awesome.

I particularly like your ingenious tonearm "pod" - a nearly universal solution, it looks like. I want one... :yes:

Are the terraced armboard pieces dry-stacked, or have you bonded them to the top plate somehow?
 
@ dougmac,...
Yeah, slabs of the soapstone range from the high hundreds to the thousands of dollars (lots of varieties of stone; wide variable pricing).
I was able to pick mine from a remnant pile that was out back behind the chicken coop of an older house owned by a soapstone counter contractor. It cost me $100 for the rems, which is well below the pricing per sq.ft of the sheets.
Are there an such contractors in your area?

Another option you might explore is old dead slate pool tables.
You can find them on CL easily enough. I've looked at a few that went for below $100, and some have been free for the takeaway.
I'd like to try slate. But I'm really drawn to the grain texture of soapstone; similar to marble, but more dead sounding - it thuds, not rings, when knuckled.
 
What types of tools did you use to fabricate the soap stone, its been some time
since I had some in my hands.
 
Holy moley, Mike!

You've set the bar a lot higher, now! This thing is awesome.

I particularly like your ingenious tonearm "pod" - a nearly universal solution, it looks like. I want one... :yes:

Are the terraced armboard pieces dry-stacked, or have you bonded them to the top plate somehow?

thanks, Nate.

The armboard is a separate entity from the main plinth.
The main plinth is an easy 125lbs by itself, without the deck on it.
The armboard easily weighs another 40lbs.
Add the heavy platter arrangement, and, motor, and you've got yourself something too heavy to move.
So, the thing was designed to break down when it comes time to move it.

The armboard is epoxied between its two layers, as a monolith structure, but not to the main plinth. *I have a thin suede gasket between the armboard and main deck for now, to keep it from scratching the main deck.
*NOTE: This thin leather presented rumble, as the tonearm was no longer tied directly to the plinth, and no cancelling of vibrations were occurring; in fact, the opposite was happening - new vibrations to the signal chain being amplified.

Here are a few more tweaks that I've done since I posted the original pictures, which were just the first wet fitting after oiling the stone.

Finished armboard details:
IMG_1177JPG.jpg~original

IMG_1176JPG.jpg~original

The wire is copper, from Canare L4E6S Quad star mic cable that I took apart. The DIN connector is a generic one from an electronics part house.

Copper bearing end cap:
IMG_1170JPG.jpg~original
IMG_1171JPG.jpg~original
IMG_1175JPG.jpg~original


I had to grind the inside of the end cap in order to get it to fit - it was not a straight natural fit. Five minutes spent with a dremel grinder and drum sander, and I had a fit that caused air to audibly whoosh out, and have the ability to spin freely on the bearing housing.
It is copper, similar to the brass/bronze of the bearing housing, so i won't get distortions or corrosion from dissimilar metals.
At any rate - the effort was because the OE plastic end cap would be easily pushed through with the twin platters and the brace below them. Now i have a metal end cap/oil sump that can handle that load.
 
Last edited:
Gandy

@ dougmac,...
Yeah, slabs of the soapstone range from the high hundreds to the thousands of dollars (lots of varieties of stone; wide variable pricing).
Another option you might explore is old dead slate pool tables.
Gandy Pool tables were made near where I live, in Macon. They used 1" slate. They've been out of business a while, too bad. I know one of the owners, Marcus Gandy. I also took dancing lessons with the daughter of one of the founders, Rose Gandy. She is very nice, pretty, and a great dancer!
 
What types of tools did you use to fabricate the soap stone, its been some time
since I had some in my hands.

Really basic hand tools. I am an amateur hobbyist with an accountant for a wife. Fortunately, she's OK with tool purchases, as she finds those to be an investment; and I have a ton of high-end construction finishing experience.
I use a wet tile saw; a circular saw with dry-cut diamond blade; a router; hand drills; jig saw; angle grinder with variety of "blades".
The stone is fairly easily drilled. I do allot of drilling with wood spade bit (speed-bore bits), and regular machine twist drill bits. I have a small benchtop drill press that I use for the metal parts, and some of the soapstone drilling.
A problem that arises with drilling is hitting the grain veins. They can cause the drill to wander off-center, so you need to be a little tolerant of over-drilled holes occasionally.
All of my work is hand done, home spun, and prone to the "vaguenesses" as such - it adds to the character.
 
All of my work is hand done, home spun, and prone to the "vaguenesses" as such - it adds to the character.
That sounds familiar! :thmbsp:

Your work is pretty amazing Mike, but it's the ingenuity behind it that really impresses me!
 
Very Impressive, Mike! Myself, my wife and my daughter are all in awe of your resourceful creativity! Thanks for showing how it's done! :)
 
Mike, how do you couple the platters? Is the isolation between the two rigid or pliable for damping? I assume the vibration transfer from the drive idler wheel would have been a concern?
Fran
 
Thanks, 24Hacker. Appreciated.

Mike, how do you couple the platters? Is the isolation between the two rigid or pliable for damping? I assume the vibration transfer from the drive idler wheel would have been a concern?
Fran

Hi Fran,

The platters are joined by an interface of brass precision tubing from a K&S Engineering rack, available at hobby and hardware stores.
To describe this, please allow me to use a few loose terms,...
The Lenco platters are a tapered spindle/bushing fit. To make the lower platters spindle fit into the upper platters bushing requires some shimming - thus, the brass tubing.

The brass tubing is quite precise in its dimensions. Its available in concentric diameters through a range of sizes. Its these concentric sizes that make the fitting possible.

Starting from the top, and working down, then back up,....

Stacked L70 platter, with extended DIY spindle stub in place.
IMG_1135JPG.jpg~original

It appears to be a loose fit,... its not, not even close to loose.
When I sink it for permanency, I'll snug it into place with some teflon pipe tape.
The stub is made of the concentric precision brass tubing stock, with a piece of solid rod stock in the center; then its ground to a rounded end.


The stub removed:
IMG_1134JPG.jpg~original
IMG_1133JPG.jpg~original

The stub fits into the next size larger tubing section, which is inserted into the platter tapered bushing from below, as far into the taper as it will go - an easy snug pressing (will not damage the original bushing).
You can see the ridge inside the OE bushing,... thats the top of the pressed-in tubing.
The pressed-in tubing extended all the way to the bottom of the OE bushing, and can be longer to adapt to a buffer layer between platters, as needed.
The stub interface with the OE spindle is tapered to match the top of the Lenco spindle top.

Looking at the OE spindle top:
IMG_1136.jpg~original


The platter bushing bottom, bottom of taper:
IMG_1132JPG.jpg~original

There are two layers of concentric tubing in this picture. The inner most piece is the longest, and is the exact outer diameter of the Lenco OE spindle.
It needed to be supported due to the taper, so another larger outer diameter, though shorter piece of tubing was cut to interface with the OE bushing. It was still just a hair loose, so I deployed the teflon plumbers tape shimming mod, which created the perfect snugging shim, and that piece was lightly snug pressed into place.

Result:
A perfect centering of the stacked platter, without any side to side wobbles, or concern of going off-center.
The spindle extension stub is removable, so it can be adapted to thicker mats, etc.
I've done this to two Lenco platters now, as stackers, and its worked perfectly on both occasions.
AND,.... its all just snugged into place, and is easily removable; no damage to the original gear.

stacked and extended:
IMG_1137.jpg~original


To your question of rigid or pliable,...
The top platter is isolated from the bottom platter by a Lenco L75 rubber mat. Its outer diameter is a perfect fit/match to the lower outer diameter of the top platter, for a nice tight fit.
This deck had relatively low use in its former life, a Colorado State Univ A/V portable suitcase system player, with a bad amplifier; like a square dancers player. The motor is like new, and really quiet. So isolation isn't totally necessary, but I feel better about breaking the tie at that point.
 
Last edited:
WoW... to see such wonderful engineering is humbling!

congratulations on creating an amazing piece of audio equipment as well as a work of art.

you should be very proud.
 
I'm humbled by your kind words. many thanks.

A plinth building course, level 101:

It started out as a cardboard template with two perpendicular lines drawn in by a large carpenters square; everything else was measured from those two squared lines. I made initial rough block cut-outs, then refined them with smaller geometric shaped patches. The patches are highlighted by the taped areas.
IMG_0412.jpg~original


When the cardboard template was tailored to fit, the template was transferred to a piece of 1/2" mdf:
IMG_0216JPG.jpg~original
IMG_0215JPG.jpg~original


You can see the squared, perpendicular base measure lines in this image. They represent the top plates outer most measures:
IMG_0218JPG.jpg~original

Complete range of motion accounted for:
IMG_0219JPG.jpg~original


Once the mdf template was finalized, it was transferred to a piece of 3/4" plywood, so that I could gauge the vertical depth of some of the features. The 1/2" deep template revealed a couple of deeper features, so I wanted to confirm is 3/4' would be enough, or if I had to go deeper. Ultimately, I just cut out the area of the mechanical motions, as it became deeper than I wanted to try to router out.
So, this is the plywood template, and the first cutting of stone:
IMG_0381JPG.jpg~original
IMG_0382JPG.jpg~original

To cut the stone, i drilled multiple holes around the perimeter, and then used a jig saw with a low tooth count metal cutting blade, and played connect the dots between the drill marks. The hardest part of this is the drilling. The saw blasts through the stone between holes quite easily.
It takes allot of drilling baby!
 
Last edited:
Re-Mark-able (pun intended) thanks for the insight, you've inspired me to come up with an uber-cool homespun TT. It all makes sense, now. The fabrication is familiar to me, only the media is different. I'm a CNC programmer, precision machinist and metal fabricator by trade...or at least I was, until the second spinal fusion last March, LOL. Hopefully next year everything is healed and I can get back in the shop I work at. What a great project this would be for Lucite! :) I love to see the "guts" of things, much to the chagrin of my wife...
 
I had this crazy friend here in Winnipeg who was a soapstone artist and one day I commented on what a wonderful luster his pieces of sculpture had. Well he said to me in a matter of fact kinda way that it was nose grease that produced that wonderful luster. I looked at him dumbfoundedly and he motioned to the side of his nose and rubbed it, then rubbed the piece of soapstone...

he was serious and said it was an inuit technique for finishing stone work. Go figure Eh!

Shawn
 
Back
Top Bottom