


dgoldstein78
New Member
I inherited my spouse's family's 3D610B 3-piece speaker set and after them having been in the same house and spot since new, they needed some TLC.
I replaced the surround on the sub via a Midwest Speaker Repair kit (10 inch Refoam Kit (F10-5), 3.5 inch Paper Caps and Shims, White Glue (paper cones))
I also replaced the two 100uF caps in the sub-s cross-over with new caps from Mouser (107TTA100M, 100uF 100V 20%).
For the 3D6 bookshelf speakers, one of the tweeters was dead. So, I ordered a pair of replacement voice coils from Falcon Acoustics (AUDAX RW025A0 APPC 2 - replacement voice coil for Audax HD 12X9D25, HD 12X8D25 (OEM))
What I want to especially note is that the original voice coil mounting plate is thinner than the new, modern Audax replacement. This means you will need to replace the four M4 x 0.7 x 5mm Phillips screws with longer screws. I used M4 x 0.7 x 8mm button head screws and M4 lock-washers to take up the remaining difference. I also cleaned the screws in rubbing alcohol to remove the manufacturing oils and any loose black-oxide and used a miniscule amount of blue (medium) thread lock on the threads
Original voice coil on Left, new Audax voice coil on Right. Also note the depth difference of the VC itself.
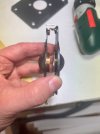
Despite these differences, once assembled and connected the tweeters performed perfectly.
Also be mindful of the flocking on the center post of the magnet structure once you pull off the old voice coils. Do your best to not disturb it.
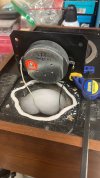
I did use a 1.5vDC AA battery to ascertain the polarity in combination with using a plastic planting ID tag I had floating around my utility room. When I applied power, with the tag resting on the tweeter's dome, the "pointer" end of the plant tag moved upwards when I had the polarity correct. I marked the back-plate with a pencil with a "+" for the appropriate terminal.
Also, be sure to watch your heat on your soldering iron when reconnecting the wiring. I inadvertently used a bit too much heat on one of the terminals and it started to melt/get tweaked. I immediately stopped and was able to prevent further damage. Thankfully, the tweeter works fine and whomever gets these after I die can deal with it then if their OCD compells them to do so
I also cleaned off the face plates, removing the old caulking and residual adhesives. I applied new gray rope caulk around the tweeter opening on the enclosure (~$6 USD from Amazon or Lowes).
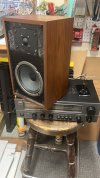
Testing with the family's original NAD 7020 (upgraded the power supply caps with 3300 Chem-Cons, cleaned pots/switches) and a Gen5 iPod). Sounds great! Will eventually replace the foam around the tweeter, but works fine for now even with the grill in place.
I replaced the surround on the sub via a Midwest Speaker Repair kit (10 inch Refoam Kit (F10-5), 3.5 inch Paper Caps and Shims, White Glue (paper cones))
I also replaced the two 100uF caps in the sub-s cross-over with new caps from Mouser (107TTA100M, 100uF 100V 20%).
For the 3D6 bookshelf speakers, one of the tweeters was dead. So, I ordered a pair of replacement voice coils from Falcon Acoustics (AUDAX RW025A0 APPC 2 - replacement voice coil for Audax HD 12X9D25, HD 12X8D25 (OEM))
What I want to especially note is that the original voice coil mounting plate is thinner than the new, modern Audax replacement. This means you will need to replace the four M4 x 0.7 x 5mm Phillips screws with longer screws. I used M4 x 0.7 x 8mm button head screws and M4 lock-washers to take up the remaining difference. I also cleaned the screws in rubbing alcohol to remove the manufacturing oils and any loose black-oxide and used a miniscule amount of blue (medium) thread lock on the threads
Original voice coil on Left, new Audax voice coil on Right. Also note the depth difference of the VC itself.
Despite these differences, once assembled and connected the tweeters performed perfectly.
Also be mindful of the flocking on the center post of the magnet structure once you pull off the old voice coils. Do your best to not disturb it.
I did use a 1.5vDC AA battery to ascertain the polarity in combination with using a plastic planting ID tag I had floating around my utility room. When I applied power, with the tag resting on the tweeter's dome, the "pointer" end of the plant tag moved upwards when I had the polarity correct. I marked the back-plate with a pencil with a "+" for the appropriate terminal.
Also, be sure to watch your heat on your soldering iron when reconnecting the wiring. I inadvertently used a bit too much heat on one of the terminals and it started to melt/get tweaked. I immediately stopped and was able to prevent further damage. Thankfully, the tweeter works fine and whomever gets these after I die can deal with it then if their OCD compells them to do so
I also cleaned off the face plates, removing the old caulking and residual adhesives. I applied new gray rope caulk around the tweeter opening on the enclosure (~$6 USD from Amazon or Lowes).
Testing with the family's original NAD 7020 (upgraded the power supply caps with 3300 Chem-Cons, cleaned pots/switches) and a Gen5 iPod). Sounds great! Will eventually replace the foam around the tweeter, but works fine for now even with the grill in place.

