• The move to the new server is done. There are some software and database maintenance updates in process. This has us passing the hat around to help out. We appreciate any donations. Seriously, even a dollar helps. The payment page may be found here - https://www.audiokarma.org/support.html

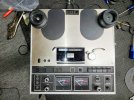
Akai GX28xD 7" reel to 10.5" reel conversion

Rickey_H

AK Subscriber
Subscriber
Folks,
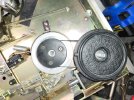
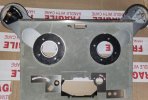
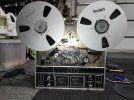
I recently two Akai reel to reel units; GX280D and GX285D. Both units use 7" reels. I could not afford a 10.5" reel machine, as these are selling close to $800 and up and I paid $350 for both my machines. I looked at purchasing an Akai EA-11 adapter kit, but decided that this was not the route I wanted to go. I went to work researching where I could mount the new reel hubs. I discovered quickly that I could not just move the old hubs and motors, as there were clearance issues with other component adjacent to where these components would be resituated. So I went to plan B, I would create a new set of NAB reel hubs that have two sets of roller bearings on a 8mm shaft that I would mount to the Tape deck chassis. I would remove the existing tape hubs and replace them with 48mm diameter pulleys. these low profile pulleys have a 3mm track for a rubber belt. The new NAB hubs also have a pulley. Mounting the axles for the NAB hubs was a royal pain! The upper left portion of the tape deck chassis resides the reel hub brake solenoid. So I remounted this unit to the other side of the chassis to gain 5mm of Z clearance. Still I had to drill the hole for the axle into the mounting bracket of this solenoid. So I now have the hubs and pulleys mounted with the belts installed. As mentioned in my initial post, I was concerned that the added Z-height might require remounting the tape heads a transports. However, it appears the alignment is still acceptable. I still have a lot of adjustments needed and eventually I will need to modify the front panel to accommodate the newly placed NAB hubs. This will be the last step, as so far all modifications can be removed and the original design still intact, but modifying the front panel is irreversible.

Now for the cost. I designed and printed all the pulleys and NAB hubs out of resin. They look professional. The only hardware that I did not have locally was the 688ZZ Deep Groove Ball Bearings Z2 8mm X 16mm X 5mm Double Shielded Carbon Steel, 5pcs for $6 on Amazon, 3mm assorted sizes of rubber belts, $5.50 on Amazon, AS-332 O-Rings, Nitrile Rubber O-Rings 2-3/8" ID 2-3/4" OD 3/16", 8 pcs $8 on Amazon. At the hardware store I spent $8 of various lengths of 5/16" bolts, nuts and washers. I still need to purchase a small length of steel or aluminum pipe or tube that I can use for a small outline Z-spacer for the 8mm (5/16") axles. I wasted a lot of 3D resin on failed design attempts so I calculate that this was the lion's share of the cost, ~$25. I estimate my total cost into this project is $66 including taxes. Update- I roached my brake solenoid plunger and it cost me an additional $35 to purchase a used one.

The EA-11 adapters are a kludge with no regard to stress loading. Most of the units I have seen on Ebay have either cracks or breaks in the casting that mount the hub axles. The casting are only part of the problem, the thin sheet metal outriggers, flexes under dynamic load placing an extraordinary amount of stress on the casting. The extend 50 mm away from the tape unit chassis on either side making them look awkward. My design brings these hubs back inward by 80mm each side, making the tape system look sharp and taking up less real estate. Last, the EA-11 are as rare as chicken teeth and ones that come up for sale are undesirable.

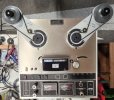
I am far from completion, as I still have adjustments to make. I still do not know if these 3mm belts will be reliable enough, maybe they will. I included a photo of my progress so far. I'll keep everyone apprised of my progress.

Regards,

Rickey
tape player.jpg
 

Attachments

  • RtoR hubs.jpg
    RtoR hubs.jpg
    165.4 KB · Views: 24
Last edited:
Register to hide this ad
I have two decks that accept 10.5" reels. Both have a switch for large reels (10.5") and small reels (7"). I'm assuming the switch adjusts the tourqe for the different take up reel sizes.

How is that being addressed in the proposed modification?
 
If you change your mind, DM me, and I'll put this on Barter Town. These are not thin sheet metal, Paul.IMG_2240.jpeg
 
I am far from completion, as I still have adjustments to make. I still do not know if these 3mm belts will be reliable enough, maybe they will. I included a photo of my progress so far. I'll keep everyone apprised of my progress.
Regards,
Rickey
Welcome to AK!!
 
I would think that the torque on the brake when stopping from FF or REW would be too much both for the belts and for the original brake shoe since the angular momentum has increased because you went from 7" to 10.5".
 
I would think that the torque on the brake when stopping from FF or REW would be too much both for the belts and for the original brake shoe since the angular momentum has increased because you went from 7" to 10.5".
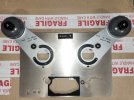
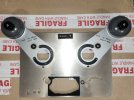
Indeed. I have a contingency plan using a 4mm belt if needed, but this narrows my Z height margins. However, my biggest challenge is designing my own NAB hubs. I'm debugging a spring loaded ball bearing latching system that locks the hubs so the reel doesn't fly off. This is my first hack on the panel bezels that hide the primary pulleys and belts.
 

Attachments

  • R2R_panel.jpg
    R2R_panel.jpg
    143.9 KB · Views: 19
Indeed. I have a contingency plan using a 4mm belt if needed, but this narrows my Z height margins. However, my biggest challenge is designing my own NAB hubs. I'm debugging a spring loaded ball bearing latching system that locks the hubs so the reel doesn't fly off. This is my first hack on the panel bezels that hide the primary pulleys and belts.
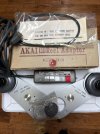
The belts in the factory kit I pictured in post #3 are 4mm round. Paul.
 
Want 10.5" reel capability. Best solution, buy a machine designed for this. And avoid clunky adapters.
Perhaps I should have prefaced this subject with my qualifications. I am a retired mixed signal engineer with over 40 years of design experience. I paid for my education by working as a machinist and going to night school. I have a metal machine shop, several 3D printers (FDM and SLA) at my disposal. I also have a complete wood shop including a large CNC router that I designed and built myself. On the electronic side, I have a full mini SMT line featuring a pick and place machine that I built and modified using an open source (opulo.io) design. I am also a vertical manufacture of virtual pinball machine components which I design and fabricate (intensearcade.com).

So when you offer me your 'best solution' you are basically telling me to resign, I can't do it. Thank you for your opinion.
 
Last edited:
I was wondering why you would go through all this. After reading your above post, I can see that this project is a personal challenge, and you have the tools and ability to achieve this. Good luck to you. I am interested in the results. Paul.
 
The belts in the factory kit I pictured in post #3 are 4mm round. Paul.

I was wondering why you would go through all this. After reading your above post, I can see that this project is a personal challenge, and you have the tools and ability to achieve this. Good luck to you. I am interested in the results. Paul.
When you are an old fart like me, you don't take on physical challenges, but projects like this are always fun to undertake. Once I get it working and the bugs have been sorted I'll move the project to my github page so that other people can do this project without all the experimenting. rmhorwitz - Repositories
 
Perhaps I should have prefaced this subject with my qualifications. I am a retired mixed signal engineer with over 40 years of design experience. I paid for my education by working as a machinist and going to night school. I have a metal machine shop, several 3D printers (FDM and SLA) at my disposal. I also have a complete wood shop including a large CNC router that I designed and built myself. On the electronic side, I have a full mini SMT line featuring a pick and place machine that I built and modified using an open source (opulo.io) design. I am also a vertical manufacture of virtual pinball machine components which I design and fabricate (intensearcade.com).

So when you offer me your 'best solution' you are basically telling me to resign, I can't do it. Thank you for your opinion.
I've owned Magnecord PT-6 with this clunky adapter and an Akai with this same arrangement. A note: I traded in that Magnecord and that Akai, and got a better Magnecord machine which accepted 10.5 reels natively (and was 1/2 track Stereo with an added 1/4 track play head). That Magnecord upgrade, gave me far less problems, was easier to maintain, and was reliable.

I am not dissing your skills (and I've repaired more than my fair share of pinball machines, their complexity electro-mechanically is quite amazing). I know about making do, and those 10.5" reel adapters on 7" machines were very difficult to live with (and I am also a retired broadcast engineer). I admire what you do for the Pinball machine community, mad respect. The only 10.5" reel outrigger adapters which worked well I ever saw were on Nagra and StellaVox field recorders.

P.S. I'd love to see you make better 10.5" adapters that work well, and handle tape gently. I think if anyone can, you likely can. So, mutual respect.
 
BTW-I want to mention that I purchased Prww's Akai EA10 kit. I have a pristine GX285D complete with the original acrylic reel dust cover and it has no scratches. For those of you that grew up in the early 70's, we used these dust covers to thrash our weed to separate the stems and seeds from our stash. The acrylic would get damaged and would be eventually tossed (oh my misspent youth), my dust cover is pristine, but I digress. I figured that if I ever wanted to get a 4 hour party mix, these 10.5" reel adapters could make it happen and after the event I could revert it back to my 7" reels. This has nothing to do with my 10.5" reel conversion on my Akai GX280D.

Regards,

Rickey
 
I have the conversion completed, but I have a couple of issues to iron out. As dankik pointed out, a full reel has a lot of moving mass and when the main spindles suddenly stop, the belt stretches, the tape builds slack and occasionally trips the take up switch shutting the unit down. I knew this might happen and I am researching a larger 4mm belt. My NAB hub reel lock design sucks and I need to redesign it. Biggest challenge is designing the parts for 3D printing with no post machining. As mentioned, I want this to be a open source project that most people with access to a 3D printer and basic tools can accomplish. BTW- the 10.5" adapter kit I purchased from prww has a broken pot metal casting which is typical for these adapters. I plan on releasing an open source 3D printed design for these too.
 
Before I continue on with my original 7" to 10.5" reel conversion, I am going to focus on that Akai EA-10 conversion kit. I have read all this crap about the rarity of this kit, little did I know that it fits only a handful of Akai models made back in the mid to late 60's. These models are:
  • Akai 345
  • Akai X-355
  • Akai X-355D
  • Roberts 400 (Roberts was the US brand name for Akai-manufactured units)
  • Roberts 445
  • Akai 33 / 220
If you do a google search you will find that most of these models early models have lackluster performance, hence does not warrant the need to purchase added accessory for them including the EA-10. It is a solution to a problem that no one has anymore. As for the rarity of this product, I have seen several of them for sale on Ebay and elsewhere. It is analogous to a Christmas fruit cake that gets passed from one family to the next, as no one wants it.

As for adapting this kit to later Akai reel to reel units (early to to late 70's models), it requires extensive redesign of the pulleys and extension arm mountings to make it work. Next, is the zinc rich pot metal used for the spindle mounts. These have a nasty habit of corroding and disintegrating. Regardless of these challenges, I have successfully made modifications and replaced parts as needed to make this kit compatible with my GX 280D and GX 285D. I have looked at several models made before and after the GX-28X and this new retrofit kit should work with these models too.
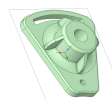
First, the pot metal spindle mounts. Here is a photo of the failing component. It crumbles at the slightest touch. Hub Spindle mount.jpg
I designed a new mount using 3D printed PLA and it accepts the same bronze bush as the original. A solid model is shown below:
1790193501490.png

Next, the trident mount spindle/pulley that came with the original kit used a two screw mounting system, making it incompatible with more recent tape units that use three screws. The Z-height of this spindle pulley was also too low. Consequently, this also needed to be redesigned. Below is the original on the left and the newly designed pulley on the right. As mentioned, they Z height had to be increased do that the pulley was a few mm above the panel. One drawback is that I could not use this new design for a trident hub mounted 7" reel, as the tape alignment was too high. However, I discovered that the NAB mounts on the extensions also have provisions for a legacy RTMA standard hub that can accept a smaller CINE reel using a 8 mm rod that is offset from the center by 18mm. I'll discuss this later.

Pulleys.jpg
The extension arm mounting originally required mounting directly to each reel motor. Without this, these extension arms will need to be mounted to the then front panel sheet metal. Again, I had to design an adapter ring/stiffener to allow proper and secure mounting of both extension arms. Below is a photo of the rear of the panels showing the adapter/stiffener ring and a photo of the front side of the panel
Akai EA 10 arms back side.jpg
Akai EA 10 arms.jpg

Below is a image of the kit fully installed. Note the black idler pulley on each arm. I had to make these pulleys smaller so that the belts could clear the horse-shoe nut plate/stiffener plates.
Akai EA 10 assy overview.jpg

Last, is a photo of the hub mounts showing the original and replacement.
Axai_NAB_Adapter_Arms.jpg

In summary, the Akai EA-10 is an obsolete kit for a nearly extinct product. However, with these added modifications it breathes new life into this kit. These modifications will work on most Akai Reel to Reels that use three screw hubs. I still have some minor tweaking to do. When finished, I am placing this kit back up for sale on Ebay, as I believe that these improvements add more value to this kit. In addition, I plan to upload the 3D models to my Github page. In the meantime, I have reversed engineered this complete kit (all mechanical drawings and hardware sources). If there is any interest, I will have a full modern kit available at a much lower price than most of the EA-10 currently being sold. However, if you enjoy pain, killing time and saving money, I will also have these drawings and a BOM on my github too.

As for my original 7" to 10.5" reel conversion plan, I successfully increased the belt size of my pulleys and the system works great, but I have one nagging problem, this new system uses a fixed axle, and has no provisions for a trident mount or RTMA type reels. So, I am stuck with NAB hubs only. I'll post more about this later. Let me know what you think.
 

Attachments

  • Akai EA 10 arms.jpg
    Akai EA 10 arms.jpg
    111.8 KB · Views: 5
Last edited:
I think it’s pretty frikken impressive you thought it up and then too have the design and fab skills to realize it. It looks as polished as any high end commercially made unit.

Again, pretty amazing, as is the commitment to open source.

I tip my hat to you sir.
 
Back
Top Bottom