• The move to the new server is done. There are some software and database maintenance updates in process. This has us passing the hat around to help out. We appreciate any donations. Seriously, even a dollar helps. The payment page may be found here - https://www.audiokarma.org/support.html

An Idiot Attempts to Restore Altec Model 19s

ionjua

New Member
After going through about 15-20 pairs of speakers in a little over a year (that should be a thread in itself!), I've had my sights set on a pair of Altec Model 19s as my potential end game speakers. Auditioning so many speakers (including several Altecs) as well as speaking with many smart, enthusiastic audio aficionados (AK members as well as "free agents"), it became clear that a pair of 19s should be located.

Altecs in general seem pretty tough to find in New England, and if you're looking for 19s, well, I've personally not heard of any being recently for sale. But a chance chat at the recent FrankenFest finally brought me the opportunity to own a pair. BUT there's a catch: they need restoration.

I've never done this much work on a pair of speakers before, from the outside cabinets to the parts inside. So I'm hoping I can get plenty of guidance and advice on this project in order to have a quality product completed at the end. The good news is that most of the pieces are present: I just want to do these justice.

More soon, but here's a pic of one as a hint of the work that's needed. I'll describe what I have to work with as the thread progresses.


altec19.jpg
 
Register to hide this ad
Yes, those are highly sought after speakers! Good luck with the restoration project. When you’re finished, you will have an amazing pair of speakers that you will literally know inside and out, and have lots to be proud of. Have fun!
 
Hard to tell from the angel but is that an 511 horn rather than the 811 that came with the model 19?

I actually built a pair of model 19 cabinets from scratch. Here are a couple of recommendations.

Coasters on the bottom. Easier to move.
Move the wiring connections from the bottom to the lower back of the box
Foam around the 811's on top
Z19 Crossovers to replace the originals

Wishing you much luck on your project!
 
I did a complete rebuild on a pair of big JBLs and it was really rewarding. My 19s were in good shape when I got them so maybe I'll look at a crossover upgrade in the future per mv's comment. You will love the 19s, I promise.

My JBL build included a complete cabinet restoration (bad water damage) and new veneer. I did it all. I'd say the veneer is the hardest part because it's the finish you look at every day. I had no experience with veneer but just went for it. Yours is likely good in most places and bad in others. Matching will be your biggest task. Consider sending the cabinets to a furniture restoration shop that specializes in veneer (unless you are already good at it). Then, do everything else yourself. Very rewarding and you'll treasure them.
 
I did a complete rebuild on a pair of big JBLs and it was really rewarding. My 19s were in good shape when I got them so maybe I'll look at a crossover upgrade in the future per mv's comment. You will love the 19s, I promise.

My JBL build included a complete cabinet restoration (bad water damage) and new veneer. I did it all. I'd say the veneer is the hardest part because it's the finish you look at every day. I had no experience with veneer but just went for it. Yours is likely good in most places and bad in others. Matching will be your biggest task. Consider sending the cabinets to a furniture restoration shop that specializes in veneer (unless you are already good at it). Then, do everything else yourself. Very rewarding and you'll treasure them.

I have a set of 620 cabinets I picked up to mate with the 604-8g's I already had so I could create a proper Model 17. Thing is, the cabinets are in pretty rough shape, and a speaker of this stature really should be put back to original fit and finish if at all possible, IMO. But I'm not confident I have the skills for a top shelf restoration since I have zero experience applying veneer. I can stumble my way through most wood working tasks, but that final finishing touch is where the buck stops and I'm thinking that hiring a pro is my best course of action.
Consider yourself WAAAY ahead if you don't have any major cabinet construction/comsetic issues to deal with (the one pictured looks really good) @ionjua .
 
I agree with Tom on the condition in the one pic. Based on that pic the condition of the cabinets wouldn't require new veneer. You can do wonders refinishing tired veneer. Just as long as it is not peeling, warping or other. If I were to restore these I'd save that original veneer and just refinish it, assuming that the rest of the cabinets look like that pic.
 
Veneering a big cabinet with flat surfaces and straight edges is really pretty simple though it does take some practice and lots of elbow grease. That's why the cabinets have bottoms and backs to do first ;). Veneering a set of practice speakers or home furniture should be considered.

Proper surface prep cannot be over emphasized...imperfections will telegraph through the veneer. Clean and mirror flat is the goal.

Considering the labor involved, spending an extra $100-$300 to get a premium veneer (various rosewood cousins, quarter-sawn red or white oak, figured maple, zebrawood, mahogany, etc) to get look you want is a bargain. A hand-rubbed oil finish is pretty easy to DIY. Lots of labor but you aren't paying someone else $50-$100/hour to do it.

From the photos I really can't tell if those are walnut or oak...color looks like oak but the grain pattern doesn't have the classic oak look so I'll go with faded walnut.

Obviously I'm a fan of new veneer but refinshing may be all you need :beerchug:

Great project. Good luck!
 
Thanks for the questions/advice/feedback on this: I can only work on these on weekends unfortunately, given work & other obligations, so this'll take a while.

mvandyke the horns are both 811's although the gold one is probably a Seeburg horn. I think both horns need to be painted though, so that gold color will be gone.

I'm terrible at identifying wood grains so I don't know if it's walnut or oak. I will move these cabinets outside to get some better pics. My gut feeling is that although there are nicks & dings on the cabinets, I don't think any major veneering is needed. (I've not done any veneering before, but I have a Guinea pig to try it out: I have a Sansui 8080 here along with some veneer sheets to attempt this skill). donprice I think you're right that these are tired-looking walnut cabinets. Bringing their richness back is something I hope to get advice on: I have a small record cabinet project to try out using gel stains, which might be an option for these 19's.

A previous owner put these cabinets on casters thankfully. One thing I've learned with this hobby of collecting large speakers: I need to start weightlifting: these are getting heavier as I get older!

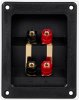
I completely agree about moving the posts from the bottom to the back. I've got a pair of 14's with the posts on the bottom and this is a super pain to deal with. A question when we get to it: should I use the original post plate on the bottom (and fill in the bottom with a patch?) or keep the original on the back and put an aftermarket post plate on the back?
 
Last edited:
They look like walnut to me too. Mine are the same. You might want to research what finish was originally used on the 19s at the factory. I’m sure the formula is out there. Might be all you need to make these shine again. And it will match the original!
 
Yes, I would keep the original and put an after market post in the back. I biwired mine in case I wanted to go to seperate amps for the highs and the lows in the future.
 

Attachments

  • Screen Shot 06-11-22 at 07.05 AM.JPG
    Screen Shot 06-11-22 at 07.05 AM.JPG
    172.5 KB · Views: 33
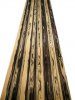
white ebony.jpg If you take pics of the nasties that would be helpful. Dings and nics usually need some crafty techniques to fix them. The wood imps in he gallery will no doubt pitch in.
Complete re veneering is actually easier than you might imagine , there are tons of YT vids on the subject. Its very rewarding.

If you want to get adventurous Oakwood Veneers in the US have a huge selection of exotics. Fortune favours the bold. Here's a wild and crazy veneer that I'll bet ytou didn't know existed.
White Ebony. I'm not suggesting for a second that you use this on your 19's , it's jus an example of the kaliedescope of veneers out there.
 
Last edited:
Yes, I would keep the original and put an after market post in the back. I biwired mine in case I wanted to go to seperate amps for the highs and the lows in the future.

If you were using just one amp, where'd you get the 4 speaker cables per side? Do you jumper them on the binding posts?
 
Last edited:
A previous owner put these cabinets on casters thankfully. One thing I've learned with this hobby of collecting large speakers: I need to start weightlifting: these are getting heavier as I get older!

I wish I had purchased one of these hydraulic lift carts years ago. Excellent for lifting a big cabinet to height you can work on it comfortably. Also makes moving from ground level to a work bench or truck bed a one man job.

https://www.harborfreight.com/500-lb-capacity-hydraulic-table-cart-61405.html
 
If you were using just one amp, where'd you get the 4 speaker cables per side? Do you jumper them on the binding posts?

The two high frequence cables come down to the inside post and the 2 from the woofer - a total of 4. There is a jumper between the 2 positives and 2 negatives on the outside that are jumpered as a default. If you remove the jumper they are then bi-wired. Parts Express has them available.
 
As I understand it, the Altec Model 19 crossover is not bi-wirable. The wires from the input terminals go to the crossover, not to the drivers. The standard crossover has no provisions to separate the inputs for the two drivers without extensive modifications.
 
As I understand it, the Altec Model 19 crossover is not bi-wirable. The wires from the input terminals go to the crossover, not to the drivers. The standard crossover has no provisions to separate the inputs for the two drivers without extensive modifications.
This is correct. You would need to put in a new Z19 crossover. There is a very large thread covering this crossover.https://www.audiokarma.org/forums/index.php?threads/z19-crossover.328530/

I biwired mine (using the Z19 and speaker input pads) but I'm currently happy with just one amp driving both speakers.
 
Hi @ionjua

I recently picket up a pair of Altec 19s as my forever speakers. They are truly awe inspiring!

Please post some better pics of your cabinets. I can give you some advice based on the condition.

Here is what I did: My 19s are oak, and the veneer is in very good condition. I sanded the old finish off completely, along with a layer of tar and nicotine! It was not readily visible that they had a coating of gunk until I started sanding. Had I explored further before breaking out the sandpaper, I would have scrubbed the goo off first. I started with 150, then 180 grit on an orbital sander, and followed by hand sanding at 180 then 220. To sand the small "shelf" between the bottom and top cabinet, I wrapped sandpaper around a plastic putty knife and gently sanded with the grain, 180 then 220. I vacuumed then wiped with microfiber between each grit. Once I was happy with the final sanding, I washed thoroughly with mineral spirits. I considered bleaching the veneer with oxalic acid before finishing, but all off marks came out with the sanding, so the acid treatment was not needed (The bleaching was very effective in removing water stains from a pair of JBL 4311B that I recently restored.) I also cleaned the black vinyl with Marine 303. This is what I use on the convertible top and dash of my Miata. It works excellent.

Once the cabinets were ready for finish, I used Old Masters 100% Tung oil. I considered staining before oiling, but decided it was not needed. The OM tung is pricey, ~$40/quart, but I found it excellent to work with. I diluted the first coat 75/25, mineral spirits/tung oil. Wiped on, let sit 15 minutes, then rubbed out with old white t-shirts. Do not use microfiber for this. I let the first coat cure for about 48 hours, then followed with 50/50 spirits/oil, following the same procedure. I let this coat cure for ~72 hours. Then followed with 100% tung oil, and let dure for another 72 hours before proceeding. This was all done in my garage with the outside temps in the upper 50s, low 60s with low humidity.

I had the horns stripped and powder coated. They came our beautiful! You say you are in New England--I can recommend a place in Waltham, MA if you decide to go the powder coat route, which I recommend.

I installed new 5 way binding posts in the back of the cabinets, but left the original posts on the bottom.

When the cabinets were ready, I reinstalled the woofers 180 degrees from the original position, then the horns. Pots were cleaned with Deoxit. That is all I did with the crossovers. I did not want to recap for fear of changing the "voice" of the speakers. Upon listening this was a good decision. Do not replace the caps unless absolutely necessary.

I have restored many of a speaker. Other than the shear bulk, these were one of the easier pairs.

Peter


IMG_2799[1].JPG

IMG_2800[1].JPG
IMG_2805[1].JPG
 
Back
Top Bottom