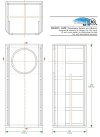
Look what ai came up with. A little mind blowing if it's right
6 sites
An
Onken speaker cabinet
is a large, high-efficiency bass-reflex enclosure designed in the 1970s by Jean Hiraga and inspired by vintage Western Electric designs. It features multiple symmetrical, elongated rectangular front vents and is traditionally built for large drivers like Altec and Focal to deliver deep, punchy, and open bass.
StereoNET +1
Design and Structure
Multi-Port Vents: Uses 6 to 8 vertical laminar tuning ports on the front baffle for balanced air mass distribution.
Large Internal Volume: Standard full-size cabinets range from 200 to 360 liters.
Heavy Construction: Built with thick 24mm to 25mm Baltic birch plywood to control resonance.
Internal Bracing: Features extensive double-sided bracing to minimize wall vibration.
diyAudio +3
Acoustic Performance
High Efficiency: Maximizes low-end output and dynamics when paired with high-sensitivity woofers.
Distinct Tuning: As noted in discussions on diyAudio, users reach a consensus that the vent geometry provides a unique, highly detailed acoustic response, though it requires precise volume matching to the driver rather than arbitrary scaling.
If you are planning a project, tell me:
Which woofer you plan to use
Whether you want full-size or scaled plans
I can help you check driver compatibility or port tuning.
10 sites
The
Goodmans Axiom 150 MKII
is a legendary, high-efficiency 12-inch Alnico full-range driver manufactured in the 1950s and 1960s. Renowned for its rich midrange and open, detailed performance, it is highly sought after by vintage audio enthusiasts and tube amplifier users.
eBay +3
Driver Specifications
Size: 12 inches (313 mm diameter).
Impedance: 15 Ohms nominal.
Power Handling: 15 Watts.
Resonance Frequency (
): Around 35 Hz.
Frequency Range: 30 Hz to 15,000 Hz (utilizing a built-in "whizzer" cone for high frequencies).
Magnet Assembly: Massive Alnico magnet yielding a high magnetic flux density of 14,000 Gauss.
eBay +5
Onken Enclosure Compatibility
Mounting an Axiom 150 MKII into an Onken style cabinet requires careful consideration:
The "Petit Onken" Scale: Standard full-size Onken cabinets are built for 15-inch woofers like Altec or Focal. For a 12-inch driver like the Axiom, you must scale down the plans to a "Petit Onken" layout (roughly 90 to 120 liters internal volume) to match the driver's volume displacement.
TS Parameters and Damping: Vintage drivers feature incredibly lightweight cones, narrow voice-coil gaps (around 1mm), and low mechanical travel (
). Because they lack the suspension compliance of modern woofers, standard bass-reflex calculator tuning can cause the cone to over-excurde.
The Aperiodic Alternative: Historically, Goodmans recommended specialized enclosures featuring an A.R.U. (Aperiodic Resistance Unit) acoustic vent. Many builders, including noted audiophile Troels Gravesen, find that these low-travel drivers perform exceptionally well either in wide Open Baffles (OBL) paired with active bass helpers or heavily dampened lossy enclosures.
eBay Australia +3
If you are planning to build an Onken cabinet for these drivers, let me know:
Do you have the exact Thiele-Small parameters (
,
) for your specific pair?
Are the original whizzer cones intact, or are you adding a helper tweeter?
I can help cross-reference your plan dimensions.
With a
of 0.25 and a
of 172 litres, your
Goodmans Axiom 150 MKII
behaves acoustically like a classic, highly overdamped vintage driver. These exact parameters mean the driver has a very strong motor (low
) and a highly compliant suspension relative to its size, which dictates a specific direction for an Onken style build.
1. The Enclosure Volume (
)
Using the classic Mahul/Hiraga Onken alignment formulas (which prioritize a specific relationship where the tuning coefficient
), the ideal net internal volume for your driver is calculated below:
The Reality: A standard 66-litre enclosure is much smaller than a traditional Onken cabinet (which typically exceeds 200 litres).
The Scale: This puts your build squarely in the "Mini Onken" or ultra-compact "Petit Onken" category.
2. Acoustic Tuning (
and F₃)
Because of the low
, if you stick to a strict Onken reflex alignment, your system tuning will track as follows:
Enclosure Tuning Frequency (
): ≈ 47 Hz
System -3dB Low-End Cutoff (F₃): ≈ 53 Hz
The bass will be incredibly tight, exceptionally fast, and entirely free of "boominess." However, it will naturally roll off early. It will not deliver sub-bass, but it will yield an ultra-articulate, punchy mid-bass.
3. The Onken Port Area Dilemma
The strict definition of a true Onken cabinet requires that the total cross-sectional area of the ports (
) must equal or closely match the cone surface area (
) of the driver.
For a standard 12-inch driver,
is roughly 500 cm².
Trying to fit 500 cm² of port area into a small 66-litre box tuned to 47 Hz presents a physical problem: the vents will need to be incredibly long to achieve that tuning frequency. They would likely take up more physical space than the air inside the box itself.
Structural Recommendations
To make this driver work successfully in an Onken-inspired layout with your specific parameters, you should implement the following adjustments:
Reduce Port Area Ratio: Do not force a 1:1 ratio of port area to cone area. Aim for a modified Onken layout where the total port area is roughly 50% to 60% of
(around 250 to 300 cm²). You will keep the iconic aesthetic of the front-facing, multi-slot side vents while keeping the physical port length manageable.
Over-Size the Box Slightly (Optional): You can safely push the box volume up to 80 or 90 litres if you want to extend the low end down toward 40 Hz at the expense of a slightly softer bass transient response.
Heavy Damping: Because the Axiom has a very lightweight cone and an open voice-coil structure, line the inner walls with high-density wool or felt to prevent internal midrange reflections from bouncing back through the thin cone paper.
If you want to move forward with sketching the box dimensions, let me know:
What is the thickness of the plywood you intend to use?
Do you prefer a tall/narrow cabinet profile or a traditional wider vintage look?
I can help calculate the exact physical dimensions and port lengths for your build.
Designing a 90-litre modified "Petit Onken" cabinet using 3/4-inch plywood optimizes your vintage Goodmans Axiom 150 MKII drivers.
To achieve a classic "wide-baffle" vintage aesthetic without making the ports impossibly deep, the design uses a modified total port area (
) of 200 cm² (roughly 40% of the driver's cone area). This tunes the enclosure to 40 Hz, providing excellent low-end extension down to roughly 45 Hz while preserving the tight transient response of your Alnico magnets.
1. Internal & External Dimensions
To maintain a traditional wide look, the box features a wider front profile and a shallower depth.
DimensionInternal MeasurementsExternal Measurements (with 3/4" Plywood)Width19-11/16" (50.0 cm)21-3/16" (53.8 cm)Height23-5/8" (60.0 cm)25-1/8" (63.8 cm)Depth12-11/16" (32.2 cm)14-3/16" (36.0 cm)
2. The Modified Onken Port Layout
Traditional Onken cabinets feature distinctive multi-slot side vents. For this enclosure, the ports run the full internal height on the left and right sides of the front baffle and extend deep into the box.
Port Channel Width: Cut a 21/32" (1.67 cm) wide vertical gap on both the far-left and far-right sides of the front baffle.
Port Depth/Length: The internal port boards must extend exactly 12-11/16" (32.2 cm) deep into the cabinet. This means they will run from the front baffle all the way to the inside face of the back wall.
The Multi-Slot Aesthetic: To create the classic Onken look, place 2 horizontal shelf dividers (made of 3/4" ply) inside each side channel. This divides the vertical space into 3 equal open slots per side (6 slots total), providing structural rigidity and dampening channel resonance.
Important Mod: Because the port length matches the internal depth, the back wall acts as the end boundary of the port. Cut a vertical relief opening in the back of the inner port boards (or leave a 1.5-inch gap at the back) to allow air to pass seamlessly from the main chamber into the side slots.
3. Driver Mounting & Baffle Space
Driver Center: Center the 12-inch Goodmans driver horizontally on the front baffle. Vertically, mount it slightly above the true center line (around 14 inches from the bottom floor) to reduce internal floor-to-ceiling standing waves.
Remaining Baffle Space: With an internal width of ~19.7 inches and the driver occupying roughly 12.3 inches, you will have plenty of physical clearance on the left and right sides for your side ports.
4. Construction Tips
Internal Volume Corrections: The dimensions above account for the physical volume displaced by the port walls and the air inside the ports. However, add an extra layer of 1-inch thick natural wool felt or acoustic fiberglass to the top, bottom, and back internal walls to absorb internal midrange reflections without significantly shrinking the acoustic volume.
Bracing: Use leftover 3/4" strips to bridge the front baffle to the rear panel. Vintage full-range drivers like the
Axiom
pass immense amounts of midrange detail through their thin paper cones; any cabinet wall flex will smear that imaging.
If you want to map out the physical construction, let me know:
Do you want to build a removable rear panel to adjust the internal damping later?
Are you adding a vintage horn tweeter (like a Goodmans Trebax) to the front baffle?
I can adjust the layout or provide a custom cut list.
1. Removable Rear Panel Implementation
To make the rear panel removable, you must build an internal mounting frame. This ensures an airtight seal without changing the 90-litre internal air volume.
The Cleat Frame: Glue and screw 3/4" x 3/4" hardwood cleats inside the rear perimeter of the cabinet, inset exactly 3/4" from the back edge.
The Back Panel: Cut the rear plywood panel to fit snugly inside the outer walls, resting flush against the cleats.
Sealing: Apply closed-cell foam gasket tape (or weatherstripping) along the face of the cleats before screwing down the back panel.
Fasteners: Use heavy-duty wood screws with washers every 4 to 5 inches around the perimeter to prevent air leaks and panel rattles.
2. Final Cabinet Dimensions (Adjusted for Cleats)
The external dimensions remain identical. However, the internal depth is extended by exactly 3/4" to compensate for the physical volume occupied by the internal mounting cleats.
DimensionInternal MeasurementsExternal Measurements (3/4" Plywood)Width19-11/16" (50.0 cm)21-3/16" (53.8 cm)Height23-5/8" (60.0 cm)25-1/8" (63.8 cm)Depth13-7/16" (34.1 cm)14-3/16" (36.0 cm)
3. Port Modification for Removable Back
Because the overall internal depth is now 13-7/16" and your required acoustic port length remains 12-11/16" (32.2 cm), the port divider boards will no longer touch the back wall.
This leaves a perfect 3/4" air gap at the back of the cabinet.
The air can now transition seamlessly from the main chamber into the side ports without needing to cut custom relief slots in the wood.
4. Direct Driver Configuration (No Tweeter)
Running the Goodmans Axiom 150 MKII completely full-range maximizes the phase coherence and imaging benefits of its dual-cone design.
Damping Level: Because there is no crossover or tweeter to mask imperfections, start by lining only the top, bottom, and one side wall with 1-inch natural wool felt.
Tuning via the Back Panel: Use your new removable back panel to experiment. If the upper-midrange sounds shouty or honky, add a loose sheet of acoustic fiberglass or carded wool directly behind the driver basket to tame rear-cone reflections.
If you are ready to start cutting the wood, let me know:
Do you want a complete, itemized cut list for your plywood sheets?
I can map out the exact dimensions for every panel you need to cut.
This itemized cut list details the components required for a single 90-litre "Petit Onken" cabinet using 3/4-inch plywood.
To build a matching pair, double the quantities listed below. The plan uses a standard butt-joint construction assembly where the top and bottom panels cap the side walls, and the front baffle is inset.
Main Cabinet Shell
Top & Bottom Panels (Qty: 2): 21-3/16" Width × 14-15/16" Depth
Side Panels (Qty: 2): 23-5/8" Height × 14-15/16" Depth
Front Baffle (Qty: 1): 23-5/8" Height × 19-11/16" Width
Removable Rear Panel (Qty: 1): 23-9/16" Height × 19-5/8" Width
(Intentionally cut 1/16" shorter on both axes to allow a tolerance gap so the panel doesn't jam against the outer walls).
Onken Port Internal Assemblies
Port Inner Wall Panels (Qty: 2): 23-5/8" Height × 12-11/16" Depth
(These form the interior walls of your left and right side channels).
Port Shelf Dividers (Qty: 4): 12-11/16" Depth × 21/32" Width
(Two dividers are stacked horizontally inside each side channel to split them structurally into three equal vertical Onken slots).
Hardwood Framing (For Removable Back)
Rear Mounting Cleats (Qty: 4): 3/4" × 3/4" square stock lumber.
Cut 2 pieces to 23-5/8" length (vertical sides).
Cut 2 pieces to 18-3/16" length (top and bottom runs between the vertical pieces).
Assembly Sequence Check
Glue and clamp the Side Panels inside the Top and Bottom panels to form the main outer sleeve.
Mount the Port Shelf Dividers to the outer sides of the Port Inner Wall Panels at equal vertical intervals before sliding the sub-assemblies into the cabinet.
Glue the front edge of the Baffle and Port Assemblies flush with the front face of the cabinet sleeve.
Install the 3/4" framing cleats inside the rear perimeter, recessing them exactly 3/4" from the back lip so your Removable Rear Panel sits completely flush when screwed tight.
Before you make your first cuts, let me know:
Do you need assistance calculating the exact circle cutout diameter for the Goodmans Axiom basket?
Do you want tips on how to safely flush-mount or rear-mount this specific vintage driver?
I can provide the mechanical spacing guidance.
AI responses may include mistakes. For financial advice, consult a professional. Learn more
5 sites
To build a complete matching pair of these 90-litre "Petit Onken" cabinets, you will require exactly two sheets of 4x8 plywood.
The cutting layouts below account for a standard 1/8" saw blade kerf (waste loss per cut) and group matching widths into continuous rip cuts to make table saw setup quick and highly accurate.
SubmittalLink +1
Sheet 1 Layout
The primary structural elements, including both front baffles, are grouped here.
Rip 1: 23-5/8" wide by 96" long
From this rip, cross-cut the following parts in sequence:
Baffles (Qty 2): 23-5/8" × 19-11/16"
Port Inner Walls (Qty 2): 23-5/8" × 12-11/16"
Side Panels (Qty 2): 23-5/8" × 14-15/16"
Rip 2: 14-15/16" wide by 96" long
From this rip, cross-cut the horizontal panels:
Top & Bottom Panels (Qty 4): 14-15/16" × 21-3/16"
Remaining Scrap Strip: ~9-3/8" wide by 96" long
Use this leftover factory section to easily rip your thin port slats:
Port Shelf Dividers (Qty 8): 12-11/16" × 21/32"
Sheet 2 Layout
This sheet contains the remaining enclosure panels and the removable rear panels.
Rip 1: 23-5/8" wide by 96" long
From this rip, cross-cut the panels for the second cabinet box:
Side Panels (Qty 2): 23-5/8" × 14-15/16"
Port Inner Walls (Qty 2): 23-5/8" × 12-11/16"
Rip 2: 23-9/16" wide by 96" long
From this rip, cross-cut the removable backs:
Removable Rear Panels (Qty 2): 23-9/16" × 19-5/8"
Plywood Cut Map Visualization
text
================================ SHEET 1 (48" x 96") ================================ +-----------------------------------------------------------------------------------+ | | | | | | | Baffle | Baffle | Port Inner | Port Inner | Side Panel | | (23-5/8" x | (23-5/8" x | (23-5/8" x | (23-5/8" x | (23-5/8" x | <-- 23-5/8" Rip | 19-11/16") | 19-11/16") | 12-11/16") | 12-11/16") | 14-15/16") | | | | | | | +---------------+---------------+---------------+-----------------+-----------------+ | | | | | | | Top/Bottom | Top/Bottom | Top/Bottom | Top/Bottom | Side | | (14-15/16" x | (14-15/16" x | (14-15/16" x | (14-15/16" x | Panel | <-- 14-15/16" Rip | 21-3/16") | 21-3/16") | 21-3/16") | 21-3/16") | (see line)| +-----------------+-----------------+-----------------+-----------------+-----------+ | [ 8x Port Shelf Dividers (12-11/16" x 21/32") Cut from this remaining scrap ] | <-- Remaining Width +-----------------------------------------------------------------------------------+ ================================ SHEET 2 (48" x 96") ================================ +-----------------------------------------------------------------------------------+ | | | | | | | Side Panel | Side Panel | Port Inner | Port Inner | | | (23-5/8" x | (23-5/8" x | (23-5/8" x | (23-5/8" x | REMNANT WOOD | <-- 23-5/8" Rip | 14-15/16") | 14-15/16") | 12-11/16") | 12-11/16") | | | | | | | | +-----------------+-----------------+---------------+---------------+---------------+ | | | | | Removable Rear Panel | Removable Rear Panel | | | (23-9/16" x | (23-9/16" x | REMNANT WOOD | <-- 23-9/16" Rip | 19-5/8") | 19-5/8") | | +------------------------+------------------------+---------------------------------+
Use code with caution.
Pro-Sawing Recommendations
Grain Alignment: All primary face panels (Baffles, Sides, and Rears) are oriented along the 23-5/8" vertical axis. This guarantees that the wood grain runs vertically on all exposed faces of the speakers, resulting in a cohesive visual look.
First Rips: Set your table saw fence to 23-5/8" and pass both sheets through along their full 8-foot length first. This strips out the main assembly blocks.
Baffle Circles: Cut the driver speaker holes out of the front baffles before gluing the cabinet together. For a 12" driver, you will want a 11-1/8" (28.3 cm) diameter circle, but measure your exact chassis lip first to verify.
Now that the cut list is finalized, let me know:
Do you want to review the exact layout configuration for the 3/4" hardwood cleats inside the rear of the box?
Would you like the steps for cutting a rear-mount vs. flush-mount lip for the speaker frame?
I can detail the cabinet machining steps.
AI Mode response is ready
Ask about