• The move to the new server is done. There are some software and database maintenance updates in process. This has us passing the hat around to help out. We appreciate any donations. Seriously, even a dollar helps. The payment page may be found here - https://www.audiokarma.org/support.html

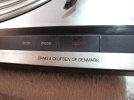
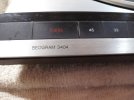
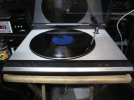
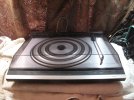
B&O Beogram 3404 in the house.

gary7

AK Subscriber
Subscriber
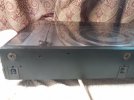
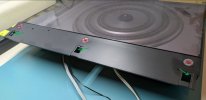
Been quite a while since I've had a B&O TT. Picked it up at a thrift Wed. Fairly dirty. Cleaned up nice. Cover needs a bit more polish. Some of the LED lamps are out. Had a MMC 20E cart, but tip was gone. Luckily I had a MMC 4000 cart. Downloaded the OM and got it playing. Got a DIN-RCA adapter coming. I'll post when I get it all squared away.
IMG_4462.JPGIMG_4463.JPGIMG_4465.JPGIMG_4466.JPG
 
Last edited:
Register to hide this ad
Just be careful to remove the correct screws if you attempt to remove the dust cover. Take off the wrong ones and the spring and shims will pop out and are difficult to replace. Loosening the wrong screws also places undue stress on the fragile plastic hinge on the right side of the dust cover which is difficult to repair (ask me how I know). You want to remove the hinge screws that hold it to the base, not the cover... or was it the other way around??? Anyway, not the ones that hold the spring onto the base.

One more thing that I noticed was that the dust cover has a small rubber "bumper" on each front corner. Mine disappeared when I was polishing my cover with plastic polish/cleaner. Keep an eye on them.
 
Last edited:
Just be careful to remove the correct screws if you attempt to remove the dust cover. Take off the wrong ones and the spring and shims will pop out and are difficult to replace. Loosening the wrong screws also places undue stress on the fragile plastic hinge on the right side of the dust cover which is difficult to repair (ask me how I know). You want to remove the hinge screws that hold it to the base, not the cover... or was it the other way around??? Anyway, not the ones that hold the spring onto the base.

One more thing that I noticed was that the dust cover has a small rubber "bumper" on each front corner. Mine disappeared when I was polishing my cover with plastic polish/cleaner. Keep an eye on them.
Which screws do you refer? I'll probably just leave it on to polish it.

1000004876.jpg
 
Remove the dust cover and hinge as one piece.
DO NOT remove the screws with the RED X.
Remove the screws with the green arrows. Hold the dust cover in its open position when you unscrew the screws to minimize the tension on the hinge.

Screenshot 2025-11-14 103740.jpg
 
Saw several front panels on the bay. Worth replacing for lamps? Easy or hard job?
 
I have not changed the lamps on my 3400, so I don't know the difficulty to get at them. Which lamps are out on yours?
As far as I can tell, I only have lamps on 45, 33, Start, Speed dial.
 
I have not changed the lamps on my 3400, so I don't know the difficulty to get at them. Which lamps are out on yours?
As far as I can tell, I only have lamps on 45, 33, Start, Speed dial.
Only one lit on mine is the 45 RPM lamp.
 
Last edited:
I have a 3404 that I bought new in the early '80s. I haven't used it in years, but it's safely stored in its original box for some future use. I really enjoyed that table when I got it, used it for quite a few years.
 
This one?
View attachment 3634077
Looks like lams are soldered in, but not too hard to exchange.
View attachment 3634078
View attachment 3634081
Well I got a 3400 that did not play local. I planned to swap the cover, was better than mine. But two screws were rusted tight. Trying to get the cover off I broke part of the cover. But my 3404 has 3 control lamps out. I metered the lamps on the 3400 control pc board. they showed good. According to the OM they look to be the same part. Would swapping out the boards be easier than swapping just the lamps?
 
Probably, but check to make sure that everything looks the same on both boards. I don't know what the difference is between the 3400 and 3404 except the tonearm. It looks like the 3404 has a remote control capability when used with other B&O components, but I don't know if the button panel is affected by this.
 
Probably, but check to make sure that everything looks the same on both boards. I don't know what the difference is between the 3400 and 3404 except the tonearm. It looks like the 3404 has a remote control capability when used with other B&O components, but I don't know if the button panel is affected by this.
The DIN plug has 2 extra pins that screw in for the remote (Mine doesn't have them) But the 3400 looks exactly like the 3404 panel PC board in the ebay pics. But is it worth doing as the table works fine. Might mess something up.
 
Yes, you need to be careful when you disassemble the turntable. You would need to remove the platter, cartridge (to protect it from damage), tape the tonearm to the base, then turn the whole thing upside down and remove the screws to the bottom cover. You would then need to unplug the wiring harness, remove the switch panel (I'm not sure how that is done), then swap the panel with the new one.

It looks like you may be able to remove the whole control panel without taking the bottom cover off.
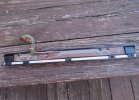
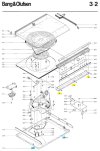
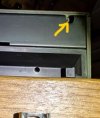
  1. There are 3 screws under the turntable in the front (highlighted in yellow)
  2. I think these hold the circuit board and buttons onto the turntable base
  3. The first photo is looking up under the bottom of my turntable.
  4. The 3 yellow arrows show the location of the 3 screws
  5. The last photo is a closeup of one of the screws and it looks like a small Phillips head screw
  6. Remove these 3 screws and I think you should be able to lift off the control assembly
  7. There will be a wire harness connected that needs to be disconnected.
  8. I can't tell if the front wood grain panel also comes off when you remove the 3 screws
Screenshot 2025-12-05 160853.jpg
Screenshot 2025-12-05 162249.jpg
Screenshot 2025-12-05 162549.jpg
 
Last edited:
Yes, you need to be careful when you disassemble the turntable. You would need to remove the platter, cartridge (to protect it from damage), tape the tonearm to the base, then turn the whole thing upside down and remove the screws to the bottom cover. You would then need to unplug the wiring harness, remove the switch panel (I'm not sure how that is done), then swap the panel with the new one.

I can't tell from the drawing in the SM if you need to remove the top cover in order to remove the bottom cover. It could be a lot of work?

View attachment 3648264
You have to remove the 3 screws & brackets from the top cover hinge & 2 screws on the sides of the bottom to get to the wiring harness. But you can remove 3 screws of the switch panel and flip it back to access the pc board to replace the lamps. The lamp wires are very thin, Care must be taken. My soldering skills aren't the best.
 
Back
Top Bottom