The RX-2 dust cover is same as on the 1800 and several other models but different from the RX.
I removed the "friction pieces" thinking they needed to be off to remove the cover. Now cannot figure out how to put them back together.
The pieces have little notches which fit into slots in the dust cover, so the orientation and how they fit into the cover is clear enough.
However, I don't know where the torsion spring goes relative to the piece Should the spring go between the friction piece and the cover? Or does the friction piece have nothing to do with the spring?
I have read many, many posts on how to reattach the dust cover, but none are specifically for this model, or they all assume the friction pieces are already installed. Here is the best post: https://archivedforum.beoworld.org/forums/t/7735.aspx, but again, this assume everything is already assembled correctly.
The service manual shows the parts but not how they fit together in relation to one another. It does not help that I really don't understand how the spring mechanism is supposed to work with the friction pieces.
When I tried manually closing the dust cover (not with it attached to TT), plastic parts on the inside near hinge snapped off (not good). The spring is clearly under tension as the lid closes, and the friction pieces don't seem to be doing anything.
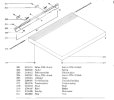
Attaching picture from the SM showing the parts. Part 1203 is the friction piece. Part 1202 is a spring which is attached to the outside of the dust cover with screw, part 1203. I don't quite understand how that is a spring.
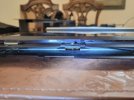
Other picture is my latest attempt, with the torsion spring between the friction piece and the dust cover. I don't know if this is the correct way to install it.
I removed the "friction pieces" thinking they needed to be off to remove the cover. Now cannot figure out how to put them back together.
The pieces have little notches which fit into slots in the dust cover, so the orientation and how they fit into the cover is clear enough.
However, I don't know where the torsion spring goes relative to the piece Should the spring go between the friction piece and the cover? Or does the friction piece have nothing to do with the spring?
I have read many, many posts on how to reattach the dust cover, but none are specifically for this model, or they all assume the friction pieces are already installed. Here is the best post: https://archivedforum.beoworld.org/forums/t/7735.aspx, but again, this assume everything is already assembled correctly.
The service manual shows the parts but not how they fit together in relation to one another. It does not help that I really don't understand how the spring mechanism is supposed to work with the friction pieces.
When I tried manually closing the dust cover (not with it attached to TT), plastic parts on the inside near hinge snapped off (not good). The spring is clearly under tension as the lid closes, and the friction pieces don't seem to be doing anything.
Attaching picture from the SM showing the parts. Part 1203 is the friction piece. Part 1202 is a spring which is attached to the outside of the dust cover with screw, part 1203. I don't quite understand how that is a spring.
Other picture is my latest attempt, with the torsion spring between the friction piece and the dust cover. I don't know if this is the correct way to install it.