The Energy 22 series speakers have earned a legendary reputation among audiophiles for their incredible imaging and seamless soundstage. A massive part of that magic comes down to their famous dual hyperdome tweeters, which boast phenomenal dispersion and are crossed over to the 7-inch woofer at a remarkably low 1500 Hz.
Unfortunately, time is the ultimate enemy of these classic speakers. As the decades pass, the ferrofluid inside the original hyperdomes dries up, leading to muted performance, distortion or complete driver failure. Compounding the heartbreak, professional refurbishment can easily cost upwards of $200 per tweeter, forcing many owners to consider third-party replacements.
If you are looking to rescue your Energy 22s, finding a proper replacement is a complex engineering challenge. A suitable drop-in tweeter must meet four critical criteria:
Enter the Peerless DA32TX00-08 1.25" Corundum Dome Tweeter. Boasting ultra-low distortion, wide dispersion, an 8-ohm impedance, and a robust design that handles a 1500 Hz floor effortlessly, it checked every single box. Better yet, it is highly affordable—available from Solen Electronique in Canada for around $90 CAD and from DigiKey for roughly $82 CAD.
You can review the full technical parameters here:
DA32TX Specifications
Determined to see how they lived up to the data, I purchased a matched pair of DA32TX tweeters to replace the dead hyperdomes in my own Energy 22 Reference monitors. The results were excellent. If you are struggling with dead tweeters, here is exactly how you can use the Peerless DA32TX to bring your Energy 22s back to life.
The Baseline: The Original Energy 22 Response
To understand what we are aiming for, it helps to look at how these speakers measured in their prime. While I didn't have a working pair of stock hyperdomes to establish an "as-built" baseline, I found a vintage 1982 review containing frequency response measurements:

1982 Measurements of Energy 22 Pro
According to those historical measurements, a healthy Energy 22 exhibits:
Physical Fit & Installation
Out of the box, the DA32TX aligns beautifully within the original cabinet's circular cutout, but it poses a slight depth problem: the Peerless faceplate is only about 2 mm thick.
Initially, I tried sealing it using a thick, stiff weatherstripping tape, but the tweeter shifted and "floated" too much within the deep recess. To fix this properly, I fabricated a custom wooden spacer ring out of 1/8-inch Baltic Birch plywood (though Masonite or a custom 3D-printed ring would work just as well).
The ring specs are straightforward:
The result? The DA32TX seats perfectly flush with the front face of the cabinet, leaving a clean, uniform 1.5 mm gap around the perimeter. Once I am finished tweaking the system, I plan to fill this tiny outer aesthetic gap with a clean bead of black gasket maker.
Electrical Connections
The DA32TX uses a unique terminal style that ships with its own matching banana plugs. To integrate it cleanly, I snipped the factory spade connectors off the original blue and yellow tweeter wires and connected the Peerless-supplied banana jacks. The above photo of the spacer ring mounted in the cabinet also shows the Peerless DA32TX banana plug fastened to the yellow and blue tweeter wires
When wiring your set, follow this polarity orientation:
Sound Quality & Stock Measurements
For anyone looking for a simple drop-in fix without touching a soldering iron to the crossover, you will be very pleased. Even with the factory crossover completely stock, the speaker sounds wonderfully balanced, engaging, and clear.
Measuring the speaker with the stock crossover reveals a very respectable response curve:

On-Axis Frequency Response (Stock Crossover + DA32TX)
The output above 1 kHz sits a bit lower than the response below 1 kHz. While it misses the absolute "ruler-flat" perfection and the 12 kHz bump of the original hyperdomes, the presentation is smooth, highly non-fatiguing, and exceptionally clean.
Crossover Modifications (Optional Optimization)
After living with the stock crossover integration for an extended listening period, there were two minor deviations from the vintage sound profile that I wanted to correct:
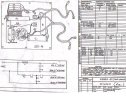
Schematic of Original Energy 22 Crossover Network
The crossover is mounted on the back wall of the cabinet behind the woofer. The input terminals on the back of the cabinet are integral with the crossover.
Note that my factory crossover did not match the physical layout shown in the upper lefr corner, but all of the components were they (just laid out differently) and matched the schematic.

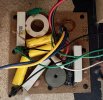
Factory Crossover Board
1. Boosting Output Above 1.2 kHz (Tweeter Padding)
To bring the overall tweeter level up by roughly 1 dB to better match the woofer output, you can simply lower the resistance of the factory padding resistor (R2 in the photo). By soldering a 10-ohm resistor in parallel across R2, the net padding resistance drops from 3.3 ohms down to roughly 2.5 ohms, which opens up the top-end slightly.
2. Resolving the 1.2 kHz to 3 kHz Droop
To smooth out the droop around the crossover point at 1500 Hz, you can adjust the capacitance immediately following the padding network (C2, the 6 µF capacitor, in the photo). By adding a 2 µF capacitor in parallel across C2, you raise the total capacitance to 8 µF. This shifts the filter response just enough to lift the 1 kHz to 3 kHz region by about 1 dB.
Here’s a shot of the frequency response without any changes to the crossover (brown trace) and after the two changes to the crossover described above (10 ohm in parallel with R2 and 2 uF in parallel with C2) shown in blue trace. You can see that the modifications provide a slight lift above 800 Hz:

Frequency Response With and Without Crossover Changes
Here’s the on axis (blue), 30 degree off-axis (green) and 60 degrees off-axis (purple) frequency response with the modified crossover:

0, 30 and 60 degree off-axis frequency response
(Note: I also experimented with adding parallel resistance to the shunt resistor, R3 on the schematic, but this introduced an unpleasant peak between 2 kHz and 5 kHz, so I highly recommend leaving R3 completely stock).
Testing
To safely test adjustments to the crossover in real-time without constantly opening the cabinets, I clipped test leads to either side of R2 (white leads) and C2 (black leads), routing the wires out through the front bass reflex port.
Here is a picture of the modified crossover with the 2 uF capacitor in parallel with the original 6 uF C2 capacitor and a 10 ohm resistor in parallel with the original 3.3 ohm R2 resistor.
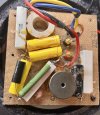
Modified Crossover
While a complete, ground-up crossover redesign could theoretically squeeze even more performance out of the DA32TX, the historical acclaim of the Energy 22 series makes a conservative, additive approach much more appealing.
Conclusion
With the modifications complete, these iconic Canadian monitors sound absolutely spectacular. The Peerless DA32TX preserves the soulful, non-fatiguing, and expansive presentation that made the Energy 22 a legend, while introducing the razor-sharp imaging and vanishingly low distortion of a modern driver.
While I have not had the opportunity to compare them side-by-side to a factory-fresh pair of working hyperdomes, I can confidently say that this upgrade rescues these speakers from the scrap heap and places them right back on the high-end audio map. If you have a pair of Energy 22s collecting dust because your tweeters aren’t working and you don’t know what to do, I suggest the DA32TX as the upgrade your listening room deserves.
I would love to hear from the rest of the audio community on this! If you have also modified a pair of Energy 22s, let me know:
Unfortunately, time is the ultimate enemy of these classic speakers. As the decades pass, the ferrofluid inside the original hyperdomes dries up, leading to muted performance, distortion or complete driver failure. Compounding the heartbreak, professional refurbishment can easily cost upwards of $200 per tweeter, forcing many owners to consider third-party replacements.
If you are looking to rescue your Energy 22s, finding a proper replacement is a complex engineering challenge. A suitable drop-in tweeter must meet four critical criteria:
- Low Crossover Capability: Most importantly, it must comfortably handle a 1500 Hz crossover point. Very few modern tweeters can play this low without straining or distorting, heavily limiting your options.
- Wide Dispersion: It needs excellent off-axis performance to match the expansive soundstage of the original design.
- Physical Dimensions: The original hyperdome features a massive 136 mm faceplate. A new tweeter requires a similarly large footprint, or it will leave a glaring gap in the cabinet's original tweeter recess.
- Electrical Sympathy: It should feature close efficiency and impedance matches to the original drivers to minimize the need for complex crossover overhauls that could negatively impact the sound profile of the speakers.
Enter the Peerless DA32TX00-08 1.25" Corundum Dome Tweeter. Boasting ultra-low distortion, wide dispersion, an 8-ohm impedance, and a robust design that handles a 1500 Hz floor effortlessly, it checked every single box. Better yet, it is highly affordable—available from Solen Electronique in Canada for around $90 CAD and from DigiKey for roughly $82 CAD.
You can review the full technical parameters here:
DA32TX Specifications
Determined to see how they lived up to the data, I purchased a matched pair of DA32TX tweeters to replace the dead hyperdomes in my own Energy 22 Reference monitors. The results were excellent. If you are struggling with dead tweeters, here is exactly how you can use the Peerless DA32TX to bring your Energy 22s back to life.
To understand what we are aiming for, it helps to look at how these speakers measured in their prime. While I didn't have a working pair of stock hyperdomes to establish an "as-built" baseline, I found a vintage 1982 review containing frequency response measurements:
1982 Measurements of Energy 22 Pro
According to those historical measurements, a healthy Energy 22 exhibits:
- Ruler-Flat On-Axis Response: Extremely linear delivery with a minor, airy lift in output above 12 kHz.
- Excellent 30-Degree Off-Axis Response: Impressively flat behavior, with only a gentle, natural roll-off above 10 kHz.
- 60-Degree Off-Axis Trajectory: A steep drop-off above 10 kHz, coupled with a noticeable droop in the 500 Hz to 3000 Hz range. This droop is caused by the natural directionality of the 7-inch woofer, though Energy cleverly mitigated this by crossing over to the tweeter at a low 1500 Hz.
Out of the box, the DA32TX aligns beautifully within the original cabinet's circular cutout, but it poses a slight depth problem: the Peerless faceplate is only about 2 mm thick.
Initially, I tried sealing it using a thick, stiff weatherstripping tape, but the tweeter shifted and "floated" too much within the deep recess. To fix this properly, I fabricated a custom wooden spacer ring out of 1/8-inch Baltic Birch plywood (though Masonite or a custom 3D-printed ring would work just as well).
The ring specs are straightforward:
- Outside Diameter (OD): 135 mm
- Inside Diameter (ID): 102 mm
The result? The DA32TX seats perfectly flush with the front face of the cabinet, leaving a clean, uniform 1.5 mm gap around the perimeter. Once I am finished tweaking the system, I plan to fill this tiny outer aesthetic gap with a clean bead of black gasket maker.
The DA32TX uses a unique terminal style that ships with its own matching banana plugs. To integrate it cleanly, I snipped the factory spade connectors off the original blue and yellow tweeter wires and connected the Peerless-supplied banana jacks. The above photo of the spacer ring mounted in the cabinet also shows the Peerless DA32TX banana plug fastened to the yellow and blue tweeter wires
When wiring your set, follow this polarity orientation:
- Yellow Wire: Connects to the Positive (+) tweeter terminal.
- Blue Wire: Connects to the Negative (-) tweeter terminal.
For anyone looking for a simple drop-in fix without touching a soldering iron to the crossover, you will be very pleased. Even with the factory crossover completely stock, the speaker sounds wonderfully balanced, engaging, and clear.
Measuring the speaker with the stock crossover reveals a very respectable response curve:
On-Axis Frequency Response (Stock Crossover + DA32TX)
The output above 1 kHz sits a bit lower than the response below 1 kHz. While it misses the absolute "ruler-flat" perfection and the 12 kHz bump of the original hyperdomes, the presentation is smooth, highly non-fatiguing, and exceptionally clean.
After living with the stock crossover integration for an extended listening period, there were two minor deviations from the vintage sound profile that I wanted to correct:
- A slightly recessed overall response above about 1.2 kHz.
- A subtle droop in the critical 1.2 kHz to 3 kHz transition region.
Schematic of Original Energy 22 Crossover Network
The crossover is mounted on the back wall of the cabinet behind the woofer. The input terminals on the back of the cabinet are integral with the crossover.
Note that my factory crossover did not match the physical layout shown in the upper lefr corner, but all of the components were they (just laid out differently) and matched the schematic.
Factory Crossover Board
1. Boosting Output Above 1.2 kHz (Tweeter Padding)
To bring the overall tweeter level up by roughly 1 dB to better match the woofer output, you can simply lower the resistance of the factory padding resistor (R2 in the photo). By soldering a 10-ohm resistor in parallel across R2, the net padding resistance drops from 3.3 ohms down to roughly 2.5 ohms, which opens up the top-end slightly.
2. Resolving the 1.2 kHz to 3 kHz Droop
To smooth out the droop around the crossover point at 1500 Hz, you can adjust the capacitance immediately following the padding network (C2, the 6 µF capacitor, in the photo). By adding a 2 µF capacitor in parallel across C2, you raise the total capacitance to 8 µF. This shifts the filter response just enough to lift the 1 kHz to 3 kHz region by about 1 dB.
Here’s a shot of the frequency response without any changes to the crossover (brown trace) and after the two changes to the crossover described above (10 ohm in parallel with R2 and 2 uF in parallel with C2) shown in blue trace. You can see that the modifications provide a slight lift above 800 Hz:
Frequency Response With and Without Crossover Changes
Here’s the on axis (blue), 30 degree off-axis (green) and 60 degrees off-axis (purple) frequency response with the modified crossover:
0, 30 and 60 degree off-axis frequency response
(Note: I also experimented with adding parallel resistance to the shunt resistor, R3 on the schematic, but this introduced an unpleasant peak between 2 kHz and 5 kHz, so I highly recommend leaving R3 completely stock).
Testing
To safely test adjustments to the crossover in real-time without constantly opening the cabinets, I clipped test leads to either side of R2 (white leads) and C2 (black leads), routing the wires out through the front bass reflex port.
These test leads allowed me to swap various resistor and capacitor values on the fly while listening to familiar reference tracks in my actual room. While the 10-ohm resistor and 2 µF capacitor combination sounded best to me in my room, you can use this approach to voice the speaker to your personal taste. For example, you could try various combinations of capacitor values of 1 uF, 2 uF or 3 uF, along with resistances of 20 ohms, 10 ohms or 3.3 ohms to determine which combination sounds best to you in your room (also listening to the stock crossover without any modifications as the “base” combination).
Here is a picture of the modified crossover with the 2 uF capacitor in parallel with the original 6 uF C2 capacitor and a 10 ohm resistor in parallel with the original 3.3 ohm R2 resistor.
Modified Crossover
While a complete, ground-up crossover redesign could theoretically squeeze even more performance out of the DA32TX, the historical acclaim of the Energy 22 series makes a conservative, additive approach much more appealing.
With the modifications complete, these iconic Canadian monitors sound absolutely spectacular. The Peerless DA32TX preserves the soulful, non-fatiguing, and expansive presentation that made the Energy 22 a legend, while introducing the razor-sharp imaging and vanishingly low distortion of a modern driver.
While I have not had the opportunity to compare them side-by-side to a factory-fresh pair of working hyperdomes, I can confidently say that this upgrade rescues these speakers from the scrap heap and places them right back on the high-end audio map. If you have a pair of Energy 22s collecting dust because your tweeters aren’t working and you don’t know what to do, I suggest the DA32TX as the upgrade your listening room deserves.
- Have you tried the Peerless DA32TX, or did you go with other tweeters like the Dayton or Audax?
- Have you measured the frequency response of your modified speakers?
- Did you leave the crossover stock or did you make changes. If so, what changes did you make and why?
- If anyone has an intact pair of Energy 22s with original working hyperdomes and is near the Kingston, Ontario area, I would welcome the opportunity to run a side-by-side listening and measurement test to see how the modern Peerless tweeter stacks up against the factory original sound!