• The move to the new server is done. There are some software and database maintenance updates in process. This has us passing the hat around to help out. We appreciate any donations. Seriously, even a dollar helps. The payment page may be found here - https://www.audiokarma.org/support.html

Buick Verano 2013 - rear brake pads complicated by electronic parking brake (EPB)

roger2

.
Subscriber
Ok, need some help with this one please. 2013 Buick Verano with disc brakes on rear and electronic parking brake (EPB). I have several questions.

First let me say that there is precious little information available about this car. It is a Chinese design. There is no Haynes Manual for it. I subscribed to AllDataDIY just for this model and there is almost nothing there. YouTube does have a handful of videos, which help some, but also leave many questions unanswered.

Here is what happened: one of the pads on the left rear broke, causing that wheel to drag and semi-lockup. I removed the entire caliper + caliper bracket assembly (15mm bolts) to remove the pads. That may or may not have been a mistake, I don't know, but that is where I am at this point. The entire caliper assembly is currently hanging safely by a wire. I also have new, quality ceramic pads and also the special tool to compress (turn in) the caliper piston, and everything else needed to install the new pads. Rotors look good, surprisingly.

QUESTIONS:

(1) Do I need to put the electronic parking brake into service mode in order to compress the caliper piston?

(2) If I do need to put the electronic parking brake into service mode, how is that done? (I found a youtube video describes the process but it is not very clear, and it assumes that the entire brake system is intact)

(3) With the caliper assembly unattached and no pads installed, what would happen with the caliper piston if I should press the brake pedal? ( I ask because that is part of the process described in the video mentioned above in question #2)

(4) What torque should I use when reinstalling the two main 15mm bolts that attach the caliper assembly?

Hopefully somebody here knows something about the EBP and the complications it brings to the table. I have never worked on brakes on a car this "new". I know, a 2013 is not new. But working with any type of EPB is new to me :)

Thanks in advance...


.
 
Last edited:

Register to hide this ad
I haven't worked on one of these either so take my advice with a mountain of salt. Is the EPB the type that only turns on when you hit a button? Some automatically apply the parking brake when you put the car in park but based on what you're saying, it doesn't sound like yours is this type. You wouldn't have been able to get the caliper off the rotor if the parking brake were working. I don't think you need to put the parking brake in service mode unless it automatically applies itself.

Don't touch the brake pedal or EPB switch until the new pads are installed and the caliper is back on the rotor. You'll probably blow the piston out of the caliper and that will be a mess to fix. If someone does that while you have a finger in the way of the piston, it'll take a finger clean off.

If you can't find a torque spec for the bolts, you can use a generic guide like this - https://www.metric-bolt-torque.com/metric-thread/metric-thread-bolt-torque-table/ I assume the 15mm you gave is the bolt head size which is not really helpful. You need the thread size and strength (probably 8.8 or 12.9 - look at the bolt head for those numbers) to get in the ballpark for the torque you should use.
 
@Brian1970

That is helpful, thank you.

Not sure exactly how the EPB is supposed to operate. It has had intermittent issues with "catching" and needing to put the car in reverse to free it. But, this is not what I experienced when the pad physically broke. That was more like a semi-lockup. The car would still move but the rotor got hot from friction.

RE the 15mm bolts, yes your assumption is correct, 15mm is the head size. I will have a look at them when I am back into the project later today, and see if there are any markings indicating grade or strength, and measure thread diameter. Thanks for the link, haven't looked at it but will do so now.
 
@Brian1970

That is helpful, thank you.

Not sure exactly how the EPB is supposed to operate. It has had intermittent issues with "catching" and needing to put the car in reverse to free it. But, this is not what I experienced when the pad physically broke. That was more like a semi-lockup. The car would still move but the rotor got hot from friction.

RE the 15mm bolts, yes your assumption is correct, 15mm is the head size. I will have a look at them when I am back into the project later today, and see if there are any markings indicating grade or strength, and measure thread diameter. Thanks for the link, haven't looked at it but will do so now.
Well, you got it apart and the reason for the EPB service mode is to keep the parking brake off so you can get it apart. So I wouldn't worry about that at this point. If the parking brake doesn't work correctly after you get it back together, you can treat that as a separate problem I think.
 
If you absolutely must step on the pedal with the caliper off, stuff a wood block in there to keep the caliper piston from being able to come out of the bore.
 
I will post a picture and measured diameter of the caliper bracket bolts in about 15 minutes. Proper, or best guess, torque for those is the only significant remaining issue!

Good news is that I was able to get everything cleaned up and test fit the new pads into the caliper, and the caliper assembly over the rotor. I did need to "screw in" the caliper piston but the special tool (loaned from Advance Auto) worked. And no, the EBP was not an issue, thankfully. Was able to compress the piston far enough to make a wide enough gap between the pads. No issues with brake fluid over flowing.

P.S. one other observation is that there was some type of thread locker on the large caliper bracket attachment bolts. I have Permatex Threadlocker BLUE (medium strength) and am thinking it might be a good idea to use it here. Any opinions about that?
 
P.S. one other observation is that there was some type of thread locker on the large caliper bracket attachment bolts. I have Permatex Threadlocker BLUE (medium strength) and am thinking it might be a good idea to use it here. Any opinions about that?

My only question would be, are you sure it's thread locker, and not anti seize compound?

I know you said there is scant to none for info on this car, but, are the same brakes used on a different car that may have better documentation?
 
quick Rockauto search shows this for the rear caliper, no idea if the Cascada has better docs

1771534877719.png

Centric brand has this for cross-reference

1771535015254.png
 
Good question but I think it was thread locker. The texture was not like anti-seize. I went around the inside of the threads with the sharp end of a dental pick to remove the material. It was more brittle than soft. and flaked off. Can't be 100% certain. But I think it was thread locker.
 
Good thinking! Cascada, which I have never heard of BTW, may well have better documentation. And I will check into that later.

At this point I am going to continue getting my pics uploaded and let @Brian1970 have a look, he seems to be knowledgeable in this area. Unfortunately, I do not currently have the luxury of time for reasons I prefer not to go into...
 
Last edited:
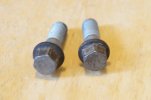
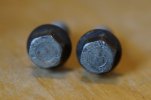
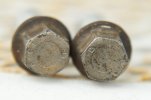
The head is 15mm hex, as already mentioned. The shaft is 12mm diameter at the top (unthreaded area) and around 11.8mm in the threaded area.

Pics below. There are numbers and a symbol, I think, but it means nothing to me.
DSC09343cr.JPGDSC09344cr.JPGDSC09351cr.JPG
 
quick Rockauto search shows this for the rear caliper, no idea if the Cascada has better docs

View attachment 3703545

Centric brand has this for cross-reference

View attachment 3703546

Here is what google's AI answered to this question: what is the bolt tightening torque for Buick Cascada rear caliper bracket mounting bolts?

"Based on typical GM specifications for vehicles in this class, the rear caliper bracket mounting bolts for the Buick Cascada (2016-2019) should be tightened to approximately
94 lb-ft (128 Nm).

  • Rear Caliper Bracket Mounting Bolts: 128 N-m / 94 lb-ft.
  • Rear Caliper Pin/Slide Bolts: 27 N-m / 20 lb-ft.
It is highly recommended to clean the threads and apply thread lock adhesive to the caliper bracket bolts during installation to prevent them from loosening. "
 
Google inquiry: what is the bolt tightening torque for 2013 Buick Verano rear caliper bracket mounting bolts?

"AI Overview

Based on GM brake service specifications for vehicles of this type, the rear caliper anchor bracket bolts for a 2013 Buick Verano should be tightened to
128 N-m / 94 lb-ft.

  • Rear Caliper Anchor Bracket Bolts: 128 N-m or 94 lb-ft.
  • Rear Caliper Guide Pin Bolts: 27 N-m or 20 lb-ft.
Important Notes:

  • It is highly recommended to use threadlocker on the bracket bolts.
  • Some late-model GM service procedures indicate these may be torque-to-yield fasteners that should be replaced, requiring a specific angle (e.g., 60-70 degrees) after initial tightening. Always check if your replacement bolts came with pre-applied threadlocker."
 
Well, new development. It seems that these caliper bracket bolts may be "single use". They sell them at RockAuto and Advance Auto Parts.

So I guess my new plan will be to finish the left wheel today and use the old bolts temporarily, torqued to 94 ft lbs and with thread locker. I will order new bolts from RockAuto and wait to do the right wheel until I get the new bolts. Then go back and put the new bolts in the left side.

Still don't know the torque for certain, or whether or not these are "TTY" types. Any additional input on those topics will be welcomed.

And thanks to everyone who posted, every single post was helpful and much appreciated!

.
 
Thanks for the vote of confidence but these other guys are at least as good as I am at this :). Looks like 10.9 stamped on the heads so for a little under 12mm, I think about 80 lb/ft is a good number based on that generic chart. 94 lb-ft like you found sounds a little high but isn't crazy. If they are TTY bolts, be careful because you may snap one if you try to reuse it. Might be hard to get it out depending on where it is. It pays to have a feel for these things and be able to tell when a bolt's starting to let go so you can stop and just take it back out.
 
Thanks for the vote of confidence but these other guys are at least as good as I am at this :). Looks like 10.9 stamped on the heads so for a little under 12mm, I think about 80 lb/ft is a good number based on that generic chart. 94 lb-ft like you found sounds a little high but isn't crazy. If they are TTY bolts, be careful because you may snap one if you try to reuse it. Might be hard to get it out depending on where it is. It pays to have a feel for these things and be able to tell when a bolt's starting to let go so you can stop and just take it back out.


Hadn't thought about snapping one. That is a scary thought for sure.

Do you, or anyone reading, think that the fact that these bolts are readily available implies that they are indeed single use, or TTY?

EDIT: I will answer my own question ....google says they are single use and TTY. It said (again) torque to 94 ft lbs but didn't mention anything about any additional turning to satisfy the TTY requirement..

.
 
Last edited:
My gut says they're not TTY bolts. But I'm not willing to bet your safety on my gut. New bolts are cheap. I wouldn't try to re-use them at all if you're getting new ones anyway.
 
Project update: I got pads replaced on both rear wheels. Thanks again to everyone who posted :)

On the left rear I used new caliper bracket attachment bolts torqued, as noted above, to about 94 ft lbs.

On the right rear I did it the easier way, which is removing one of the bolts at the end of the slide pin, allowing the caliper part of the assembly to rotate and give access to both the caliper piston and the pads. Removing the large caliper bracket bolts is not required except to replace rotors. Also want to note, on the off chance that someone else might use this thread as a resource sometime in the future, that accessing the rear pads as described above requires a #10 E-Torx socket to remove a small bracket holding the brake line.

I also cleaned and re-greased both of the caliper slide pins on the right rear wheel. Will go back and re-grease the pins on the left rear when I do the front pads in a week or so.

Turns out that the EPB was not that much of an issue, other than requiring a special tool to turn in the caliper pistons.
 
Last edited:
Back
Top Bottom