• The move to the new server is done. There are some software and database maintenance updates in process. This has us passing the hat around to help out. We appreciate any donations. Seriously, even a dollar helps. The payment page may be found here - https://www.audiokarma.org/support.html

Building an EFB Dynaco ST-35 restomod in 2026

I did indeed and didn't find it too difficult to work with. The amp is dead quiet with respect to any hum/buzz. Note that Dave gives a specific reason in the instructions for attaching the ground lug to the specified location.

Here's underneath with the switch and pilot lamp treatment, FYI, @Lavane. I also added the CL-80 you see.

View attachment 3856961
The ST-35 is so clean inside when using DG's EFB board kit.
 
Stainless usually drills better at lower speeds and more pressure. Keep the bit cutting and COMMIT.
Some alloys will work harden to a real tough surface in three revs or less of a drill bit. Keep. It. Cutting.
Sharp bits & lube.
 
You don't need Telefunkens in your ST35. You do need a quartet of matched tubes, that is more important then brand. Matching implies new tubes, that's the only way to keep them matched.
No argument from me. :) The ST35 was half price without the Telefunken EL84s.

I bought a new matched quad of EL84/6P14P "Reflector" tubes from TheTubeStore, which sound incredible. The PAS3 came with Dynaco-branded Telefunkens, which might be a bonus there.

Sadly I see TheTubeStore no longer has the Reflectors.
 
Every time I see a picture of your amp I want to pull my amp out of my sysyem and add a pilot light. How hard was it to drill through that stainless steel chassis? Did you use a certain thoe a drill bit? Ive had bits weld there selves to stainless.
Stainless is much harder than plain steel. Which I discovered when drilling a pilot light hole in a Chinese tube amp kit. My recommendation is to pick up a bit intended for use with thread taps. They come in gauge sizes, but the equivalent metric/fractional sizes can be found online.

These work well because they are intended for metal, and also will be new, so they'll be sharp ;)

My local Ace hardware carries these. Made the job very easy.
The drill bits that welded to rhe chassis was one od rhose Chinese stainless
Steel chassis as well. It was a small one I bad bought ro build a preamp into.
I'll checkout the hardware store near me for one of those bits.
 
I've been wanting to do an ST 35 project myself but my gas and nitro powered RC speed boat builds have sucked up a lot of time and money. I did purchase around 3 years ago a new build PAS 3, I really like it, it matches nicely with any of the amps I use.
 
Center punch and use a carbide drill bit.
Also if possible put a small block of wood on the back side of the hole for support when the drill breaks through, plus you won’t distort (bend) the chassis.
 
Last edited:
I've been wanting to do an ST 35 project myself but my gas and nitro powered RC speed boat builds have sucked up a lot of time and money. I did purchase around 3 years ago a new build PAS 3, I really like it, it matches nicely with any of the amps I use.
I'm also in the nitro gang and as much as I love a good nitro slash, amps are better for me. I'll add that reading through this thread a lot of people have been reading the right advice because few amps sound as beautiful as the SCA-35 / ST-35. Plenty others have more power, but not the goosebumps.
 
Most the local hardware stores now sell either the DeWalt or Milwaukee Cobalt drill bits, that is what you will use to drill hard steel, finding some carbide bits will be more difficult and not necessary. The carbide is bit harder which allows a bit higher drill speeds which is more common in machine tools and production work but because of the hardness is more common to chip and using these bits I use moly as a lube, kind of nasty black lube. The cobalt bits just run them slow and steady and for a lube I love Anchor Lube, it is a water based so easy to clean up and most the time you can find it for sell in small bottles on Amazon. You will need to deburr the hole after drilling it. If you're working at building more than one kit and drilling a lot, a complete set of Cobalt bits in an index is a great tool, maybe great gift to recommend your kids to buy you for next Fathers day.

Don't fall for some crappy bits they sell that say titanium those are worthless in hard metal, just a fraudulent advertising scam.

And don't use any lube to get the hole started, it will make it harder to get the dit to stay in place and you don't want it to walk across the face, do as others have said you a starter punch to make a dimple for the bit to start.
 
Last edited:
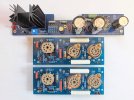
I have populated the 3 boards and drilled the missing hole needed for mounting the EFB board. Next up is extending some of the leads on the vintage transformers and cleaning them up.

I want the EFB board mounting screws to match the ones from DynakitParts and I'm trying to avoid ordering 100. Does anyone have 1/4" long pan head slotted 4-40 stainless steel screws and is willing to sell me a few?
 

Attachments

  • st35_boards.jpg
    st35_boards.jpg
    200.5 KB · Views: 30
The Ace hardware store near me has all sorts of screws in pull out drawers. I've found some I was looking for at Home Depote too in the pull out drawers thave. No need to buy 100.
 
Thanks @Lavane. I checked all the local hardware stores. None of them have these screws in stainless steel and I am being stubborn. McMaster-Carr sells them by the 100. I will reach out to DynakitParts once I am sure there is nothing else I need from them.
 
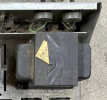
The vintage transformers I pulled from the SCA-35 are overall in good shape and I was not planning to refinish them. When I got the amp there were 2 pieces of black electrical tape over the power transformer holding down a small piece of wood!

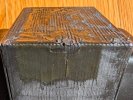
I had hoped the residue left behind when I removed the tape would come off easily but no luck. I have tried:
  • A heat gun. Got the surface up to 140F.
  • A small piece of naphtha soaked paper towel sealed against the tape residue and left over night which only effected the paint finish.
  • Both Goof Off Pro and acetone based nail polish remover attack the black finish.
Does anyone have any other ideas?
 

Attachments

  • st_tape.png
    st_tape.png
    479.7 KB · Views: 8
  • st_residue.jpg
    st_residue.jpg
    319.1 KB · Views: 8
I've never been shy about stripping transformers and refinishing. And I've never had a failure or other issue afterwards. I strip the laminations if they are rusty or crusty, which some folks say is bad but after stripping I use a foam brush with some oil based black enamel so that it flows in between the lams. Never had one go noisy or cause any other perceivable issue.
 
Thanks @nerdorama. I could refinishing the laminations and leave the end bells alone but I was really hoping not to do that. How do you strip the laminations?
 
Back
Top Bottom