• The move to the new server is done. There are some software and database maintenance updates in process. This has us passing the hat around to help out. We appreciate any donations. Seriously, even a dollar helps. The payment page may be found here - https://www.audiokarma.org/support.html

Can you diagnose? (Pioneer PL-05 issue)

A bit of troubleshooting is in order here. You want to check each part of the system as independently as possible.

Turn the system off.
Turn the Master volume ALL the way down.
Unplug your turntable.
Take a phone, ipod or mp3 player, or some other portable device and plug that into the phono jacks. You will need one of these:
Turn the output of the player ALL the way down.
Start a song or recording playing on the player with the volume all the way down.
Turn on the Amp and slowly bring the volume up to a normal listening position. Stop if you start to hear the recording.
Now slowly bring up the volume on the player. Stop if you hear the music. It will sound lousy but you will hear it.

If all that works it means your amp is working OK and the problem is in the turntable or interconnects.

Thank you. I tried that and it all works.
 
On a receiver or amp with a tape monitor switch, you can have any other input selected and the tape monitor will affect it if selected. Does your amp have a tape monitor switch?
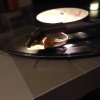
Yes. In "normal" mode, I can select different input devices, including "TAPE" [see picture]
 

Attachments

  • image.jpg
    image.jpg
    67 KB · Views: 12
Did it ever work properly for you or was it working like this since you have had it? If it has changed since you got it, when did that occur? Otherwise do you know anything about it's history?

I sold a turntable to someone several months ago. They also bought an amp. They recently complained they could barely hear anything while playing a record and they brought the amp over; it tested fine. They didn't bring the turntable, but when they did I found that the stylus wasn't installed properly. It wasn't the one they took it home with originally but a replacement. Once seated correctly it worked fine.

You might be dealing with something like that. As said above, the wires might be on the wrong pins though I'm not sure if that would be easy to screw up on that table.

It has never worked for me. It definitely work in the '80's and possibly much later. The non-working conditioned has not changed since I've had it. I do know a little about its history, as it belonged to my wife's grandmother (quite the audio set up for a 63-year old in 1983). Sometimes grandkids would press the buttons on it and the grandparents would get them to stop messing with it. FWIW, the buttons all work fine...just obviously not the output...
 
Are the cartridge leads on the right pins -- you may have two reversed, which would cancel the center mono part of the signal.
And check the connections at the end of the wire also, to make sure they weren't reversed.

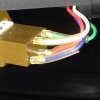
Do these look good thus far? [see pictures. Wide shot, then zoomed in]
 

Attachments

  • image.jpg
    image.jpg
    47.2 KB · Views: 15
  • image.jpg
    image.jpg
    41.4 KB · Views: 16
That doesn't look right. The red and white are the + or signal leads and the green and blue are the ground or -. One side appears to be upside down.

I dont know that cartridge so am not sure what is correct but it should have some marking near the pins if you can get in close.

My guess is that you need to reverse the red and green wires.
 
That doesn't look right. The red and white are the + or signal leads and the green and blue are the ground or -. One side appears to be upside down.

I dont know that cartridge so am not sure what is correct but it should have some marking near the pins if you can get in close.

My guess is that you need to reverse the red and green wires.

I think the cart is wired correctly. Found a pic of one on Google which shows the wiring like that. Unless it's wired incorrectly at the headshell end?

Is there any chance you could load a pic of the back of the amp and turntable as you have it currently hooked up?
 
I think the cart is wired correctly. Found a pic of one on Google which shows the wiring like that. Unless it's wired incorrectly at the headshell end?

Is there any chance you could load a pic of the back of the amp and turntable as you have it currently hooked up?
Absolutely! Good idea. I took a panoramic with my iPhone. Please excuse the choppiness of the panoramic. [see pic] (never mind the voltage selection to 110 volts. A switch between 110 and 120 is making no difference in the issue)

Edit: I have the original user manuals and I believe I set it up to a T per the manuals. But if I missed something, I'd obviously love to know haha.
 

Attachments

  • image.jpg
    image.jpg
    45.1 KB · Views: 17
Last edited:
Well nothing obvious stands out. This is a real head scratcher!
I guess if other sources sound fine then it's got to be something with the TT whether that be the cartridge or something else in the signal chain. Don't suppose you have another cartridge to fit?
Hmm.
 
Do you have anything else to test the phono input on the receiver with? If you don't have another turntable, you can use a CD player or something with a variable output, just turn the CD player/source down to about a quarter volume. The equalization will be off but you should be able to verify the input works. I do this all the time with an ipod on the bench.

Do you hear any hum?
 
You know what? I think I have one of those turntables in the garage. I can't promise I will be able to check it soon but can take a look at the cartridge wiring at some point.

Actual just checked. It's PL-X9 so perhaps not so related.
 
Okay i'm going out on a limb here. On the cartridge, carefully swap the blue and white leads. But be carefull and pull the connectors not the wires. Then try it.
 
Thank you. I tried that and it all works.

Good. That proves the amp is OK and the problem is in the turntable.

Next step is to check the connection between the cartridge and the ends of the interconnects. You will need an ohm meter to do this. If you don't have one you can get a real cheap one at Harbor Freight. You will need to pull the pins off the back of cartridge. Note the colors and the locations on the cartridge BEFORE you pull them off, cause they will need to be reattached when you are done. Best to pull one pin off, test and then put it back on before moving on to another. Here is what you are going to do:

Carefully remove a connector from one pin on the cartridge.
Set the test meter to test ohms (read the meter instructions on how to do this)
Insert one of the test meter probes into the end of the connector (not the pin on the cartridge, the connector on the end of the tonearm wire).
Place the other probe firmly on the correct part of the correct RCA jack based on the color code below. Read the meter. It should be close to 0 ohms. Typically, hand held testing like this encounters some resistance simply cause we are all human and the surfaces we are testing pick up dirt over time. Never the less, a reading of over a few ohms or an open is a sure indicator of a problem with the wiring. Also, when testing the center pins, that is the white and red, after you test to the center of the RCA and get your low reading, test to the shield or outer part of the connector. This you want to be completely open. If you have a muting switch in the turntable and it is holding everything in mute. you will see a very low reading from the outer part of the RCA to the center. That could be the reason for low to no output.

Left center = white wire
Left Ground = blue wire
Right center = red wire
Right Ground = green wire

Post back your results.

Good luck

Shelly_D
 
Good. That proves the amp is OK and the problem is in the turntable.

Next step is to check the connection between the cartridge and the ends of the interconnects. You will need an ohm meter to do this. If you don't have one you can get a real cheap one at Harbor Freight. You will need to pull the pins off the back of cartridge. Note the colors and the locations on the cartridge BEFORE you pull them off, cause they will need to be reattached when you are done. Best to pull one pin off, test and then put it back on before moving on to another. Here is what you are going to do:

Carefully remove a connector from one pin on the cartridge.
Set the test meter to test ohms (read the meter instructions on how to do this)
Insert one of the test meter probes into the end of the connector (not the pin on the cartridge, the connector on the end of the tonearm wire).
Place the other probe firmly on the correct part of the correct RCA jack based on the color code below. Read the meter. It should be close to 0 ohms. Typically, hand held testing like this encounters some resistance simply cause we are all human and the surfaces we are testing pick up dirt over time. Never the less, a reading of over a few ohms or an open is a sure indicator of a problem with the wiring. Also, when testing the center pins, that is the white and red, after you test to the center of the RCA and get your low reading, test to the shield or outer part of the connector. This you want to be completely open. If you have a muting switch in the turntable and it is holding everything in mute. you will see a very low reading from the outer part of the RCA to the center. That could be the reason for low to no output.

Left center = white wire
Left Ground = blue wire
Right center = red wire
Right Ground = green wire

Post back your results.

Good luck

Shelly_D

I tested for continuity between the pins and the RCA outs. Tests appear to show perfect continuity between each pin and its associated output. I was unable to disconnect individual wires, so I disconnected all four, at the point at which they're designed to be disconnected, in the event of a cartridge installation.

[see image for photos associated with the below numbers]

1. I did a baseline test, to prove no continuity when disconnected. I tested each pin [white wire shown] to each...

2. ...RCA [left RCA shown].

3. Zero continuity

4. I continued, testing for continuity between the pins [white shown again] to each...

5. RCA [left RCA shown again].

6. Perfect continuity shown.
White and blue have continuity with white
RCA.
Green and read have continuity with red
RCA.

***
I'm only slightly confused about the latter test concerning the "shield or outer part of the connector". I'd appreciate more clarity for that test, if necessary. If all goes well, it seems this alleged muting switch may be the culprit.​
 

Attachments

  • Continuity.jpg
    Continuity.jpg
    20.2 KB · Views: 6
The shields are the grounds, You should therefore have continuity from the red shield and the green wire and the white shield and the blue wire. You should also have continuity between the center pin of the the red RCA and the red tonearm wire and the center pin of the white RCA and the white wire.

John
 
Your post is not clear at all, at lest not to me. The photos are way to small for me to see.

There should have been 4 continuity tests:

What happened when you tested Left center pin to the white wire?

What happened when you tested Left Ground (outer shield) to the blue wire?

What happened when you tested Right center pin to the red wire?

What happened when you tested Right Ground pin to the green wire?

Please list each of these tests separately. Also, these tests must be made to the wires at the back of the cartridge, not the base of the tonearm. From your pictures and description I have no idea where you were testing to.

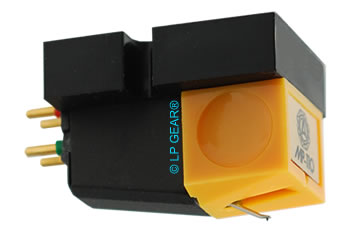
Cartridges have 4 pins on the back. They are the gold pins seen on the left in this image:
Nagaoka-MP-110-cartridge.jpg

There are wires that attach to these pins. One meter probe touches the clip that is held onto those pins and the other meter probe touches the correct rca pin or shield.

Shelly_D
 
Back
Top Bottom