• The move to the new server is done. There are some software and database maintenance updates in process. This has us passing the hat around to help out. We appreciate any donations. Seriously, even a dollar helps. The payment page may be found here - https://www.audiokarma.org/support.html

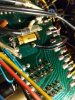
Cleaning sealed pots on Sansui QRX-7001 F-2425 Tone Control board

metaphile

New Member
Hello audiokarma,

First post here. I'm in the process of restoring a Sansui QRX-7001 that I inherited from my late father earlier this year. I didn't even know how to solder when I began in June - by now I've completed two DIY amplifiers and a preamp and have recapped and replaced (some of) the transistors in all the boards in the Sansui's 2-channel audio path. I am obsessed with this hobby and deeply grateful to the folks on this forum and at diyaudio for all the knowledge y'all have shared.

I was lucky to find that the receiver was in working condition when I began. It sounds significantly better w/ the new caps and transistors. That said, I still have enough hiss from the speakers (90dB sensitivity Infinity 3000 3-ways) that it's audible from the listening position. In addition, the balance, bass, treble, and volume knobs all seem to impart some hiss and crackle.

I already removed and re-capped the tone control board and replaced some of the purported-to-be-noisy transitors. But I didn't clean the pots. I now have acquired some needle-tips and a few types of contact cleaner (QRC contact cleaner, Deoxit Fader F5, Deoxit 5%) and I'm looking for some advice:
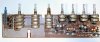
  1. What is the best way to clean inside the sealed pots and switches in the photo? I have read some recommend drilling a small hole w/ a tiny hand drill and using a needle tip to spray Deoxit inside and then actuating the pot many times (from xraytonyb's Youtube channel - forgot which video). Seems I'd need to drill holes to access each layer of discs inside, yes?

    Others have suggested de-soldering and disassembling the pots.I have never disassembled/reassembled one of these and am a bit intimidated by it, as I don't have any spares. Looks like I'd have to bend and re-bend the metal tabs that hold the discs inside?

    Any advice on how best to approach this would be appreciated.

  2. Which type of Deoxit is recommended for these types of pots? I assume regular Deoxit 5% is best while the Fader F5 is preferred for the plastic push button switches. Correct?
I searched through the forum a fair bit for existing advice on this topic -- apologies if I missed a thread that has addressed this question already. Seems there are many different types of pots - some with holes and some without - and even on this board there seem to be two distinct types.

On another topic, I have only recapped the two channel audio path and power boards so far (no room in my Brooklyn apartment for rear speakers for quad!) but I did cycle through the switches for the various quad decoding modes last night - one of them (Synthesizer Surround) caused a very loud pop that seemed to engage the speaker protection relay when enabled. Others hissed even louder than the 2-ch direct mode. This gives me additional motivation to go ahead and finish the job and recap / replace transistors on all the other boards, even if I am only using two speakers at present.

Also, I was lucky to find that there were no fusible resistors on any of the boards I've done so far! Additionally, the pots on the driver boards work perfectly, so I haven't had to replace those. Amp biased perfectly and DC offset is near zero. It was kept in a cool basement for many years and was rarely listened to since my mother banished it from the livingroom, so it's well preserved. Serial #23408011 for the curious.
 

Attachments

  • F-2425 pots.jpg
    F-2425 pots.jpg
    75.4 KB · Views: 67
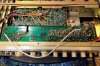
  • QRX-7001 under surgery.jpg
    QRX-7001 under surgery.jpg
    124.8 KB · Views: 67
Register to hide this ad
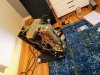
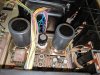
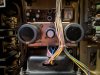
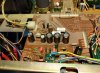
Unrelated to the original question - but I found the photos others have shared here indispensable as I was working on this receiver, so here are a few of my own during the process.
 

Attachments

  • switch_board_buried_cap.jpg
    switch_board_buried_cap.jpg
    73 KB · Views: 56
  • tone_control_recap.jpg
    tone_control_recap.jpg
    61.2 KB · Views: 55
  • front_driver_board_recap.jpg
    front_driver_board_recap.jpg
    80.7 KB · Views: 55
  • filter_caps.jpg
    filter_caps.jpg
    123.1 KB · Views: 52
  • filter_caps_top.jpg
    filter_caps_top.jpg
    98.1 KB · Views: 52
  • power_board_recap.jpg
    power_board_recap.jpg
    132.3 KB · Views: 56
Each square dent at the top ends with a cavity right over the respective wiper - perfect for contact cleaner spraying.
Each elongated slit opening is suitable for spraying contact cleaner inside. Some of the pots have round holes on the sides, for the same purpose.
If the slit, dent or hole isn't visible - it's on the bottom side. My best way is to desolder the pots and toss them in a contact cleaner bath.
 
Hey Tom, thank you for the reply. Tossing them in a contact cleaner bath sounds like an interesting approach - can you share the recipe for the bath (e.g. how much contact cleaning solution to water)?
 
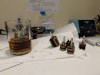
Water? Not in my bath. If I'm feeling generous I'd spray half a can of D5 into a glass and use it pure. Most times I'm skimpy and use 30% D5, 20% WD-40 and 50% IPA. It looks like light beer - but not recommended for recreational activities.
 
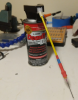
Just a quick update here: too cowardly to desolder the pots and too parsimonious to submerge them in a bath of Deoxit, I instead attached a needle-tip with some heat shrink to the Deoxit straw and inserted it in each of the small holes in the pots. After much spraying and actuating and spraying and actuating I found the crackle gone and the pots considerably looser than before. I used the same process on the rest of the pots and switches on the receiver. So far, so good!

Many thinks for the advice.

upload_2019-10-2_22-38-10.png
 
I remove the pots off those boards when I do QRX7001/777......
Makes it so much easier, and cleaner...You're in there anyway and in the end its probably just as quick...
 
I remove the pots off those boards when I do QRX7001/777......
Makes it so much easier, and cleaner...You're in there anyway and in the end its probably just as quick...
Same here, I remove each one. Then hose it out over a white paper towel to observe what comes out. A little black is normal. A lot of black indicates more carbon wear. But at least all the crud is thoroughly flushed out and not still in there acting like an abrasive.
 
I don't have a vacuum desoldering station which makes desoldering these sorts of pots a bit dicey what with all the wiggling and the easily-lifted traces.

Open to recommendations for inexpensive vacuum desoldering tools ;)
 
I don't have a vacuum desoldering station which makes desoldering these sorts of pots a bit dicey what with all the wiggling and the easily-lifted traces.

Open to recommendations for inexpensive vacuum desoldering tools ;)
I use a PACE MBT series soldering station, iron, tongs, hot air, etc etc, and it also has the vacuum solder X-Tractor which runs off compressed air....But this is thousands of dollars and way over the top for what you want.......
Best bet is the one Skywatcher put the link to.

Otherwise for a bit more money you could get this one, I also have one of these I use in the field....
https://www.amazon.com/Hakko-FR300-05-P-Desoldering-Tool/dp/B00KWM69C4
 
I use a PACE MBT series soldering station, iron, tongs, hot air, etc etc, and it also has the vacuum solder X-Tractor which runs off compressed air....But this is thousands of dollars and way over the top for what you want.......
Best bet is the one Skywatcher put the link to.

Otherwise for a bit more money you could get this one, I also have one of these I use in the field....
https://www.amazon.com/Hakko-FR300-05-P-Desoldering-Tool/dp/B00KWM69C4
Well, he did say "inexpensive". :D The Hakko is nice and with the straight nozzle it reaches into places the one I linked to can't.
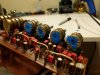
 
Otherwise for a bit more money you could get this one, I also have one of these I use in the field....
https://www.amazon.com/Hakko-FR300-05-P-Desoldering-Tool/dp/B00KWM69C4

Last night I sat down to re-cap the CD-4 main board and ended up lifting another trace while wiggling a capacitor that was wedged into a tiny space between other components.

Before I even saw these posts I put in an order for the Hakko FR301-03/P. Not cheap, but I'm calling it an early birthday present to myself.

Appreciate all the suggestions, folks.
 
Hey folks,

Still chasing a hissing problem so I thought I'd take advantage of the new desoldering pump and properly bathe the pots in Deoxit.

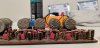
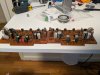
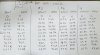
While I was at it, I compared the 4 100K pots (Front and back Bass and Treble adjustments for the receiver) for channel matching. Thought some of you might be interested in the results, so I've shared them below. Since I'm only using the front speakers at the moment I selected the two pots with the best channel matching and re-installed them in the Front Bass & Treble positions.

The hissing is persistent, so the pots weren't the issue there, but they're all very clean and lubricated with no crackle or anything upon adjustment, so the work was worth doing regardless. I also got the thick black oxidation off the legs of the pots which just looks much nicer. After I've tried a few more things to fix the hiss I'll create a separate post.

Thanks again for the advice.

IMG_20191010_184505.jpg IMG_20191010_205800.jpg IMG_20191010_200923.jpg
 
Since I'm only using the front speakers at the moment I selected the two pots with the best channel matching and re-installed them in the Front Bass & Treble positions.

And now as I look at the photo I attached to my message I notice I made a mistake and installed pot #1 for Front Bass instead of pot #3... if you check my notes #2 and #3 had the best channel matching so I intended to put both of them in the front positions. Oops!
 
Hey folks,

Still chasing a hissing problem so I thought I'd take advantage of the new desoldering pump and properly bathe the pots in Deoxit.

While I was at it, I compared the 4 100K pots (Front and back Bass and Treble adjustments for the receiver) for channel matching. Thought some of you might be interested in the results, so I've shared them below. Since I'm only using the front speakers at the moment I selected the two pots with the best channel matching and re-installed them in the Front Bass & Treble positions.

The hissing is persistent, so the pots weren't the issue there, but they're all very clean and lubricated with no crackle or anything upon adjustment, so the work was worth doing regardless. I also got the thick black oxidation off the legs of the pots which just looks much nicer. After I've tried a few more things to fix the hiss I'll create a separate post.

Thanks again for the advice.

View attachment 1641494 View attachment 1641495 View attachment 1641496
Pots won't cause a hiss like that. That's going to be a combination of old transistors (not yet replaced), with possible a sprinkle of diode and resistors.. :biggrin: The hiss you are hearing is background noise being amplified. If it is there with volume at zero, it's in the power amplifier. If it is quiet with the volume down, and increases as you turn it up, it's in the pre-amplifier stage(s). If it is worse on Phono, then..... Yep, Phono stage(s).
 
If it is there with volume at zero, it's in the power amplifier.

Hey, thanks for the reply.

So - this hiss is indeed there with volume at zero. Here's a quick rundown of what I've done already to try and chase it down:
  • Replaced the known noisy 2SC1313 transitors on the driver board
  • Recapped the driver board
  • Replaced two burnt 10 ohm resistors to ground and two .1uF mylar caps on the driver board
  • Checked all the diodes, the two zeners, and the two "varistor" diodes with diode check on a multimeter diode test and in the live circuit to see that the voltage was stable
    • Confirmed that DC offset and bias current remain stable to rule out issues with the still original transistors on the driver board
    • Confirmed that none of the output transistors are getting hot - switched to rear speakers to ensure that the hiss isn't coming from front speaker output transistors (it isn't)
  • Checked voltage into the driver board (+/- 39V rails from the power board)
  • Replaced all the electrolytics in the 2-ch audio path (from power supply thru preamp/tone control board all the way through the driver stage and speaker protect board)
  • Replaced all the transitors on the preamp / tone control board
  • Tried the freeze spray on nearly every transistor and diode in the 2-channel audio path -> no change
  • Made sure none of the output transistors are getting hot
  • Unplugged boards one by one (phono stage, power to tuner, QS boards, CD-4 main board) to ensure none of them were contributing to the hiss (even though it's audible in 2-Ch front direct mode with no input connected) -> no change
I have kept one of the two driver boards intact so I can swap between them and see if the hiss changes. It doesn't. So, with new transitors, replaced resistors, and caps on one and everything original on the other the hiss remains the same. Unless I happen to have a noisy transistor that I haven't replaced on * both * driver boards that happens to be exhibiting the same noise characteristics, I think I've ruled out the driver board(s) as the source.

I don't have an oscilloscope (yet) so I'm somewhat limited in what I can do. But I do know that the hiss seems to have gotten worse around the time I was re-capping the power supply board for the low voltage power supply (F-2428) and the speaker protect relay board (F-1461).

So my thought was to:
  • Check for out-of-spec carbon comp resistors on the speaker protect relay board
  • Proactively change out the speaker protect relay (I already have the replacement, just was waiting for the desoldering pump before trying to change it out)
  • Try changing the 2SC1364 transistors on the F-2428 filter & power supply board
  • Try changing the 2SC1364 transistors on the F-1461 protector board
  • Try changing the green mylar caps on the tone control board in case one of them has gone bad is causing oscillation in the (new) KSA992 and KSC1845 transistors I installed there
I've read through a lot of threads on hiss and the above is my current collection of ideas. I feel like I've moved past the most obvious things. I'm tempted to go ahead and try replacing all the transistors on the driver board but frankly I don't think that's the problem (I also removed and checked all the adjustment pots just to be sure they weren't causing any issues and they're fine so I put them back).

I'm very much open to any feedback or suggestions as to where to start. :) Also - not sure if this might be related but I had a resistor burn out on my (R-601, one of the fusibles) on the bottom of the F-2428 filter & power supply board and I replaced it recently (you replied to the thread :) ).

Thanks again.
 
Last edited:
I think I've had a breakthrough here and narrowed down my hiss problem. It is not in the drive board or power amp stage. It is somewhere on the tone control board.

Posting here so you can check my logic.

There are no pre-out or main-in jacks on the QRX-7001 to make bypassing the preamp section easy. So I went ahead and did it with a jumper from the front R channel input to the front R channel output (see photo). I plugged in my volume-controlled DAC to both channels so I didn't blow my speakers with this test. Now I have the L channel passing through the preamp board and the R channel passing bypassing it straight through to the power amp.

The L channel, which is passing through the preamp is still hissing. The R channel, which is not, is not hissing (aside from the typical put-your-ear-next-to-the-tweeter type of hiss. I can't hear this from my listening position and it doesn't bother me. It's much, much quieter). I switched the speakers at the outputs, too, just to make sure the hiss follows the channel that's still passing through the preamp. It does. So whatever the source of the hiss - be it the power being supplied to the preamp module or some oscillation / noisy transistor / etc. on the preamp board itself - it's in front of the power amp.

The problem with the "if it's hissing at any volume level, it's the driver / power amp section" in this case is that the volume control is at the very front of the preamp board. All the active components in the preamp comes after the volume control attenuates the signal. See highlighted section of the schematic below. Signal flow from inputs to driver board is from L to R.

So - now I need to figure out what is causing the hiss on the preamp board. Without a scope I don't know how to check how clean the power is to it, but there's no hum so I suspect that this is not a noisy power supply. Could be one of the brand new transistors I installed is making noise - though I installed a second set on top of the first one. And I thoroughly cleaned all the pots, re-capped the whole board, and triple-checked the solder joints. So I will have to investigate further.

f-2425 volume control_highlighted.jpg

IMG_20191011_181751.jpg
 
Back
Top Bottom