• The move to the new server is done. There are some software and database maintenance updates in process. This has us passing the hat around to help out. We appreciate any donations. Seriously, even a dollar helps. The payment page may be found here - https://www.audiokarma.org/support.html

Disassemble PS Audio 4.6

kappa7krazy

Active Member
In another thread I talked about replacing some caps in my ps audio 4.6 preamp but I am having a difficult time getting to the bottom of the pcb to remove the old caps. Has anybody torn apart their ps audio preamp? If so, any suggestions or ideas? Thanks, Brian
 
Register to hide this ad
In another thread I talked about replacing some caps in my ps audio 4.6 preamp but I am having a difficult time getting to the bottom of the pcb to remove the old caps. Has anybody torn apart their ps audio preamp? If so, any suggestions or ideas? Thanks, Brian
Hello
This thread is over 10 years ago but I have dissassembled a few PS 4.5 and 4.6. Remove all of the pots hex nuts in front, then remove all screws in the back holding the RCA jacks. Desolder or clip the ground wire inside by the selector switch. The PCB will slide out from its grooves. The umbillicord to the power supply leads will stay intact. And, finally, there is another black ground wire from the RCA jacks.
 
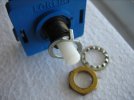
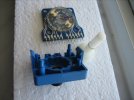
I just disassembled my 4.6. Remove all the hex nuts from the pots. Keep the 4.6 with face slightly tilted up when you remove the hex nuts as you don't want the "stop rings" from falling out of their recesses. Now slowly remove the stop rings and make a mark on the body of the pot where the tab is inserted. Believe me , this will save you a lot of trouble deciding where to insert the tabs in the mechanism if they ever slip out. See pics where I used a sharpie to make a mark. Alternatively you could use a bit of contact cement to keep them in place. Desolder the longer of the two ground wire ( leave the one soldered to the rca jack) from the back of the faceplate. Undo all panel screws and slide the top cover rearwards. Once the four screw on the back panel , two on either side, are remove pull the circuit board rearwards and remove. It is not necessary to remove the screws securing the rca jacks. The sealed volume pot may be dangling at this point so use a bit of packaging tape and secure in place as you will be flipping the unit a lot in the recap process. Do not allow the packaging tape to contact the traces on the solder side of the board as this will strip the protective coating during removal. Ask me how I know. The output pot and the source pot are scratchy and so I installed a new source one and I am waiting for wafers for the output pot.
 

Attachments

  • IMG_1364.JPG
    IMG_1364.JPG
    63.7 KB · Views: 11
  • IMG_1363.JPG
    IMG_1363.JPG
    66.1 KB · Views: 11
  • IMG_1366.JPG
    IMG_1366.JPG
    83.6 KB · Views: 11
Last edited:
Back
Top Bottom