• The move to the new server is done. There are some software and database maintenance updates in process. This has us passing the hat around to help out. We appreciate any donations. Seriously, even a dollar helps. The payment page may be found here - https://www.audiokarma.org/support.html

DIY Rek-O-Kut Headshell Pin Replacement

Joe Nardy

AK Subscriber
Subscriber
I have a Rek-O-Kut K-33H TT with S-120 tonearm. Recently one of the proprietary headshell pins broke, the flat section used to solder the headshell wire broke off leaving the pin flush with the plastic collar. I was able to solder the headshell wire to the pin by pushing it in, but the wire had to be soldered to just the tip of the pin leaving a very small and fragile solder connection. It was functional but so fragile that the wire would break off whenever the wires were moved. These headshells are hard to find and the pins are even harder to find (if you can find them at all), so I decided to try to fabricate my own. The thicker part of the pin that makes contact with the tonearm pins is 1/16 inch, so I picked up some 1/16 inch brass rod at Hobby Lobby. Since I don't have a lathe, I had to improvise. I used my drill press and files to spin down the brass rod to the size needed for the thinner part of the headshell pin. I drilled a 1/16 inch hole in a 2x4 and clamped it to the drill press plate. This way the rod had support at the top from the drill chuck and below from the 2x4. The below pic shows the rod after filing.
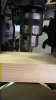
P1060264.JPG

Here are the original pin and the new pin before cutting the rod down to size. The new rod looks thicker than the original but it's just the camera angle. On the original pin the thinner part was longer and flattened out. This is where the headshell wire was soldered to the pin. There is also a spring that slides over the thin part of the pin to apply pressure to the tonearm pin. I forgot to take a pic of that.
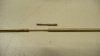
P1060266.JPG

And here are the old and new pins after cutting the brass rod down. Again, the new pin looks thicker and the thicker part looks longer but that is also due to the camera angle.
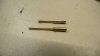
P1060267.JPG

I fitted the pin new pin and spring into the headshell and now have plenty of room to solder the headshell wire to the pin. I now have roughly 3/16 inch of rod to solder the wire to. I installed a cartridge and gave it a spin. Everything sounds fine to me with no detectable difference in sound level between channels.

I love it when I am able to come up with a functional yet inexpensive fix, especially for a part that's virtually unobtainable!

Joe
 
Last edited:
Register to hide this ad
Thanks for posting this.
I have two Rek-O-Kut stereo headshells that need new pins. I also need to replace the springs so I have ordered micro-springs from China that are 1mm OD X 5mm L and also 1mm X 7mm (just in case). The 1mm OD is about 0.04” which should seat well on the 1/16” (.06”) brass rod. The ID of the spring is 0.8mm (.03”) which should also work. I may have to open up one end of the spring if it doesn’t catch the lip. I also ordered the 1/16” brass rod. I’ll post some pics when all the bits arrive and are put together.
***UPDATE ON SPRINGS BELOW***
 
Last edited:
Thanks for posting this.
I have two Rek-O-Kut stereo headshells that need new pins. I also need to replace the springs so I have ordered micro-springs from China that are 1mm OD X 5mm L and also 1mm X 7mm (just in case). The 1mm OD is about 0.4” which should seat well on the 1/16” (.06”) brass rod. The ID of the spring is 0.8mm (.03”) which should also work. I may have to open up one end of the spring if it doesn’t catch the lip. I also ordered the 1/16” brass rod. I’ll post some pics when all the bits arrive and are put together.
I'm glad this helped someone out. Good luck with the process. It's not difficult, just tedious. Looking forward to pics of your results.

Joe
 
excellent work !

I have a ROK headshell with the same problem, I've been using it for a mono cartridge but now I'm inspired to repair it....:)
 
I'm glad this helped someone out. Good luck with the process. It's not difficult, just tedious. Looking forward to pics of your results.

Joe
Joe, I do have another question - which is what keeps the pins in place (once installed) - I assume its soldering the tonearm wires in place?
 
Joe, I do have another question - which is what keeps the pins in place (once installed) - I assume its soldering the tonearm wires in place?
Yes, the pins will not be retained unless the tonearm wires are soldered in place. It might be possible to flatten out the ends inside the headshell if you're replacing all the pins. In my case, I replaced just one pin and it was one of the lower pins so there was really no way to get any tool in the tight space to flatten the pin. Even if you're replacing all the pins, it would still be difficult to get in there to flatten the pins. It might be possible to remove the plastic insert that holds the pins and flatten them outside of the headshell but I didn't want to risk destroying the holder and/or the headshell. I knew the pin would stay in place once the wire was soldered in place and that was sufficient for my needs.

Maybe you can come up with a creative solution to this issue.

Joe
Thanks - of course once the headshell is connected to the tonearm it’s a mute point. I will give it some thought though.
 
drill press as a vertical lathe works pretty well. I've also used a drill chuck held in the chuck of my lathe for small work like this when I didn't have collets.
 
I wanted to provide an update on springs. The 0.1mm wire springs seemed too weak to me and I ended up using 0.2mm wire - which provides plenty of “spring”. The correct spring can be found on ePay with this description - “Wire Dia 0.2mm Compression Pressure Spring OD 1.5mm L 5mm Stainless Steel A2”. Still playing around making the Pins.
 
One additional update - I couldn’t file the brass rod down without it breaking in my drill chuck (probably too darn clumsy). However, I found a pin on digikey that will work as a replacement It’s gold plated copper and cheap. The only downside is the fat part of the pin is hollow - but I found it sturdy enough and has enough wall to make a good connection to the tonearm contacts(ohms out perfect). Here is the info and some pics …
DigiKey Part Number1195-8605-ND
ManufacturerHARTING
Manufacturer Product Number21011009020
DescriptionM12 A-CODE 8PIN MALE CONTACT AWG

IMG_0351.jpegIMG_4924.jpegIMG_4917.jpegIMG_4914.jpeg
 
Back
Top Bottom