• Please note that Audiokarma will be offline briefly for updates early on Monday morning, September 28th.

Dual CS 429 tonearm starts too far in

Kfeuerherm

New Member
Greetings!

New member with a brand new turntable. It’s not clear how Dual support works orher than manuals, have written, but as Ive seen similar threads her, thought I’d drop a line.

This turntable purchased tiday and carefully set up. Played very nicely for a few LPs, but the last two had the beginning of the track cut off as the arm swings in too far when started automatically.

Is this a relatively easy fix? Or hest returned? (Hoping not because we returned the new Pioneer PLX-500 due to poor cuing and even wirse support from Pioneer), and also because this replaces our very CS 308 which we much enjoyed.

Many thanks!

Karljürgen
 
Register to hide this ad
Update: Well, I am most impressed; a query to Dual support email when I first posted this was answered by the next morning, with an attached “how to” sheet. I am providing it here in the hope it might some day be useful to someone else. I’ve not had a chance to try this just yet, but hope to do so tomorrow. It looks straightforward.
 

Attachments

Update: Well, I am most impressed; a query to Dual support email when I first posted this was answered by the next morning, with an attached “how to” sheet. I am providing it here in the hope it might some day be useful to someone else. I’ve not had a chance to try this just yet, but hope to do so tomorrow. It looks straightforward.
I'm thinking that needing this type of adjustment isn't too unusual, but that's just based on my first turntable, a BIC 960, having simple instructions for this right in the owner's manual. Hope it goes well.
 
I'm thinking that needing this type of adjustment isn't too unusual, but that's just based on my first turntable, a BIC 960, having simple instructions for this right in the owner's manual. Hope it goes well.
Thanks!

I’ve never experienced this before, but am pleased it is apparently so simple. I do wonder, though, why they don’t just include this info in the manual in the first place, especially as, as far as I can see, it’s not an obvious download on their site….
 
(...) I do wonder, though, why they don’t just include this info in the manual in the first place, (...)

That surely wouldn't be a bad idea - at least in case of the first two adjustment. Whereas in case of the third it would appear, that one would need to open the turntable to access it, so that info might be better suited for being included in the service manual(s).

What I'm missing in case of all three adjustments, though: Which turn direction causes which adjustment direction? In my view they should add at least some info on that (e.g.: "Drehen im Uhrzeigersinn verschiebt Aufsetzpunkt in Richtung Tellermitte." / "Turn clockwise to shift the touchdown point towards the platter spindle." (*)). And some info on the adjustment ranges wouldn't harm either - especially as that would also allow to guesstimate, whether solving a certain problem would merely be a matter of correcting the adjustment or would rather require further failure diagnosis. Hmmm - maybe I should write a message to Dualfred....

Greetings from Munich!

Manfred / lini

*) Random example - no idea, whether that actually apllies.
 
So, here’s what I did:
1. Remove record and rubber mat.
2. Push start, then set tone arm lever to keep the tone arm up.
3. Turn the amp power off (my record player is plugged into the back so when the amp is off, power to devices is cut).
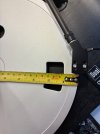
4. Measure distance from platter edge to needle. Looked to be ca. 0.85mm.
5. Locate the screws (which are white, as they say, though the image suggests otherwise) (intuitively) turn both one quarter turn clockwise/im Uhrzeiger Sinn.
6. Restore power, press stop on the record player, then start again, cut power.
7. The second measurement was ca. 0.35mm. So clockwise/im Uhrzeiger Sinn –> move starting point outwards.
8. Restore power, press stop.
9. Replace mat and try a record. That turns out to have been plenty! I may have to back them up a bit. So: if you need to do this, take small steps.

See attached photos! (A narrow standard screwdriver is called for.)
 

Attachments

  • IMG_1162.jpeg
    IMG_1162.jpeg
    255.1 KB · Views: 10
  • IMG_1163.jpeg
    IMG_1163.jpeg
    243.1 KB · Views: 11
  • IMG_1165.jpeg
    IMG_1165.jpeg
    249.5 KB · Views: 10
  • IMG_1164.jpeg
    IMG_1164.jpeg
    256.3 KB · Views: 9
Last edited:
(...) 7. The second measurement was ca. 0.35mm. So clockwise/im Uhrzeiger Sinn –> move starting point outwards. (...)

Actually, this is not quite true. Shall mean: I had a little email conversation with Dualfred in the meantime and got some info. The reason, why there's no info on which turn direction causes which adjustment direction, is, that at least the adjustments for the two touchdown points and the stop point are actually controlled by eccentrics. So the adjustment directions depend on the initial positions of the eccentrics - and these positions may vary a bit due to tolerances in manufacturing/assembly.

Greetings from Munich!

Manfred / lini
 
Hmm. I actually have no idea what that means, other than that there is some ambiguity here. So… you are saying: try one direction, see the consequence, if necessary try the other?

But there are two screws, they didn’t say turn them in the same direction, so there could be four possibilities…

I did actually worry a bit about this, the two screws maybe do something different. The only comforting thing (and maybe a coincidence?) was that the screw slots seemed to be oriented the same way when I started, so kept that relationship….
 
Hmm. I actually have no idea what that means, other than that there is some ambiguity here. So… you are saying: try one direction, see the consequence, if necessary try the other?


Alright, imagine the screws to turn somewhat eggish shaped discs, the eccentrics.

A good example would be the antiskating mechanisms of various classic Dual turbtables - like for example the 510, as shown in figure 13 of its service manual - see for example over there: https://www.hifi-archiv.info/Dual A...hsler CS/Dual CS 510 Service/Dual_510_S08.jpg Works like this: Spring 208 pushes lever 207 against the rim of eccentric disc 65, the position of which is controlled by the antiskating adjustment wheel above on the upper side of the table, not really shown in figure 13. If one turns that wheel, the eccentric disc turn with it, thereby varying the position of both arms of the lever, to the end of the other arm of which one end of the antiskating spring is fixed - while the other end of that spring is fixed to segment 211, which turns with the tonearm. Antiskating wheel in position 0 moves the segment side arm-end of the lever into the centre of rotation of that segment, at which position there's hardly any tension on the antiskating spring, so that it doesn't really pull at the tonearm. But if the wheel is now turned to one side or the other (in case of most Duals each side has a different scale - e.g. one for spherical and the other for elliptical needles), the segment-side arm end moves out of the centre of rotation of the segment and increases the antiskating spring tension - up to its maximum, from which the tension would decrease again (now being on the other side scale of the wheel), reaching the 0 position again after a full 360° turn.

Well, and while I don't know the exact shape of the adjustment eccentrics and mechanisms for the 429/529, the former for example might as well be symmetrically egg-shaped and have their centre of rotation on the symmetry axis. So one could for example imagine an initial position a bit before the maximum excursion, so that a certain turn towards the maximum excursion would mean to hit the one extreme of the adjustment range, from which the same turn into the same direction would mean to hit the initial adjustment again, just now on the other side of the egg, so to speak.

So in both examples the adjustment direction would depend on the initial position of the eccentric and how far one would turn it. See?

But there are two screws, (...)

(...) the two screws maybe do something different. (...)

Well, that's easy: Did you notice the 30 and the 17 in the arrows in the first picture of the Dual document? Those would mean ca. 30 and 17 cm - so one screw adjusts the touchdown point for LP-sized records, the other the touchdown point for single-sized records. If you use the autostart function, you can choose between the two touchdown points with the little selection lever at the tonearm base in front of the lift lever - so the 429 and 529 allow for a speed-selection-independent selection of the record size.

Greetings from Munich!

Manfred / lini
 
Ok, now I’m getting the picture! Let’s start with this:
Well, that's easy: Did you notice the 30 and the 17 in the arrows in the first picture of the Dual document? Those would mean ca. 30 and 17 cm - so one screw adjusts the touchdown point for LP-sized records, the other the touchdown point for single-sized records. If you use the autostart function, you can choose between the two touchdown points with the little selection lever at the tonearm base in front of the lift lever - so the 429 and 529 allow for a speed-selection-independent selection of the record size.Alright, imagine the screws to turn somewhat eggish shaped discs, the eccentrics.
So, I did notice the numbering of the screws, but I did not make the association to disc size; I thought they were just part numbers referring to some larger diagramme, i.e., screw ## 17 and 30.

This is maybe a generational thing. When I was younger, we spoke of records as being 33s or 45s or 78s. No one (in my circle, anyway) ever talked about sizes, they were just implicit: 33s are larger, 45s are smaller. In fact, I was speaking with a young member of a band a few years bag who told me they had put out a 6-inch (or something like that). I had to ask, what’s a 6-inch? And concluded that discussion with, Oh, you mean, a 45….

In fact, when I first set this machine up, I checked that the speed to 33 and was surprised that the tonearm moved to ’the middle’ of the disc and was worried there was something wrong, until I realized there was another dial (which we didn’t have on the CS 308 we were replacing) and when I set it to 30, it was correct (or nearly so, as I found out, giving rise to this thread).

So that means that I have inadvertently moved the start position for the 45s as well, and should potentially take corrective action before playing any of those. In which case, the parallel screwhead slots was a red herring!
A good example would be the antiskating mechanisms of various classic Dual turbtables - like for example the 510, as shown in figure 13 of its service manual - see for example over there: https://www.hifi-archiv.info/Dual Anleitungen & Kataloge/Dual Plattenspieler & Wechsler CS/Dual CS 510 Service/Dual_510_S08.jpg Works like this: Spring 208 pushes lever 207 against the rim of eccentric disc 65, the position of which is controlled by the antiskating adjustment wheel above on the upper side of the table, not really shown in figure 13. If one turns that wheel, the eccentric disc turn with it, thereby varying the position of both arms of the lever, to the end of the other arm of which one end of the antiskating spring is fixed - while the other end of that spring is fixed to segment 211, which turns with the tonearm. Antiskating wheel in position 0 moves the segment side arm-end of the lever into the centre of rotation of that segment, at which position there's hardly any tension on the antiskating spring, so that it doesn't really pull at the tonearm. But if the wheel is now turned to one side or the other (in case of most Duals each side has a different scale - e.g. one for spherical and the other for elliptical needles), the segment-side arm end moves out of the centre of rotation of the segment and increases the antiskating spring tension - up to its maximum, from which the tension would decrease again (now being on the other side scale of the wheel), reaching the 0 position again after a full 360° turn.
This part I understand in principle, now, though I should study the diagramme you have kindly provided to get the full sense. In the meantime, it suggests that given a 50/50 chance, I happened upon the correct turn of the screw, so to speak :)

Thanks for taking the time to provide all this illustrative detail. Much appreciated!

 
Folk, I tried contacting the distributor and warranty centre for Dual in Canada, explained myself in detail by email, asked whether I could call in and talk to someone who’s savvy to sort it out. I got a very brief response saying that if the fixes suggested by Dual (see above) don’t work, send it back for refund or replacement.

2 days left in the return period, so don’t really want to take chances with this intermittent issue, so returning it. The vendor has one left they’ve set aside for me.

Thanks to everyone who took time to offer help. If there’s a continuation to this saga, I’ll let you know!
 
Thumbs pressed for a good exemplar!

Greetings from Munich!

Manfred / lini
Ha! I just said “ich drück’ dir die Daumen” to my grandson just yesterday (in English) on the occasion of an internship interview.

Let’s hope I don’t have “pitch”, eh?

Many thanks!!
 
Last edited:
Well. Exchange went well. Assembled the new turntable, no need to adjust the arm drop; it landed in the right place. Great!

I figured we had it sorted… then on the 6th side it did the warble… and twice as bad as before. Long enough to rush and get my phone and take a video… except that I fumbled it.

However: I now have 5 years to document this (my return period has expired) under warranty. Presumably this is going to be a recurring problem so I should be able to make a video at some point. S.O.P, record the start of every first track going forward.

I’m very, very disappointed.
 
UPDATE! Possible reason to hope….

I have always (since the 70s) cleaned records the same way: start the machine, hold the brush lightly against the record and ensure I take it off before the arm drops. Always = since the 70s up to and including the Pioneer PLX-500 I returned due to a cuing issue, before I bought the Dual. Never, ever had any issue.

I did notice with this machine, though, that it’s pretty sensitive in that regard and I had to really try hard not to affect rotation. Now, I assumed that whatever influence I had caused would be corrected quickly enough. But… I wondered about that.

So yesterday, I decided to brush the records by turning the platter by hand BEFORE pressing START; this also allowed me to apply a bit more pressure without worry. I played a half dozen records with no issues at all. The other day, the same number of records revealed the problem twice.

I explained my thinking to Dual, and they seem to agree. Here’s what they said (in original, English following courtesy of Google):

Ja, das ist bei diesem Modell durch die Automatik am Anfang normal. Der CS 429 verfügt über eine optoelektronische Drehzahlregelung, die beim Startvorgang verständlicherweise von der mechanischen Automatik durcheinandergebracht wird. Dies sollte sich jedoch beheben, sobald der Tonarm aufgesetzt hat und der Plattenspieler mit der korrekten Geschwindigkeit läuft.
Wenn Sie also mit der Plattenbürste reinigen, dann wird der Motor mit seiner Regelung stark durcheinander gebracht und er benötigt einige Sekunden bis er wieder genau läuft!
i.e.,
Yes, this is normal with this model due to the automatic start-up mechanism. The CS 429 has an optoelectronic speed control, which is understandably disrupted by the mechanical automatic speed control during the start-up process. However, this should resolve itself once the tonearm has lowered and the turntable is running at the correct speed.

Therefore, if you clean the record with a record brush, the motor's speed control will be significantly disrupted, and it will take a few seconds for it to run accurately again!
So I will continue with this more careful procedure and see how it goes. I conclude that this particular model is much more sensitive than every other model I’ve used in the past. If that’s the case, no worries, I can live with that….
 
Back
Top Bottom