• The move to the new server is done. There are some software and database maintenance updates in process. This has us passing the hat around to help out. We appreciate any donations. Seriously, even a dollar helps. The payment page may be found here - https://www.audiokarma.org/support.html

Dust cover restoration

pixelriffic

New Member
Howdy folks,

I've spent a good bit of time attempting to return a number of dust covers to something close to what they were when new. Mostly poly japanese covers. No acrylic. All of these covers were in varied states of scratches and haze. On modestly light scratches, the Novus system works well. As did a McGuire headlight polish. For more serious issues, I've tried many things. Including a headlight restoration kit, other abrasives, wet sand then polish, and more. Still never really return these guys to anything close to new. It's easy enough to make them works if you're not careful.

If anyone has manage to restore a dust cover in poor condition to like new, I'd love to hear what they did.
 
Register to hide this ad
Howdy.

Have a look at what the following archive tells you – it’s the helpful page of the late Joel Thorner (died 2007), aka The Turntable Guy, who ran a store servicing and restoring turntables, and had lots of good advice about the subject. He would reply to emails asking advice, and also had a very helpful page on restoring covers here https://web.archive.org/web/20070208181201/http://www.theturntablefactory.com/cover.html . There weren’t many people who knew as much about it as he did.

As it happened, I had a cover which looked terrible, with deep scratches, and after going through his steps, starting with a deep sanding, it came up looking (probably) better than new. Good luck!
 
Howdy.

Have a look at what the following archive tells you – it’s the helpful page of the late Joel Thorner (died 2007), aka The Turntable Guy, who ran a store servicing and restoring turntables, and had lots of good advice about the subject. He would reply to emails asking advice, and also had a very helpful page on restoring covers here https://web.archive.org/web/20070208181201/http://www.theturntablefactory.com/cover.html . There weren’t many people who knew as much about it as he did.

As it happened, I had a cover which looked terrible, with deep scratches, and after going through his steps, starting with a deep sanding, it came up looking (probably) better than new. Good luck!

That's some great information- thanks for the link!
 
I remember reading years ago to use a combination of Pledge and Windex together with a buffer for light surface scratches. I tried it on a foggy looking dustcover and it worked pretty well.
 
After attempting to restore a few covers, I discovered after market source for covers.
Beautiful, better than new. For what polishing restoration, kits cost and the value of your time, I wouldn't bother trying anymore.

I'm sure some oddball ones may not be readily available. As always YMMV
 
After attempting to restore a few covers, I discovered after market source for covers.
Beautiful, better than new. For what polishing restoration, kits cost and the value of your time, I wouldn't bother trying anymore.

I'm sure some oddball ones may not be readily available. As always YMMV

And what market source might this be - or is it a secret?
 
I have good results with going from 400 working to 2000 block wet sanding. On very badly marked up tops.
Then using a car buffer starting with rubbing compound then working up to a final polishing compound.
I like 3m Finesse-it II and Maguiers plastic headlight restorer.
But in the final stage most polishes and a buffer work well.
 
Doesn't look like they make covers that match OEM, just a box without hinges you put over the TT.
They make very nice duplicate covers. Add hinges and your good to go. I have a Pioneer PL 518 and Thorens TD 125 cover made by them. Both very nice.
 
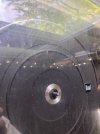
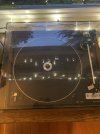
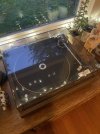
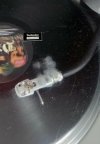
I bit the bullet today and tried a dust cover restoration technique I saw on YouTube. It seemed relatively easy and the polish recommended was available at my local Tap’s Plastic.

I just used a cordless drill with headlight buffing sponge and Novus 2 polish. Did multiple passes inside and out and finished up with a click wipe on of Novus 1 polish.

Pretty happy with the results! It’s not perfect and didn’t get all the deep scratches but pretty good for less than $20 of investment and less than two hours of time including the trip to the plastic shop.

This is a Dual 506-1 TT.
We just finally moved from a little shelf where it was hidden it to a place where it’s very visible and the scratches were driving me crazy.
Here are some photos.

BEFORE:
IMG_3121.jpegIMG_3122.jpeg
AFTER:
IMG_3124.jpegIMG_3123.jpeg
I feel like I could get this to that better “ultra wet” stage if I got some better buffing sponges and put in a little more time which could be a project for another day.
 
Last edited:
I bit the bullet today and tried a dust cover restoration technique I saw on YouTube. It seemed relatively easy and the polish recommended was available at my local Tap’s Plastic.

I just used a cordless drill with headlight buffing sponge and Novus 2 polish. Did multiple passes inside and out and finished up with a click wipe on of Novus 1 polish.

Pretty happy with the results! It’s not perfect and didn’t get all the deep scratches but pretty good for less than $20 of investment and less than two hours of time including the trip to the plastic shop.

This is a Dual 506-1 TT.
We just finally moved from a little shelf where it was hidden it to a place where it’s very visible and the scratches were driving me crazy.
Here are some photos.

BEFORE:
View attachment 3320623View attachment 3320627
AFTER:
View attachment 3320636View attachment 3320637
I feel like I could get this to that better “ultra wet” stage if I got some better buffing sponges and put in a little more time which could be a project for another day.
Looks terrific in the photos!
 
Back
Top Bottom