Quick project:
My Dynaco Pat-4 preamp started humming. I decided to change out the main filter cap in the power supply. I did not want to spend much time/money on this so I did not obsess on the purchase of a multi-cap that matched well as I usually do. I also did not use a terminal strip for mounting.
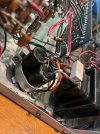
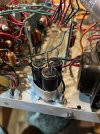
I used three Nichicon 1000uf @ 100V caps to replace the multi-cap. The original was 850/700/700. I removed the old cap and slightly bent the mounting ring to accept the three new caps. The caps were faced so that the negative leads were close and twisted together. A random stranded copper scrap of wire was fitted with a crimp on spade connector. The spade attached to the mounting screw on the chassis and the other end twisted around the negative leads to get a good chassis ground connection. The three positive leads were each bent over with a loop at the top to make a connector to solder the wires and resistors to. All wires and components were attached as they were on the original multi-cap and soldered in place. The whole assembly made for a surprisingly rigid structure that only took maybe twenty minutes to wire up.
I usually tend to overthink but in this case I just threw the components in (leaving town tomorrow). It is a pet peeve of mine to see flying caps and poor wire dressing on repairs but this method surprised me with how sturdy it turned out and well it worked.
Back in the rack and sounds great!
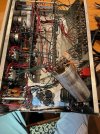
Some pics for your enjoyment below:
My Dynaco Pat-4 preamp started humming. I decided to change out the main filter cap in the power supply. I did not want to spend much time/money on this so I did not obsess on the purchase of a multi-cap that matched well as I usually do. I also did not use a terminal strip for mounting.
I used three Nichicon 1000uf @ 100V caps to replace the multi-cap. The original was 850/700/700. I removed the old cap and slightly bent the mounting ring to accept the three new caps. The caps were faced so that the negative leads were close and twisted together. A random stranded copper scrap of wire was fitted with a crimp on spade connector. The spade attached to the mounting screw on the chassis and the other end twisted around the negative leads to get a good chassis ground connection. The three positive leads were each bent over with a loop at the top to make a connector to solder the wires and resistors to. All wires and components were attached as they were on the original multi-cap and soldered in place. The whole assembly made for a surprisingly rigid structure that only took maybe twenty minutes to wire up.
I usually tend to overthink but in this case I just threw the components in (leaving town tomorrow). It is a pet peeve of mine to see flying caps and poor wire dressing on repairs but this method surprised me with how sturdy it turned out and well it worked.
Back in the rack and sounds great!
Some pics for your enjoyment below: