


henkjas
New Member
As I did some research on how to service a Denon dp47-f, I learned some lessons I'd like to share with you.
When you have some experience soldering you can do some service yourself and solve some problems that often occur with these older turntables.
Sure, there are a lot of people telling you should do a complete recap, replacing 36 electrolytic capacitors. I can imagine that's difficult for a lot of people. Like me with some soldering experience it seems a hell of a job, and I don't have all the knowledge and equipment to do all the variable resistor settings. But there's a reasonable easy way to correct some common problems.
I already shared the way to correct a wrong lead in on the 17cm records:
https://audiokarma.org/forums/index...lead-in-arm-adjustment.1058215/#post-17079858
But what if there are any problems with auto-start or auto-stop? Mine worked most of the time but sometimes seem to be stuck when moving to the starting point. Also sometimes when returning to the resting point the platter did not stop. Sometimes the arm would not return at the end of a record. After some research online it seems to me that the problem could be with the ligt sensitive resistors. There are 3 located on the arm circuitboard and they are coded with CDS1, CDS2 en CDS3.
First remove the mat and platter, you can just pull it off and lay it aside.
Then turn around your turntable, let it rest on the dust cover, puth some cloth under it. Remove the dempening feet.
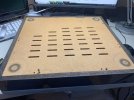
Remove the 6 screws and remove the bottom cover.
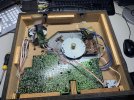
It's all about the little circuit board on the top left.
 CDS1, CDS2 and CDS3 are located on the bottom part of the circuitboard. It's also printed on the circuitboard, you can't miss it.
When you remove the 3 screw holding the little board in place, you can see the 3 resistors when turn the board gently around.
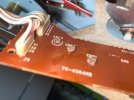
These are the parts you should replace. There is some debate over the specs. I can only share what I did:
CDS1: 5528 (light 10-20kOhm, dark 1 MegOhm)
CDS2: 5506 (light 2-5kOhm, dark 0,2MegOhm)
CDS3: 5526 (light 8-20kOhm, dark 1 MegOhm)
I found it on vinylengine:
https://www.vinylengine.com/turntable_forum/viewtopic.php?f=18&t=122474&p=1187577
So just order online some CDS with numbers 5528, 5506 and 5526. Carefully desolder the parts from the circuitboard, put in your new CDS parts.
Be careful not to break some of the wires going to the turnarm, you should just have enough room to work.
Just check the big circuitboard on any leaking capacitors. If you spot one, you should also replace it. Mine was looking fine fortunately.
Then close up everyting, turn the TT around, place platter and mat, and you're good to go.

My DP47f is functioning fine now. Hope this helps future owners.
Cheers!
When you have some experience soldering you can do some service yourself and solve some problems that often occur with these older turntables.
Sure, there are a lot of people telling you should do a complete recap, replacing 36 electrolytic capacitors. I can imagine that's difficult for a lot of people. Like me with some soldering experience it seems a hell of a job, and I don't have all the knowledge and equipment to do all the variable resistor settings. But there's a reasonable easy way to correct some common problems.
I already shared the way to correct a wrong lead in on the 17cm records:
https://audiokarma.org/forums/index...lead-in-arm-adjustment.1058215/#post-17079858
But what if there are any problems with auto-start or auto-stop? Mine worked most of the time but sometimes seem to be stuck when moving to the starting point. Also sometimes when returning to the resting point the platter did not stop. Sometimes the arm would not return at the end of a record. After some research online it seems to me that the problem could be with the ligt sensitive resistors. There are 3 located on the arm circuitboard and they are coded with CDS1, CDS2 en CDS3.
First remove the mat and platter, you can just pull it off and lay it aside.
Then turn around your turntable, let it rest on the dust cover, puth some cloth under it. Remove the dempening feet.
Remove the 6 screws and remove the bottom cover.
It's all about the little circuit board on the top left.
CDS1, CDS2 and CDS3 are located on the bottom part of the circuitboard. It's also printed on the circuitboard, you can't miss it.When you remove the 3 screw holding the little board in place, you can see the 3 resistors when turn the board gently around.
These are the parts you should replace. There is some debate over the specs. I can only share what I did:
CDS1: 5528 (light 10-20kOhm, dark 1 MegOhm)
CDS2: 5506 (light 2-5kOhm, dark 0,2MegOhm)
CDS3: 5526 (light 8-20kOhm, dark 1 MegOhm)
I found it on vinylengine:
https://www.vinylengine.com/turntable_forum/viewtopic.php?f=18&t=122474&p=1187577
So just order online some CDS with numbers 5528, 5506 and 5526. Carefully desolder the parts from the circuitboard, put in your new CDS parts.
Be careful not to break some of the wires going to the turnarm, you should just have enough room to work.
Just check the big circuitboard on any leaking capacitors. If you spot one, you should also replace it. Mine was looking fine fortunately.
Then close up everyting, turn the TT around, place platter and mat, and you're good to go.
My DP47f is functioning fine now. Hope this helps future owners.
Cheers!