• The move to the new server is done. There are some software and database maintenance updates in process. This has us passing the hat around to help out. We appreciate any donations. Seriously, even a dollar helps. The payment page may be found here - https://www.audiokarma.org/support.html

Finally got the LED kit in the MC352

jdandy

Super Member
Banned
And don't let anyone tell you how easy it is. Man, wrestling that MC352 out of the rack, turning it upside down, turning it back right side up, and then getting it back into the rack is tough stuff. The kit itself was easy enough to get in, but you have too completely remove the front panel from the amp to get the parts installed. There are a few places where the directions are not completely clear, as well, but I figured it out. A little Asper-Cream on my back, and I think I'll be ok.

The LED lighting in the MC352 is awesome. Well worth the trouble. Now the amp's meters match my C2200 meters perfectly. I put the LED kit in the C2200 a couple of months ago. It's the way to go. LED lighting really improves the appearence.
 
Register to hide this ad
Yes, Jerry is correct, Audio Classics for the LED kits. I didn't take any before pics since I have already posted several photos of the McIntosh system in the studio. I'll get my camera and get a shot of the finished product posted shortly. Looks really good.
 
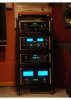
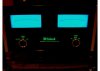
Here's a few photos of the studio system with the LED lighting kits in both the C2200 and the MC352.
 

Attachments

  • Mac New LED.jpg
    Mac New LED.jpg
    47.5 KB · Views: 192
  • Mac New LED1.jpg
    Mac New LED1.jpg
    21.3 KB · Views: 173
  • Mac New LED2.jpg
    Mac New LED2.jpg
    23.9 KB · Views: 193
I knew about the kit for the MR85. I was not aware that they had developed others. How will this affect the resale of MAC with this type of modification from the original design?

Greg.......As far as resale, I would think LED lighting might enhance the value since there will never be any burned out lamps to have to deal with. Just the same, I have kept all the original parts from the C2200, and the MC352 in their respective LED kit boxes should I elect to reinstall them for any reason, or pass them on to a future owner should there ever be one.
 
And don't let anyone tell you how easy it is. Man, wrestling that MC352 out of the rack, turning it upside down, turning it back right side up, and then getting it back into the rack is tough stuff. The kit itself was easy enough to get in, but you have too completely remove the front panel from the amp to get the parts installed. There are a few places where the directions are not completely clear, as well, but I figured it out. A little Asper-Cream on my back, and I think I'll be ok.

The LED lighting in the MC352 is awesome. Well worth the trouble. Now the amps meters match my C2200 meters perfectly. I put the LED kit in the C2200 a couple of months ago. It's the way to go. LED lighting really improves the appearence.

I will be doing that mod in another month or so when my two MC352's are going to be moved to a different room -- once the amp was on the floor, how much time was involved in the actual installation and was any soldering required? Are there just lamps on the top or are there also lamps below for the backlit words?

Thanks,

MikeSp
 
I will be doing that mod in another month or so when my two MC352's are going to be moved to a different room -- once the amp was on the floor, how much time was involved in the actual installation and was any soldering required? Are there just lamps on the top or are there also lamps below for the backlit words?

Thanks,

MikeSp

Mike.......It took me about an hour from start to finish. There is no soldering, everything is pin connectors, and a small power supply board that gets installed on the bottom side of the amp above the power supply board on a short stand-off. All the work can be completed with a phillips head screw driver and a 1/4" nut driver. The kit includes the LED power supply board, the LED light strips for the two meters, new filters for both meters, and a LED light strip that replaces the lamps for the lower back lit writing. The directions are fairly clear, although they did not explain that the wiring harness from one meter LED strip plugs into the circuit board on the other meter LED strip. The directions also tell you to reinstall the front panel before you connect two pin connectors from the LED power supply board and the lower LED strip. I had to remove the screws from the front panel bracket after reinstalling them, so that I could move the front panel out far enough to get my hand in there to plug the pin connectors in, then reinstall the front panel bracket screws. The installation is straight forward with those two exceptions. The hardest part was turning the amp upside down to get at the screws for the front panel mounting bracket, and then geting it turned back right side up once the work had been completed. You don't want to put any weight or stress on the front panel glass. The MC352 weighs 107 lbs. You don't just move it around like a preamp. Follow the directions line for line and you will do just fine. The way the amp and meters look when complete makes the effort worthwhile.
 
Dan....thanks for the pics.......they are purty :drool:

'cisco.......Thanks. I have spent the entire evening in the studio listening to this system. The MCD500 in this system only has about 20 hours on it, so I am still breaking it in. It sounds extraordinary. Hanging out down in the studo is always fun, whether I'm actually doing something productive, or just goofing off like this evening. I am very pleased at how good the LED kits look in both the preamp and the amp, so I've been ejoying listening to music (Paul Hardcastle4 right now), and staring at the beautiful blue meters.
 
That's my kind of music Dan......If you have this album play it for me :D
 

Attachments

  • front.jpg
    front.jpg
    88.1 KB · Views: 30
  • 0082796949922_500X500.jpg
    0082796949922_500X500.jpg
    65.2 KB · Views: 28
'cisco.......Yes, I have Peter White, several of his CD's as a matter of fact. I also enjoy Paul Brown, Chris Standring, four80east, Jeff Golub, Tom Grant, Brian Bromberg, Lee Ritenour, and Joyce Cooling. Check out the ones you might not have heard. It's all good stuff. :yes:
 
Mike.......It took me about an hour from start to finish. There is no soldering, everything is pin connectors, and a small power supply board that gets install on the bottom side of the amp above the power supply board on a short stand-off. All the work can be completed with a phillips head screw driver and a 1/4" nut driver. The kit includes the LED power supply board, the LED light strips for the two meters, new filters for both meters, and a LED light strip that replaces the lamps for the lower back lit writing. The directions are fairly clear, although they did not explain that the wiring harness from one meter LED strip plugs into the circuit board on the other meter LED strip. The directions also tell you to reinstall the front panel before you connect two pin connectors from the LED power supply board and the lower LED strip. I had to remove the screws from the front panel bracket after reinstalling them, so that I could move the front panel out far enough to get my hand in there to plug the pin connectors in, then reinstall the front panel bracket screws. The installation is straight forward with those two exceptions. The hardest part was turning the amp upside down to get to the screws for the front panel mounting bracket, and then geting it turned back right side up once the work had been completed. You don't want to put any weight or stress on the front panel glass. The MC352 weighs 107 lbs. so you don't just move it around like a preamp. Follow the directions line for line and you will do just fine. The way the amp and meters look when complete makes the effort worthwhile.

Thanks so much--I look forward to the LED fix and not having to carry the amps in to the local dealer to have the bulbs periodically replaced or having one bulb out and living with it.

MikeSp
 
Thanks so much--I look forward to the LED fix and not having to carry the amps in to the local dealer to have the bulbs periodically replaced or having one bulb out and living with it.

MikeSp

Mike.......Happy to help out. Us McNuts love the sound of our equipment, but it has to look beautiful doing it, too. If there is a bulb burned out somewhere, not properly lighting the face, we are unhappy. It has to be perfect to be right. The LED kits insure long term reliability for the display, and insure long term happiness for owners.
 
I obviously haven't taken one apart, but, since it's being taken apart anyway, why wouldn't you just get OEM-specified replacement parts instead of using an aftermarket LED kit? Are the OEM parts unavailable?
 
Dan,

I'm considering doing my 2200 also. Seeing you have the 501's also, does the "blue" match up fairly well?

Gordon
 
I obviously haven't taken one apart, but, since it's being taken apart anyway, why wouldn't you just get OEM-specified replacement parts instead of using an aftermarket LED kit? Are the OEM parts unavailable?

kamehany.......You may have over looked my original concept. I had no lamps burned out on the MC352 amplifier. I wasn't performing a repair. I just didn't want those particular OEM parts (incandescent lamps) in the amp. That was the reason for removing the OEM light strips and replacing them with LED strips. The MC352 meters were not matching the color or brightness of my C2200 preamplifier with the LED lighting kit installed in it. By adding the LED lighting kit to the MC352, I now have a perfect color and brightness match with the C2200. More over, I have the extreme long term reliability that comes with lower temperature LED's verses incandescent lamps with filiments that routinely burn out.
 
Dan,

I'm considering doing my 2200 also. Seeing you have the 501's also, does the "blue" match up fairly well?

Gordon

Hawkeye.......Yes, the "blue" matches perfectly. That was the reason I originally installed the LED lighting kit in my C2200. Before I purchased the C2300 preamp that I presently use with the MC501 amps, I used the C2200 with the MC501's in my main system. I was unhappy with the brightness and color of the C2200 meters as compared to the beautiful, bright blue, LED lit meters on the MC501's. Audio Classics assured me that the LED kit would match the color and brightness of my amps, and they were correct. It is a perfect match, both in color, and brightness. It really tied the two pieces together by having the LED lighting kit installed in the C2200.

Of course, the C2300 has factory LED lighting, so the color and brightness of its meters and backlighting matched the MC501 amps right out of the box. When I moved the C2200 preamp to the studio system with the MC352 amp, I knew immediately the LED kit would need to be installed in the MC352 amp. Now that the kit is installed in the amp, the C2200 and the MC352 are a perfect color and brightness match.
 
I obviously haven't taken one apart, but, since it's being taken apart anyway, why wouldn't you just get OEM-specified replacement parts instead of using an aftermarket LED kit? Are the OEM parts unavailable?

Some OEM bulbs burn out after a few hundred hours and some last for thousands of hours no matter what their ratings. It is aggravating to have even one bulb out, thus the LEDs change all of that. The cost of having the service tech at my dealer rebulb the amp is $115, so in the long run, a DIY LED bulb kit makes asthetic as well as financial sense (at my age, carrying those MC352's is a pain in the ...:D

MikeSp
 
Back
Top Bottom