


Carbsandcaps
Super Member
I had some extra money (because sure it’s extra money) from the sale of a butler TDB-2150 and I’ve been on the lookout for a x-202-b to replace my x-100-b because it’s got more buttons and doohickeys and everyone knows the more the doohickeys the better right?
There was one on reverb that looks like it had been at the bottom of the ocean and would have been good just for tubes. I had been watching one for auction on the bay for a week intently. Checking 3 times a day where it was at. I was going to make this mine. Then BOOM another on shows up for buy it now the same day the auction was to end. This one was missing a few knobs and the family jewels so I figured I’d stick with my original auction baby. That was until I saw the small spot of rust behind one of the capacitors cans. This was not declared on the listing! So I decided if I’m going to do this I’m going to get the hood one even though I’m sure it’s going to be more than the auction will end at.
To make a long story longer I put my offer in and it was accepted! I continued to watch the auction and it has in fact some for $100 less than I paid for the pristine one but I’m ok with that. Neither came with tubes but I have plenty.
So I get it in and order my list of pio capacitors from the Ukraine and while I’m waiting I look into replacing the jewels on the front. They sell them for $75 for the set. No way am I paying that for plastic beads. So I decided to try an led conversion with correctly colored LED’s. So let’s begin.
I had bought a set of 3mm LED’s from Amazon for another project. They work great for station indicator lights on receivers. The kit had all the colors I needed and included a ludicrous amount of resistors in 430ohm and 470ohm sizes.

I started with a simple 1n4001 diode on the ground input at the light assembly which gave me about 4v dc. The amber and the red were rated at 2-2.5v and the green was rated at 3-3.5v So after trying the 2 different resistors from the kit the green was brighter than the others. So after experimenting I found a 2200ohm resistor brought the brightness down to about even. So I went to work assembling.
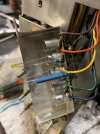
I measured how far out the faceplate sat from the body so have the led’s far enough out. started by soldering the cathode to the shell of the bulb holder. Then soldering the resistor to the anode then the resistor to the rail where the diode was then heat shrink for protection. The rail was positive only because that’s the way I put the diode but you can switch it to either way.
Do this 5 times with the led and corresponding resistor and you’ve got it. I also think they were a little bright so I added a 100ohm 1/2 watt resistor inline with the diode to lower the brightness of all of them.

The 3mm bulbs fit exactly in the holes on the faceplate which was a huge bonus. I put the faceplate on and lined everything up but it looked like a Christmas tree inside the amplifier so I decided to use the shrink wrap to cover the majority of the bulb.

Now put the faceplate back on and line up the LED’s with the holes. I find the easiest way to do this is put the faceplate on then use a screwdriver to reach down between the faceplate and the frame to moved them into the holes. The way I installed the LED’s they just poke into the hole but if I let more lead out there would be no problem with them coming all the way through. But I kind of like the recessed look
The functions all work with the exception of the bulb getting brighter when the center channel is on but I couldn’t care less about that.
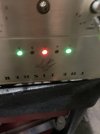

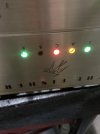
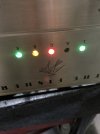
All in all it’s not a bad $7.49 alternative to the $75 replacement jewels if you’re not worried about originality. It’ll save some load on the transformer too!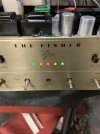
There was one on reverb that looks like it had been at the bottom of the ocean and would have been good just for tubes. I had been watching one for auction on the bay for a week intently. Checking 3 times a day where it was at. I was going to make this mine. Then BOOM another on shows up for buy it now the same day the auction was to end. This one was missing a few knobs and the family jewels so I figured I’d stick with my original auction baby. That was until I saw the small spot of rust behind one of the capacitors cans. This was not declared on the listing! So I decided if I’m going to do this I’m going to get the hood one even though I’m sure it’s going to be more than the auction will end at.
To make a long story longer I put my offer in and it was accepted! I continued to watch the auction and it has in fact some for $100 less than I paid for the pristine one but I’m ok with that. Neither came with tubes but I have plenty.
So I get it in and order my list of pio capacitors from the Ukraine and while I’m waiting I look into replacing the jewels on the front. They sell them for $75 for the set. No way am I paying that for plastic beads. So I decided to try an led conversion with correctly colored LED’s. So let’s begin.
I had bought a set of 3mm LED’s from Amazon for another project. They work great for station indicator lights on receivers. The kit had all the colors I needed and included a ludicrous amount of resistors in 430ohm and 470ohm sizes.
I started with a simple 1n4001 diode on the ground input at the light assembly which gave me about 4v dc. The amber and the red were rated at 2-2.5v and the green was rated at 3-3.5v So after trying the 2 different resistors from the kit the green was brighter than the others. So after experimenting I found a 2200ohm resistor brought the brightness down to about even. So I went to work assembling.
I measured how far out the faceplate sat from the body so have the led’s far enough out. started by soldering the cathode to the shell of the bulb holder. Then soldering the resistor to the anode then the resistor to the rail where the diode was then heat shrink for protection. The rail was positive only because that’s the way I put the diode but you can switch it to either way.
Do this 5 times with the led and corresponding resistor and you’ve got it. I also think they were a little bright so I added a 100ohm 1/2 watt resistor inline with the diode to lower the brightness of all of them.
The 3mm bulbs fit exactly in the holes on the faceplate which was a huge bonus. I put the faceplate on and lined everything up but it looked like a Christmas tree inside the amplifier so I decided to use the shrink wrap to cover the majority of the bulb.
Now put the faceplate back on and line up the LED’s with the holes. I find the easiest way to do this is put the faceplate on then use a screwdriver to reach down between the faceplate and the frame to moved them into the holes. The way I installed the LED’s they just poke into the hole but if I let more lead out there would be no problem with them coming all the way through. But I kind of like the recessed look
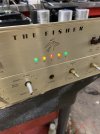
The functions all work with the exception of the bulb getting brighter when the center channel is on but I couldn’t care less about that.
All in all it’s not a bad $7.49 alternative to the $75 replacement jewels if you’re not worried about originality. It’ll save some load on the transformer too!
Attachments
Last edited:
