• The move to the new server is done. There are some software and database maintenance updates in process. This has us passing the hat around to help out. We appreciate any donations. Seriously, even a dollar helps. The payment page may be found here - https://www.audiokarma.org/support.html

Fixing/Restoring Motorola SK30B

LuckyMCM

New Member
Hello! My family has a wonderful Motorola SK30B cabinet that has been warming our house with music for years. Over the last year, we have been getting increasing spitting noises, background hum, and then one day, the volume just slowly died down to nothing, almost like an invisible hand was on the volume control. Now the unit powers up, but it no longer makes sound from either the turntable or tape inputs.

I let it sit for about 2 months and turned it on again, and it worked! For about 30 minutes. Changing the inputs or turning the unit on and off made a loud pop each time through the speakers.


The tuner has always been inoperative since we got it, although we've never hooked up a proper antenna. I'd love to fix this.

This is the model with 5", 8", and 15" speakers. I have replaced one of the 8" speakers that was inoperative with a replacement of the same size and resistance and tried phasing it, but I couldn't quite figure it out. It worked fine for 6 months after I replaced the speaker. I also connected an RCA to 1/8th cord to the tape inputs so we can play off devices using the tape setting.

We want to repair or restore the unit to continue enjoying it. After we have gotten used to the warmth of the tubes, alternatives don't sound as good.

I have a few multi-meters, an old soldering iron, a workbench, and I got the Motorola service manual for it. We have done a simple continuity test on all of the tubes, which they passed.

My experience is limited; I have done simple electrical repairs using basic multimeter functions and soldering on cars and home appliances, but nothing with capacitors, relays, or resistors.

We can shoot and post videos of the repair process but really don't know where to start.

Help Audiokarma hive mind. You are my only hope.

We are in West Michigan.

 
Last edited:
Register to hide this ad
I recently repaired a larger Motorola 3-channel amp chassis, circuit breaker was bad, rectifier tube was dead and it hummed a bit, so it got new electrolytic capacitors. Yours also has a preamp chassis with two tubes, plus a tuner (which apparently was optional - isn't included in Sams folder 491-11). The Sams folder is at radiomuseum.org, though if you have the Moto service manual, it's likely better. If you don't have the service info on the tuner, look for a chassis number (HS-???) and I'll see what I can dig up.

You don't include your location - somebody near you may have a tube tester (and more importantly, experience with tube circuits).
 
Thank you Tom! We're in West Michigan. I'm going to go over the service manual to see what it has on the tuner, and get some more information to share about that.

It sounds like proper tube testing is the first place to go. From what I've read online, planning I should plan on replacing caps and perhaps some other components as well.

I've tried search, and not found a thread that has the standard process that a restoration shop or enthusiast would use. I've found fits and starts on YouTube, but they assume a level of knowledge that I do not yet have.

Knowing how the learning curve works, I've started keeping any eye out for similar systems that are not working so I can learn on them before going on to something I actually care about.
 
Inside pics?

If you can, take the back off and watch the tubes start to glow. On the main amp, check to see if the big tube (5U4GB or 3DG4) is lighting up. It may not be your problem but this is the first thing I think of when someone says it was working and then faded out to nothing.

Could also be the first filter capacitor is bad. If it is all original, it sure could do with a recap but I think I would find the initial problem first before replacing any capacitors.
 
Slowly fading out sounds like either the rectifier losing output voltage, or leaky coupling caps swamping the output tubes. Its more than old enough to need some TLC at this point.
 
Inside pics?

If you can, take the back off and watch the tubes start to glow. On the main amp, check to see if the big tube (5U4GB or 3DG4) is lighting up. It may not be your problem but this is the first thing I think of when someone says it was working and then faded out to nothing.

Could also be the first filter capacitor is bad. If it is all original, it sure could do with a recap but I think I would find the initial problem first before replacing any capacitors.

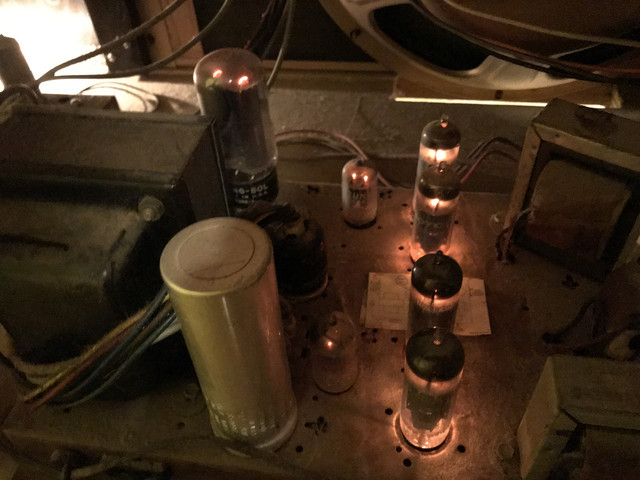
I took the back off to check the tubes while the console was turned on to see which ones got warm.

IMG-4246.jpg


I decided to lightly touch the 5U4GB to see if it had any heat since it wasn't lit. When I touched it, it lit up and the music came back. @cademan, you're right!

IMG-4247.jpg


Now it's playing again. So, what can I do to make sure that it's not so sensitive to how the tube is seated? I barely touched it, and it started up again, so any bumps to the cabinet could disconnect it again. With a family in the house, it'll get bumped.

Also the console still has a hum when it's on and there are no inputs.

As requested: some other photos of the inside.There are some wires that I haven't figured out where they go exactly. The service manual only has the control panel, speakers and amp section pictures below.

IMG-4253.jpg


IMG-4254.jpg

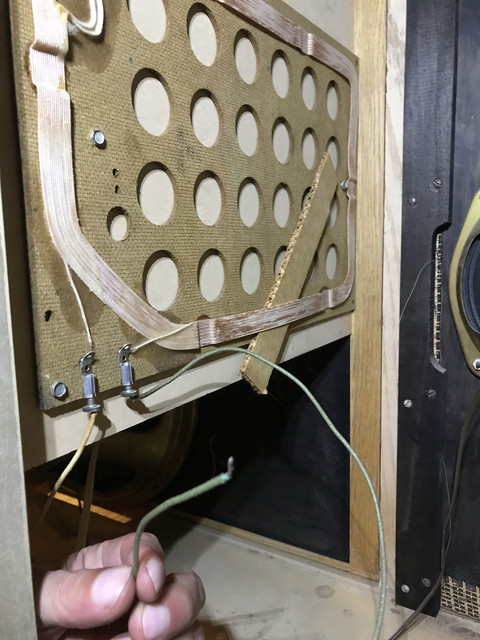
The green wire comes off what looks like a radio antenna. I can't figure out where the green wire is supposed to go. The white wire from the antenna goes to the tuner where there are a lot of what look like repeating cams, but I can't find a corresponding connection for the green wire anywhere near the white one. I'll get more pictures of that soon.

IMG-4255.jpg

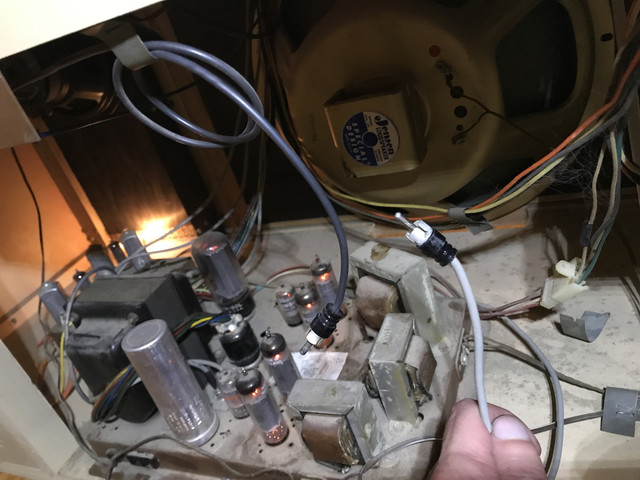
The black RCA goes to the external tape input. The grey starts plugged into the tuner chassis in a port labeled 'FM Input from Tuner,' but it doesn't actually connect to the tuner. I need to sort that out. There are two empty RCA connections at the bottom of the tuner I need to investigate.


IMG-4256.jpg

My service manual does not have this FM-Stereo unit listed. When I have the console set to 'tuner' the tube lights up. The two top RCA cords go up to the control panel, but are not connected. On the control panel there is a single 'Tuner' RCA port that went to a cord running to an external tuner RCA port on the back of the console. I haven't found the service manual for the tuner yet. When I turn on the tuner it lights up, the little baby oscilloscope is green and changes depending on the station, but it doesn't seem to be connected and I'm struggling with how to connect it.

IMG-4257.jpg

Right side speakers, you can see my replacement speaker, I made sure it's the same size and resistance. I wasn't able to test the phase, but to my ear it sounds as good as the left side.

IMG-4258.jpg


Left side speakers, all original.

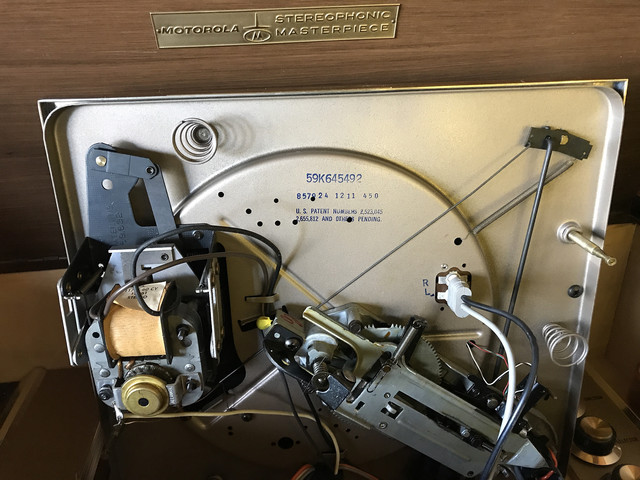
The turntable stopped working, the cycle for autoplaying seems to be broken, starting and stopping itself, never playing for long. A month ago I could turn on the turntable using the REJ/on/off dial on the turntable, and then just manually move the arm onto the record. If I went past 'on' to the REJ, it would start the auto feature, but now it automatically moves the arm no matter what I do. And then, messing with the dials and turning the console off and on again, it's working again without the autoplay. So strange. Whenever I change the Tuner dial from AM/FM/Phone to the Phono setting I get a loud pop through the speakers, which I also get when going to the LP setting on the control panel dial.

FYI the LP in this video is an old junk record to test on, I'm not destroying something vintage and valuable.


My goal is to return this console to full function, so I can use the radio, turntable and tape/RCA inputs. Currently only the tape/RCA input is working when the rectifier is seated properly.
 
Last edited:
trip linkage is probably gummy. Looks like a Voice of Music changer. There are probably guides on here somewhere about how to overhaul a VM 1200, or thevoiceofmusic.com has info and parts. The mechanisms aren't real complex. Pull the platter off and de-gunk the stuff under there. On the bottom side the whole mechanism is under a plate. That plate comes out and you can get to all the parts and pieces.

Something I've found with VM changers is the motor mounts are usually bad and sagging. The idler wheels are hit and miss, but they cannot be sanded to refresh them. Its a 2 step idler so the diameters are critical to get proper speed.
 
@Tom Bavis That schematic is super helpful.

The FM multiplex chassis is definitely labeled an HS-996A, not sure if the 'A' makes a difference.

From the provided schematic I'm missing a couple things:
  • 6AL5 Synchronous Detector tube, and perhaps the plug in the chassis, I need to clean it to see if it's under the dust. Fingers crossed it is.
  • 2SB56 Follower Emitter, which looks like a transistor. In the schematic it looks like the 2SB56 has some sort of mount it sits in that is also missing, but I can see the two screw holes for the mount and the larger hole for the wiring.
Next step for the tuner (and the whole cabinet) is to clean the internals. My plan is with a soft large paintbrush just gently brushing dust out while unplugged. Then I need to remove the tuner chassis to look at the connections on the bottom to see if I need a tube receptacle and some sort of mounting solution for the transistor. Both the tube and transistor look like they can be found and purchased online.

Turntable: When I've cleaned old car electronics (german 70's cruise control systems) I used small machinist acid brushes and spray electronics cleaner to get out the old grease before re-lubing with some dielectric grease. Would this process be safe and effective on the turntable? I can inspect the motor mounts and see about replacing them or fabricating a replacement.
 
Digging into the inter webs, I found a HS996 on eBay. It's got the 2SB56 Follower Emitter that my chassis is missing, but it doesn't have a socket for the 6AL5 tube as listed in the schematic.

Any thoughts?

Screen-Shot-2020-11-28-at-12-48-49-PM.png


Screen-Shot-2020-11-28-at-12-48-41-PM.png


Interestingly, the label on my chassis has the missing Emitter Follower blacked out both as a referenced part and it's position on the chassis. That's very strange.

Screen-Shot-2020-11-28-at-12-52-26-PM.png


Here's a tight shot of my label with those spots blacked out.
 
My guess it that they moved the transistor inside in the "A" version. Transistor sockets were used for a while, but were a reliability problem.
 
Two things could be the problem with the rectifier tube.
1) It could have an intermittent pin on the tube itself meaning that a wire might have become unsoldered inside.
2) The socket itself may need to be re-tensioned by using a dental pick or some sort of tool that can poke the pin plates closer together to make a tight tube in the socket.
 
I can check the socket, I've got a whole mess of picks I can use to poke the plates tighter.

Is it possible to heat up the tube with a heat gun to reflow the solder? I've done this on newer electronics, no idea how this would work on a tube though.

THANK YOU for the help. It's been hugely helpful.
 
Turntable: When I've cleaned old car electronics (german 70's cruise control systems) I used small machinist acid brushes and spray electronics cleaner to get out the old grease before re-lubing with some dielectric grease. Would this process be safe and effective on the turntable? I can inspect the motor mounts and see about replacing them or fabricating a replacement.

yep thats fine. Mineral spirits works well to remove petrified lube. In extreme cases I've even used acetone or Brakleen, but do not get that on anything painted or plastic. These things are probably a fair bit less fragile than anything that came out of Germany. The platter and the motor want some sort of light oil in the bearing. I like hydraulic oil or sewing machine oil, but any similar light oil is fine. Don't get any oil on the inside of the platter, the idler wheel, or the motor spindle. An alcohol wipe on all of those surfaces before re-assembly would be a good idea. I use SylGlide from Napa for grease, but its basically just dielectric grease. White lithium is also fine. It uses very little lube overall, just a small amount in a few spots.

thevoiceofmusic.com has the motor mounts for a couple bucks a set if you do need them.
 
@gadget73 Perfect, thank you. I have some machinists oil I can use. I watched a video on youtube about dismantling and cleaning the turntable, and it looks fairly straightforward as long as I don't lose that little ball bearing...

For the amplifier, I'll see if I can't source a tube tester to test the tubes on first, that seems the least invasive easiest thing to do, and try and get that pin connector snugged up a bit.
 
Hi! I am on the tail end of restoring a 1961 motorola. Im absent minded so I took a ton of pictures and videos of me disassembling, then labeled every cord with painters tape and a marker.

If you have not already obtained the schematics, you can get them here. Use the drop down then scroll down to the SK30B selection and get the whole package. Would you post a pic of the inside and your tuner? For the best performace and longevity You REALLY REALLY REALLY need to recap the amp including that can filter cap.

I think this is the MPX unit, mine goes to a separate MPX amp but it looks like yours may be build into your main amp. the later pic where you are holding a cord for FM tuner may plug into this

IMG-4257.jpg

Right side speakers, you can see my replacement speaker, I made sure it's the same size and resistance. I wasn't able to test the phase, but to my ear it sounds as good as the left side.

You need to replace those yellow caps on both sides. I could not find anything similar to the way its mounted so ended up getting an ignition wire harness clamp from an auto parts store. It comes in multiple sizes so get your caps first to figure out size up to 1" diameter. In addition the lead on those are already spades, so you will have to solder some wire to the leads, shrinkwrap and put your own spade on the end. Heres what mine ended up looking like:
0L8Ym8C.jpg
 
Back
Top Bottom