• The move to the new server is done. There are some software and database maintenance updates in process. This has us passing the hat around to help out. We appreciate any donations. Seriously, even a dollar helps. The payment page may be found here - https://www.audiokarma.org/support.html

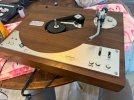
Fully rebuilt Pioneer PL-530 making a popping or thump when you play or stop.

saabracer23

AK Subscriber
Subscriber
I have a pioneer PL-530 that I just went through and this thing is running like a Swiss clock. Fully broke it down and cleaned it up as well as replace the foam for arm return. I ground down the rivets on all three micro switches so that I could open them up and use a Jonard contact burnishing tool to clean them up, every contact down to 0.01 ohm or lower. I also applied a small drop of Deoxit D100l to the contact point and closed them up with the original rivets. Everything on this table is functioning perfectly except-

You hit the play button, the tone arm lifts from the rest and moves over, and lands on the record. After about one second of playback, you get a fairly loud pop through the speakers. That’s the only time it does it in play mode. The very moment you hit the stop switch you get the exact same loud pop, then the tone arm lifts and move moves over to the rest and lands. I’m guessing it has to be some sort of switch or something, maybe one of the spark arrestors or the suppressors is not functioning correct correctly? Curious if anyone has any knowledge on this, the record player is still usable, but having those loud pops is pretty annoying. I was playing a record on a small Onkyo integrated amplifier and every time it popped it would kick the protection, then you’d get the Audio back after protection relay turn back on.

I’d really appreciate any assistance with this annoying issue.

Dan
 
Register to hide this ad
Hello Dan,


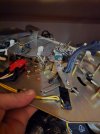
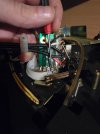
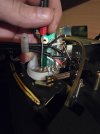
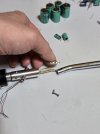
In this turntable there is a switch with two long, loose contacts. I am pointing to them with my finger in the photo. They connect the signal wires from the cartridge to the output.


When the stylus touches the record, the contacts close. When the stylus lifts up, the contacts open. Check if they are clean. They must not be black. Maybe this is the cause.


Another thing you need to check is whether the tonearm has ground connection. The whole tonearm must be connected to ground. Sometimes the side bearings are rusty and do not conduct ground. Check them.


Also check the pins between the tonearm and the headshell. Sometimes they are black, covered with sulfides. Clean them.


Check whether the ground wire to the amplifier is good and whether there is no break in it.


I think the problem is a missing ground connection somewhere. You simply have to find it.


I hope this helps.

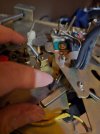
20260830_203933.jpg20260830_203949.jpg

Also check whether the contacts shown in the photos are not bent or misaligned.

If the signal contact closes first and the ground contact closes afterward, there will be a pop/crack in the speakers. The contacts must close at the same time.
 
Last edited:
Hello Dan,


In this turntable there is a switch with two long, loose contacts. I am pointing to them with my finger in the photo. They connect the signal wires from the cartridge to the output.


When the stylus touches the record, the contacts close. When the stylus lifts up, the contacts open. Check if they are clean. They must not be black. Maybe this is the cause.


Another thing you need to check is whether the tonearm has ground connection. The whole tonearm must be connected to ground. Sometimes the side bearings are rusty and do not conduct ground. Check them.


Also check the pins between the tonearm and the headshell. Sometimes they are black, covered with sulfides. Clean them.


Check whether the ground wire to the amplifier is good and whether there is no break in it.


I think the problem is a missing ground connection somewhere. You simply have to find it.


I hope this helps.

View attachment 3826827View attachment 3826828

Also check whether the contacts shown in the photos are not bent or misaligned.

If the signal contact closes first and the ground contact closes afterward, there will be a pop/crack in the speakers. The contacts must close at the same time.


Thank you so much! That certainly give me some stuff to check! I’ll report back!

Dan
 
Contacts look great actually.

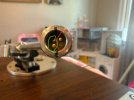
IMG_3732.jpeg

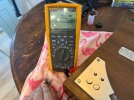
I’m gonna check out those contacts on the bottom side here in a second but is the grounding open? Meaning does any of the switches lift ground? I have absolutely zero continuity between the grounding wire and the tone arm, dances around at about eight meg. I have no real continuity between the grounding of the left channel and the grounding of the right channel RCA plugs north continuity between the RCA plug grounds and the tone arm. Should I have continuity between these items with the turntable just turned off and sitting here like this?

IMG_3733.jpeg
IMG_3734.jpeg

I’ll go ahead and dig into those switches, I’ll measure the resistance between them before I do any type of cleaning.

Dan
 
The principle of operation is as follows:

When the turntable is switched off, the long contacts I photographed earlier short the signal wires to the amplifier ground. So when the turntable is switched off, there should be continuity between the left channel ground and the left channel signal, meaning 0 ohms. The same applies to the other channel. This is when you check it at the RCA plugs.

When the turntable is switched on and the stylus lowers onto the record, the contacts open and there should be no continuity. You can check this at the RCA plugs when they are not connected to the amplifier.

Now another test. When the turntable is switched off, the connections between the pins in the tonearm tube should be as follows:

signal R (pin) - signal R (RCA): no connection
signal L (pin) - signal L (RCA): no connection
ground L (pin) - signal L (RCA): connected
ground R (pin) - signal R (RCA): connected
ground L (pin) - ground L (RCA): connected
ground R (pin) - ground R (RCA): connected

And another test. When the turntable is switched on and the tonearm is lowered onto the record, the connections between the pins in the tonearm tube should be as follows:

signal R (pin) - signal R (RCA): connected
signal L (pin) - signal L (RCA): connected
ground L (pin) - signal L (RCA): no connection
ground R (pin) - signal R (RCA): no connection
ground L (pin) - ground L (RCA): connected
ground R (pin) - ground R (RCA): connected

Do these tests without the headshell and cartridge installed.

And one more thing.

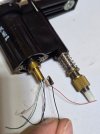
Look at the photos:
20260830_230032.jpg

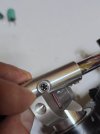
20260830_230037.jpg


From the factory, the two wires from the tonearm ground are connected to the right channel ground, as shown in the photo. Desolder them and try soldering them to the place I showed in the second photo. Only the black wires. Leave the green wire where it is.

I hope I didn't make any mistakes in the connections between the RCA and the pins, but I think it's ok
Is the crackling noise heard in both channels or just one?
 
Just checking the two contacts they do appear to be in contact with each other and when I measure across them, both are right around 0.15 ohms and that includes the lead resistance on my meter, so I’d say they’re good.

IMG_3736.jpeg

I checked, and I have continuity throughout the entire grounding cable. So I found that those switches, there are two and one for each channel Will ground the signal. Or at least tie the signal to the shield of the RCA cable, but the RCA cable shield doesn’t seem to be grounded into anything. I even checked to see if either shield of the RC cable or the grounding cable was connected to the ground plane on the power supply board and it is not. So are all of these supposed to be connected, I would assume so. Where is the tie point to connect all of the grounds together?

Dan
 
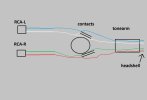
It should be like this:

Bez tytułu.jpg

Resolder those black wires like I said earlier and check. I think it might help.

When the turntable is off, the contacts are closed. When the turntable is on and the stylus is on the record, the contacts are open.
 
The principle of operation is as follows:

When the turntable is switched off, the long contacts I photographed earlier short the signal wires to the amplifier ground. So when the turntable is switched off, there should be continuity between the left channel ground and the left channel signal, meaning 0 ohms. The same applies to the other channel. This is when you check it at the RCA plugs.

When the turntable is switched on and the stylus lowers onto the record, the contacts open and there should be no continuity. You can check this at the RCA plugs when they are not connected to the amplifier.

Now another test. When the turntable is switched off, the connections between the pins in the tonearm tube should be as follows:

signal R (pin) - signal R (RCA): no connection
signal L (pin) - signal L (RCA): no connection
ground L (pin) - signal L (RCA): connected
ground R (pin) - signal R (RCA): connected
ground L (pin) - ground L (RCA): connected
ground R (pin) - ground R (RCA): connected

And another test. When the turntable is switched on and the tonearm is lowered onto the record, the connections between the pins in the tonearm tube should be as follows:

signal R (pin) - signal R (RCA): connected
signal L (pin) - signal L (RCA): connected
ground L (pin) - signal L (RCA): no connection
ground R (pin) - signal R (RCA): no connection
ground L (pin) - ground L (RCA): connected
ground R (pin) - ground R (RCA): connected

Do these tests without the headshell and cartridge installed.

And one more thing.

Look at the photos:
View attachment 3826975

View attachment 3826976


From the factory, the two wires from the tonearm ground are connected to the right channel ground, as shown in the photo. Desolder them and try soldering them to the place I showed in the second photo. Only the black wires. Leave the green wire where it is.

I hope I didn't make any mistakes in the connections between the RCA and the pins, but I think it's ok
Is the crackling noise heard in both channels or just one?

I really appreciate your assistance with this, and I do think that part of the issue is that I’m not getting the ground to the tone arm, and you mentioned something about the ball bearings getting rusty.

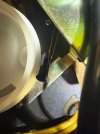
Checking these pins, continuity to the tone arm itself, the right side ground and signal I can get continuity to the tone arm now, dances around from around 100 domes, but we’ll finally settle down at a couple of ohms. The left channel signal in ground pin. I get absolutely no connection to the tone arm at all. So the two pin circled in red, I get continuity to the tone arm.

IMG_3737.jpeg


When it comes to these tests here:


signal R (pin) - signal R (RCA): no connection
signal L (pin) - signal L (RCA): no connection
ground L (pin) - signal L (RCA): connected
ground R (pin) - signal R (RCA): connected
ground L (pin) - ground L (RCA): connected
ground R (pin) - ground R (RCA): connected

I actually get connection on every single one of those, which makes sense to me. Going from the right and left signal pin to the signal pin at the end of the RCA cable you would still have connection right? It doesn’t actually lift the signal, breaking the connection, it just grounds it out. So you would still have that continuity. If I’m wrong on that, let me know, but I do have continuity on all those tests above.


These are the tests with the turntable on without the headshell
signal R (pin) - signal R (RCA): connected
signal L (pin) - signal L (RCA): connected
ground L (pin) - signal L (RCA): no connection
ground R (pin) - signal R (RCA): no connection
ground L (pin) - ground L (RCA): connected
ground R (pin) - ground R (RCA): connected

For all of these tests, they came out just as you said. So these seem to be correct.


OK, I do see where the two black wires for the tonearm ground are connected to the right channel ground, I will move them over to the grounding wire. But I’m wondering if before that maybe I should take care of the grounding issue. Checking continuity between the two black wires used for the tone arm ground and the tone arm itself. I get very intermittent beeps and almost no continuity. I’ll see anywhere from 400 ohms up to 1K and then it’ll just go “OL” since I’m in continuity mode so I’m guessing the resistance is higher. Is that likely due to the bearing issue you were mentioning earlier? Can I take care of that from the top side or the bottom side?

Thank you so much!

Dan
 
It should be like this:

View attachment 3826998

Resolder those black wires like I said earlier and check. I think it might help.

When the turntable is off, the contacts are closed. When the turntable is on and the stylus is on the record, the contacts are open.

So yes, that drawing looks correct me, and according to that drawing you have there, the contacts should never be open. You can see there that the right channel signal will always have contact with the right channel RCA signal, same with the left in your drawing. It goes all the way through without any break, all the switch does is connects the ground and the signal together which then short the signal to ground.

Dan
 
Yes, if you see 400–1000 ohms between the black wires and the tonearm, then yes — this is the problem.

First, try resoldering the black wires and separating them from the right channel. Check if that helps. If not, you will have to work on the tonearm.

Try to measure with the multimeter probe on the tonearm screws. The aluminum parts are anodized, and this can cause resistance. The tube is chrome-plated.

Yes, I would remove the side screws and check whether the bearings are rusty.

As for the black wires, they are not soldered directly to the tonearm. They are connected through a kind of copper sleeve and metal plate. Sometimes these copper parts oxidize and stop conducting.
 
I’m glad everything works now. Yes, that is what I suspected.

The manufacturer connected these grounds together with the right channel ground. I do not know why, because this creates a ground loop. Resoldering these black wires to the empty pad often helps remove pops or hum.
I would still check that 400–1000 ohm resistance just as a precaution. But of course, do it as you think best.

Congratulations on the repair!
 
Last edited:
Back
Top Bottom