• The move to the new server is done. There are some software and database maintenance updates in process. This has us passing the hat around to help out. We appreciate any donations. Seriously, even a dollar helps. The payment page may be found here - https://www.audiokarma.org/support.html

Help with Nak BX-100 electronic troubleshooting

bhurkeal

New Member
Hi. My pandemic hobby has been getting back into tapes and I figured it'd be fun to learn how to do basic maintenance on my Naks, so I bought a "does not work" BX-100 to practice on. The transport was a complete mess (either 10 year old 7up residue or someone used sticky tape on the idler to make it grip. lol). Anyway, I cleaned/lubed/deoxit/new belts and the transport works nicely now. However it has an electronic problem that I need help with. I got the service manual, but only have a rudimentary understanding of electronic circuits so could use some help. Here are the symptoms:

- Playback (RCA line-out): Left OK, Right no-output.
- Playback (Headphones): Left OK, Right no-output (so problem is on the board).
- Playback: Left LED level meter works; Right stays at 2 bars (which is the power on default).
- Record: Records on both channels (verified by playing recorded tape in another deck)
- Record: Both left/right LED level meters work properly and react correctly to the record level sliders.
- Erase: Tape erases properly.

So something is busted that only affects the right channel playback circuit. Erase and Record is not affected. None of the capacitors look visually damaged/leaking. Any ideas where I should start poking? Willing to buy basic equipment such as a multimeter (any recommendations which one to get?) and can solder stuff, etc.

One thing I've heard about is the relay that switches between play/record. Maybe the right channel relay is not making contact? I see the clear relay box below the bias oscillator board but not sure how to get into it. Does it open up somehow? If its not the relay, where do I go next?

Any help/tips/advice are appreciated!
 
Register to hide this ad
Replace the replay. They always die, sooner or later. Ask on tapeheads.net for a suitable alternative that is readily available today.

If not the relay, then perhaps playback chain mute transistors (the Qs that short signal to ground when playback is not enabled). You can remove them one by one and see if the signal returns.
 
Thanks for the reply, Werner. I'll start looking around for a replacement relay. I guess I could also see if I can short the relay leads temporarily for testing.
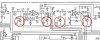
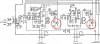
Regarding the chain mute transistors - in the service manual I see Q/transistors going to ground: 4 in the "Headphone/Line Amp" section & 2 in the "Playback eq" section.
Which ones are the chain mute ones? I've attached images of the two sections with the candidates circled.

Thanks!
 

Attachments

  • bx-100_line_amp_section.JPG
    bx-100_line_amp_section.JPG
    87.4 KB · Views: 27
  • bx-100_playback_eq_section.JPG
    bx-100_playback_eq_section.JPG
    79 KB · Views: 25
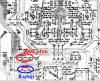
I bought a digital multi-meter and had a go. The relay is definitely bad. Left ch relay contact resistance = 0 ohms, Right ch = 200K ohm. I snipped a corner off the relay cover and liberally sprayed deoxit into it. No change. Then I shorted the two relay contacts for Play on the right channel and finally got output! The relay linked above is on several months backorder but found a similar one referenced in an old tapeheads post: https://www.jameco.com/z/G5V-2-DC12...olt-288Ohm-Through-Hole_187258.html?CID=MERCH It is in stock, so hopefully it will work.

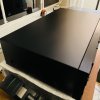
Going to do cosmetic fixes like painting the lid and bottom plate. I also need to re-open the transport and clean out the pulley for the reel motor (the brass one that drives the idler). Any tricks to removing it without taking the entire transport apart? I hate removing the demon idler washer. :( The pulley had this hard epoxy-like gunk stuck to the driving surface. I cleaned it after removing the idler, but evidently there's still crud on it in the groove. It's noisy and will wear the idler tire out prematurely. If I can get it off, the plan is to soak in acetone for an hour and then lightly polish the driving surface with a dremel buffing wheel.
 

Attachments

  • relay.JPG
    relay.JPG
    125.3 KB · Views: 13
Last edited:
pulley for the reel motor (the brass one that drives the idler). Any tricks to removing it without taking the entire transport apart?

No.

Clean it in-place. And don't think about polishing it.

Be prepared to remove the demon washer a couple more times in the future. Better the devil you know ...
 
Yeah did it in place. Hooked up a 9V battery to the reel motor and used several acetone soaked Q-tips against the brass pulley till all the crap was lifted from the grooves.
The Omron G5V-2 relay I linked to is a perfect replacement btw. It's slightly (less than 1/16") taller than the Matsushita original but the pins are exact, so no problems. Went in easy.
Cleaned and lubed transport, new belts and idler tire, new relay, lid painted in a black matte enamel, capstan motor speed adjusted to 3.005 kHz (as close as I could get) and it sounds fantastic.

Thanks for the help and tips!
This was my first refurb - done mainly to learn how to do basic service on my other decks. But it is kind of addictive... lol.
 
So looks I celebrated too soon. The reel motor has a dead spot. Suddenly stops after 10-30 mins of running. I tried putting in FF without tape, but after 20-30 mins even with no load, I hear the clutch/brake engage and the reel stops. And yes I sprayed deoxit through the slot on the back plate.

which is the best Mabuchi model to replace the reel motor? Also are there any videos showing reel motor replacement? Not finding any. I am comfortable taking off the idler and the capstan motor off. Just not sure if removing the reel motor is a super complicated thing or manageable by a first timer.
 
Werner, it’s actually getting worse. I played the deck for 12+ hours without any issues while waiting for the relay to arrive. After I finished and closed it up, the sudden-stop problems started. last night it could FF for 20-30 mins before stopping and had great torque - couldn’t stop it by pinching the hub. This morning, it shuts off from FF in 2-5 mins. Play shuts off (no tape) almost immediately. 2 hrs later - shuts off from FF in less than a minute with very little torque on the reel. Don’t even have to pinch… a light finger touch and it stalls. 5 mins later FF works with great torque. I think it runs longer/good torque when it’s cold. As it warms up, stops sooner/low torque.

I went ahead and ordered a few MABUCHI RF-500TB-12560 with the 10mm shaft so I’d have them around if this ends up needing a replacement.

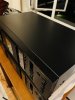
Attached a couple of pics of the lid paint job… turned out good. The original lid was horrible with rust marks and pitting.
 

Attachments

  • E99E3CEF-0BCE-493B-B5C4-EC85E4BDAE27.jpeg
    E99E3CEF-0BCE-493B-B5C4-EC85E4BDAE27.jpeg
    86.9 KB · Views: 16
  • A1DA1F93-A5A9-4B73-B6EF-515F92D94F05.jpeg
    A1DA1F93-A5A9-4B73-B6EF-515F92D94F05.jpeg
    72.6 KB · Views: 15
Last edited:
Ya. Get rid of that sankyo motor. Once they have dead spotted, they will give you problems even when rebuilt.
Unfortunately. Re and re the replacement motor is not exactly easy. The transport needs to come out and completely dis assembled. You can do it. But will need to take pictures and re assemble in opposite order. I dont know how mechanically inclined you are.

This is a link to basically the same transport but a high end deck(CR7) with DD motors(more complicated) but basically the same procedure. Perry posted pictures in that thread.
http://www.tapeheads.net/showthread.php?t=86417
 
Last edited:
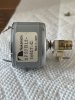
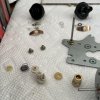
Thanks zedex for the link to that tape heads thread! I have taken the reel motor completely out from the transport twice now so I’m good with that part. Where I lost my nerve was taking the pulley and idler arm off the old motor shaft. That set screw on the pulley is so tiny that even the smallest jewelers screwdriver I have didn’t seem to fit the slot. So I ended up trying to recondition the old motor. Took it apart using a paper clip to spread the brushes and cleaned the commutator and brushes and lubed the back bearing with watch oil. Looked clean (see pics) afterwards and ff/rew is super silent now… but the dead spot is fatal and comes back as soon as the motor heats up. Replacement needed for sure.

I saw the tips about using acetone to soften any loctite in the set screw (if any) and soldering iron heat to make it expand before pulling off… sounds like something I can try next. Was worried what the heat will do to the felt pad that’s stuck to the back of the pulley.

The mabuchi motors came in yesterday and they have a 10mm shaft so not sure if it will be ok or if I should get the long shaft versions…
 

Attachments

  • 1555B7E5-9F7A-4232-8467-AEA187A23C07.jpeg
    1555B7E5-9F7A-4232-8467-AEA187A23C07.jpeg
    105.8 KB · Views: 18
  • F3352C8C-5805-45C7-A61C-B29CAC4AB87F.jpeg
    F3352C8C-5805-45C7-A61C-B29CAC4AB87F.jpeg
    110.2 KB · Views: 19
  • 665ED51E-C9A7-4B76-968B-AF44CB3014B4.jpeg
    665ED51E-C9A7-4B76-968B-AF44CB3014B4.jpeg
    102.6 KB · Views: 17
  • 255C13A3-81D8-46DA-935B-F94167E54356.jpeg
    255C13A3-81D8-46DA-935B-F94167E54356.jpeg
    134.2 KB · Views: 19
Last edited:
Ok moderately scary because I couldn’t loosen the set screw at all, but the pulley did come off after heating up with a soldering iron. The 10mm shaft motor definitely won’t fit. Have to wait for the 21mm shaft length motors to arrive next week. Sigh.

by the way, the screws that hold the reel motor to the plate are M2.6x3 binding head screws which I think are Japanese standard and very hard to get in the US. I partially stripped the head on one of mine. Was able to find M2.6X3 pan head screws from someone in NY. Not sure how hard they are to find, but I have a bag of 100 now.
 

Attachments

  • B6DAA403-12B7-4F0F-83E1-C1904745A9CA.jpeg
    B6DAA403-12B7-4F0F-83E1-C1904745A9CA.jpeg
    116.9 KB · Views: 11
100 screws should be enough.:) Those screws fit the mabuchi motor? I cant remember if they are the same size.
 
Yes, the reel motor screws are the same on the Mabuchis we use. The mode motor screws on the substitutes are a different size than the OE motor, and need to be countersunk for clearance.

Did you break the contact connection between the tabs from the motor and the exterior solder tabs that are held in place with a tiny screw to the end cap? Others have reported that oxidation there is the main cause of the stopping, but I have my doubts as I don’t see how that subsequent failure modes make sense. I have had mode and reel motors that I rebuilt as you did, fail almost exactly the same way, gradually worse & worse, but sometimes worse cold, sometimes worse warm.

Did you buy the replacement Mabuchi motors from Jameco? What part number? I bought like 40 of them many years ago and am getting close to the last few so I need to order more.

A hint for you once you are in there with the transport out again to replace the reel motor: rotate the mode motor 180 degrees. It always stops in the exact same spot, and that becomes a dead spot. Rotated 180 will have it stopping in new locations. There is adequate slack in the wires.
 
[QUOTE="perryinva, post: 15422712, member: 27331"

A hint for you once you are in there with the transport out again to replace the reel motor: rotate the mode motor 180 degrees. It always stops in the exact same spot, and that becomes a dead spot. Rotated 180 will have it stopping in new locations. There is adequate slack in the wires.[/QUOTE]
 
Yes. ^^^^^ Or you can just loosen the motor and rotate the worm gear 180 degrees and re tighten the motor back up.
 
Well duh! Well thought out! Thanks for pointing out the obviously easier way to do that Zedex! For some reason, in my mind, I was thinking of the gears as coupled like toothed gears. But you are completely correct that with a worm gear, the worm is in the same “correct” position every 180 degrees! Good idea to mark a section of the work gear not driving the cams when stopped to make sure when reassembled it is in a different spot.
 
Perry, I got a couple of the Mabuchi reel motors with long shaft from Direct Voltage ("RF-500TB-12560 32mm Diameter 22mm Long Shaft Mini DC Motor DIY Toy"). The polarity is on these is reversed from the original, so they need to be wired backwards compared to the case marking. I also saw the same motor on the auction site with a 19mm shaft which might be an even better fit. I had to grind about 1 mm from the shaft because it was uncomfortably close to the back of the beauty plate after assembly.

Now that I’ve done it, replacing reel motors doesn’t seem so scary anymore. Thanks for all the help and tips! I didn’t see the post about rotating the cam/mode motor 180 deg in time, but it makes sense and I’ll do that the next time I take it apart.
 
Last edited:
Yes, a Dremel makes fast work on shortening the shaft. A little drop of Blue Loctite between the worm gear plastic and shaft when installing it is also a good tip.
 
Back
Top Bottom