
• The move to the new server is done. There are some software and database maintenance updates in process. This has us passing the hat around to help out. We appreciate any donations. Seriously, even a dollar helps. The payment page may be found here - https://www.audiokarma.org/support.html

How does this look?

kdryan

Pioneer Addict
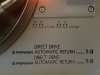
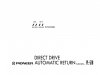
So I was thinking about resurfacing the new turntable in a cherry wood veneer but I wanted to see if I could digitize the model number and such so I could reproduce it and replace it when finished. I think I did well. It was a lot harder than it looks. The fonts were:

Modified Square 71BT Roman
Modified Haettenschweiller

and the PL-518 ended up being built from scratch. Now I just need to find a way to get them printed on rub off decals.
 

Attachments

  • 20160729_095644.jpg
    20160729_095644.jpg
    69.6 KB · Views: 147
  • 20160729_095644a.jpg
    20160729_095644a.jpg
    25.5 KB · Views: 130
Register to hide this ad
You can buy clear water-slide decal paper (the stuff used in plastic model kits) that can be used in an ink-jet printer.
https://www.amazon.ca/s/?ie=UTF8&ke...vptwo=&hvqmt=e&hvdev=c&ref=pd_sl_51zx0m5g8h_e

http://www.decalpaper.com/

That plus a clear coat spray (Krylon for example) or a liquid acrylic coat (future floor polish is actually perfect for this) should work like a charm.After they are printed apply the clear coat to the whole sheet let it dry thoroughly (overnight is generally what most do) then cut them out apply them blot dry and apply clear coat to seal.
Water slide decals are best applied to a smooth, perfectly flat surface. Glossy surfaces are best because that means they are smooth and flat. Most folks will apply a gloss coat to the surface before applying the decal. If the surface is not totally smooth air pockets will get trapped beneath the decal and the carrier film will be visible (known as silvering). If this happens you can take a sharp object and poke a hole in the decal where the air has become trapped and press gently on that spot to release the trapped air before clear coating.

*EDIT* there are also decal setting solutions that are GREAT for getting the decals to 'Hug' the surface they are applied to. Essentially they slightly dissolve the carrier film to create a 'painted on' look
A good primer on using decals can be found here: http://www.scalemodelguide.com/painting-weathering/decals/apply-waterslide-decals/
Probably more info than you'll need there.
 
Last edited:
I like that idea, but it's been my experience from model cars that even the best decals leave a edge that yellows with age. A dry rub off decal won't do that and I can still clear coat over it...
 
Will the black font color show off well against the cheery wood? Perhaps a lighter font color,or a lighter border color to bring out the font against the cherrywood?
 
So I was thinking about resurfacing the new turntable in a cherry wood veneer but I wanted to see if I could digitize the model number and such so I could reproduce it and replace it when finished. I think I did well. It was a lot harder than it looks. The fonts were:

Modified Square 71BT Roman
Modified Haettenschweiller

and the PL-518 ended up being built from scratch. Now I just need to find a way to get them printed on rub off decals.

Very nice job on these reproductions. I really like this job. Cool work.
 
Will the black font color show off well against the cheery wood? Perhaps a lighter font color,or a lighter border color to bring out the font against the cherrywood?

I had planned on printing it in white to show up better, but then this came along...

i think you should 3d print it and glue it down, so that it's raised under the varnish...or something like that.

That is an absolutely f&^%ing brilliant idea...
 
I had planned on printing it in white to show up better, but then this came along...


That is an absolutely f&^%ing brilliant idea...
thanks .... i'd make a test piece before gluing it to the actual tt....or maybe 3d print like a name plate if it doesn't look satisfactory.
 
Back
Top Bottom