• The move to the new server is done. There are some software and database maintenance updates in process. This has us passing the hat around to help out. We appreciate any donations. Seriously, even a dollar helps. The payment page may be found here - https://www.audiokarma.org/support.html

How to go about building a TT base?

judgeschreber

Well-Known Member
I recently acquired a Rek-O-kut "Rondine Deluxe," and since the cabinet it was sitting in is shot, I was thinking about building a new base. Has anyone done this? What sort of wood works well? Is a suspension mechanism do-able for a handy person with limited woodworking experience? Or, should I just go for a massive block?

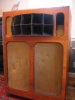
When I got the TT, I also picked up a gigantic single speaker, which I'm not going to be using (it's way too big for my space, the horn driver doesn't function, and the woofers are much too valuable to be sitting around my house doing nothing).

Thing is, the speaker cabinet is made of really nice, inch-thick, 5-ply plywood with a very attractive veneer (could use some freshening up, though). I was thinking of cannibalizing the cabinet to make the TT base (otherwise I would probably give the cabinet minus the drivers away on CL, since it's not welcome in the house anymore, if you get my drift). Is this a good or bad idea? The cabinet, once disassembled, would have two solid 2' X 4' boards, and one 2' X 3' board, plus the unveneered interior boards used for bracing and the woofer horn. Maybe I could layer the boards with some other vibration-absorbing material (mdf? cork? rubber mat?), making a nice thick base?

Any ideas?

Here's pics of the cabinet I would cannibalize if I decide to go through with it.
 

Attachments

  • IMG_1722.jpg
    IMG_1722.jpg
    63.4 KB · Views: 97
  • IMG_1724.jpg
    IMG_1724.jpg
    107.8 KB · Views: 89
Register to hide this ad
I save the speaker, but that's just me. I know there are a number of AK'ers who have built bases and I'm interested to hear what they say myself.

I have two old rim drives myself, and lacking any skill that could be called handy, I have been looking at a used Hotel furniture place, just waiting for the right end table to show up.
 
I'd love to save the speaker, but it's so big there's really no way I could keep it, and the woofers are needed to fund other audio adventures....:D
 
I have been dreaming of getting a square of thick, maple butcher block, then routing it out.
Only a dream, at this point.

Seth
Forever Analog and Covered In Parrot Poop
 
judgeschreber good to here you are going to take a shot at using that Rek-O-kut table, hope that info comes in handy. As for the base, take a look at what others have been using on there Garard 301,401,s. This should give you an idea or two. It would be nice if the cabinet could be used as was intended by another who is interested in vintage speakers.
 
OK OK, I won't cannibalize the speaker cabinet. I'm just guessing that if I give it away on craigslist, someone will take it just for the wood (like what I was thinking of doing anyways). I guess the best thing is to post in the Audiokarma freebie classifieds--maybe then someone will put it to good use.

And Totem, thanks again for the info on the Rek-O-Kut. I haven't yet begun the rehab, but I plan to get to it at some point this summer. When I do, you will likely get a PM when I run into trouble....

I like the butcher-block idea. Any others?
 
i've been itching to try a diy turntable plinth for ages also..so would love to hear more opinions and experiences too...
i'm thinking of using something simple like an old rega p2 plinth as a temple and seeing if i can turn it into a 3 point suspended...

i like the bravura of this project...

http://www.altmann.haan.de/turntable/
 
Hi JudgeSchreber,

Replinthing a Rek-O-Kut Rondine is also on my list of projects this summer. Similar to the Butcher Block plinth is the “mass constrained plinth” which I’ll be using with alternating layers of birch ply and mdf – Here’s a picture of a plinth “sandwich” I used on a Lenco-75.

4pehhfd.jpg


The Rondine will probably need a couple of more layers because of that big “soup can” motor. The advantage with this layered approach is that you need only cut out need areas with a handheld jig saw instead of a plunging rotor that the butcher block would take. But with both plinth applications: the sinking or siphoning off of rumble, and other unwanted noise transmission into a non-resonant massive hunk of wood. No more “Rumbling Rondine”!

6cslkav.jpg


4u1g49i.jpg


Cutouts for the Rondine will prove far easier that the one pictured above for the Lenco. With the solid, relatively flat Rek-O-Kut top plate there’s no need to incorporate the sunken platter well or “pan” which needed to be “direct coupled” to the plinth. The plinth for the Rondine should extend a couple of inches out from the top plate bite. More if you want to add a second arm.

Here’s the finished Lenco with two arms. I kind of liked the looks of the Baltic 13-ply birch so I surrounded the mdf layers with walnut and brought up the finish with tung oil and lots of rubbing. The Genie was sprung.

62pmro2.jpg


If you interested in this type of plinth, just PM me and I’ll be happy to go into more detail.

Mopic5
 
I made a plinth for a Garrard 401. The separation of the TT/motor on one level and the tonearm/pillar on another are to reduce transmitted motor rumble. I think that it worked great/sounds great. Thread/pics here:

http://audiokarma.org/forums/showthread.php?t=81380

I will try something different on the next plinth for a TD124 MKII. I'm planning a solid maple body (no ply) with ebony tonearm board and maybe ebony trim on the body.
 
Jcmjrt,

Stunning plinth there! Somehow missed that last fall. Absolutely love the decoupled island arm.
I take it that the foot point base cups are fixed to the lower plinth to lock in effective length of the arm?
 
Wow--now there are some ideas! Those both look amazing!

So, just so I get the concept right, the idea to "couple" the cast plate to the wood so it will subdue vibrations, right? If so, does that mean you should aim for as much surface area contact as possible between the TT and the plinth?

I've included a photo of the underside of the Rondine. What portions of it need to be "direct coupled" to the plinth for best results? Thanks!
 

Attachments

  • IMG_1736.jpg
    IMG_1736.jpg
    111.9 KB · Views: 47
Mopic5 said:
Jcmjrt,

Stunning plinth there! Somehow missed that last fall. Absolutely love the decoupled island arm.
I take it that the foot point base cups are fixed to the lower plinth to lock in effective length of the arm?

Thanks.

The base of the metal feet are recessed into the lower plinth so they can't move around and also present a finished look. The height is adjustable.
 
Hi JudgeSchreber,

Yes, Yes ... to both your questions - you've got the idea.
With the Rondine top plate you'd be using the same (8) perimeter attachment holes, but instead of wood scews into a hollow (and resonant) plinth, you'd be bolting through the entire glued up multi-layered sandwich (recessed nut fittings in the bottom layer).

This would give you a top plate "bite" along the entire perimeter casted rib reinforcement, as well as radiating a few inches centerward along many of the spoke ribs.
This will leave the edge raised above the plinth surface by 3/16" - which can be filled in with resin epoxy or more glamorous inlay material.

The casted circle rib and its spokes extend 5/16" deeper which presents a design choice - either: 1- to find a top layer that is 5/16th or 2- cut out the entire circle area (in the top layer only) and use standard 5/8th" to 3/4" flat stock.

Because of the solid, reinforced design of this Rek-O-Kut top plate, I think trying to couple in the platter area really isn't needed.

Can that motor capasitor slide inward enough to get within the casted "circle"?

By the way, you've got the top of the line hysteresis motor on that Rondine. A smooth running bruiser!

If you haven't been there already, here's an excellent site on Reks with a couple in Mass Constrained Plinths.
http://members.myactv.net/~je2a3/roktips.htm
- Mopic5
 
superb workmanship on a great looking table..love the decoupling method used too..bet it sounds a treat :thmbsp:
 
That is awesome Joyce, I was going to post the plans I found using a floppy disk drive and guitar body until I saw that! :thmbsp:
 
Cool, thanks for the info Mopic5. I think I understand the basics now. I'm sure I'll be back for more advice once I start the project...
 
Strawman said:
That is awesome Joyce, I was going to post the plans I found using a floppy disk drive and guitar body until I saw that! :thmbsp:

Well, that sounds interesting. I'm guessing that the floppy drive is the spindle and the guitar body is a solid electric one?

Mopic, didn't you have a presto that you were rebuilding at one time? I sure like the looks of the presto TT and was wondering how one would be in a great plinth.
 
i saw this somewhere last fall i thought it was cool i like the concept
 

Attachments

  • index_clip_image002_0000.jpg
    index_clip_image002_0000.jpg
    18 KB · Views: 57
Back
Top Bottom