• The move to the new server is done. There are some software and database maintenance updates in process. This has us passing the hat around to help out. We appreciate any donations. Seriously, even a dollar helps. The payment page may be found here - https://www.audiokarma.org/support.html

How to restore RS 2.5

SFC

New Member
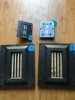
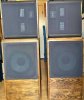
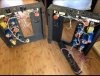
Hello I'm new to the forum and newly acquired a set a RS 2.5. I was told that the original owner put a walnut stain and I saved them as they were being parted out. The RS 2.5 have no woofers and 1 speaker has Emims and Emits as they were sold. I have my work cut out for me. I want to bring these beauties back to their original glory. These are my first pair of Infinity Speakers and am very excited to be an owner. All help is welcomed. Thanks20210816_154404.jpg 20210816_154448.jpg 20210816_154513.jpg 20210816_154603.jpg 20210816_154648.jpg
 
Register to hide this ad
Yes, you have your work cut out for you. I have two pairs of these and though they are a lot of work, you will enjoy the end results. It doesn't look like your upper boards are broken, so that's a lot less work to repair (I had to repair mine with Gorilla glue and fill in missing chunks with fiberglass resin, level out the surface, sand, and paint). You'd save yourself a lot of possible grief by screwing a pair of legs on the bottom, otherwise they're very tippy. I don't care for the walnut stain (personal preference). I re-stained mine in Honey Oak. Are any of the grill frames broken? I had to rebuild all of mine since they all were broken. Now you can't tell there was ever a problem. Keep us posted on your progress.

Larry D.
 
Larry D the only things which are broken are two pieces of the grill, other than that nothing is broken. I do want to put feet on the bottom of them so they won't tip over and maybe a top cover to make them look complete. I wil post progress.
 
There’s some great threads here on the 2.5’s. You can spends countless hours here reading on these and see what others have done using the search function. They are wonderful speakers worthy of your time. Mine are out of rotation right now but it’s one of my favorites for all day listening. Welcome to AK and best wishes restoring them.

If you need pictures of anything let us know, I’ll be happy to help as well as others I’m sure.
 
  • Like
Reactions: SFC
Thank you 7.62. So my first question is about sanding. I've spent hours looking at these threads as you have mentioned, so I'm trying to find out the best way to sand and remove this walnut vanish? I do not want to ruin the vaneer doing. Was thinking about starting out with 80g or 120g.
 
My cabinets were in pretty good shape so I didn’t do any sanding, I’m no help there. I may try that someday I think a pair in black might look really nice, especially a piano black.
 
  • Like
Reactions: SFC
I'm not sure what possessed a owner to do that and ruin the cabinet's? Piano black would look very nice, but I'm more of a purist when it classic items or upgrades within specs. I have to research more to have it correct.
 
I can understand, I think the oak veneer is way outdated. But from my observations the Veneer on these is pretty robust and with care I might try a mild stripper first with plenty of rags and a garden hose close by for rinsing and drying quickly, once you get the varnish off then I’d probably be very careful starting with 120 grit sandpaper and working it down in grits until you get the desired level you want for redoing them.
 
  • Like
Reactions: SFC
I love the speakers but I have no love whatsoever for speakers done in Oak veneer. If they were mine, I would strip the finish down as much as possible and redo them in a black satin finish or even high(er) gloss if desired. Or, re-veneer them in walnut, mahogany, cherry, etc. But that's just me. Great speakers!
 
  • Like
Reactions: SFC
I'm oak. I love oak. My house is done in oak. I'm biased. You just have to figure out what you like. Some of the oak Infinity used is great. Some other, not so much. Figure out what you like and go from there.

L.D.
 
L.D I like the oak personally. It might look dated to some, but that's what I truly like. I fell in love with these speakers in the 90's at a friend's house. I really don't mind if they are "dated", I want to enjoy music and stare at them in awe.


7.62 I will look into a mild strippper, research that, figure out which process I will do and start this week. Thank you for your help.
 
I have just put my 2.5’s back into the downstairs system. I’m really liking how they sound. A few years back I took the pots out of mine and just used a single Duelund resistor in each mid and tweeter circuit, took the electrolytic out of the midrange and put in a single Solen poly cap, and put a single Mundorf Supreme in for the tweeter cap. Great speakers!

Larry D.
 
  • Like
Reactions: SFC
Here is a pic of the upper section. The pencil thin brown cylinders are the Duelund resistors. The two casket resistors on the left are disconnected, but just have not been removed yet.

.IMG_4116.JPG

Here is a pic of one 2.5 in my system.

IMG_4111.JPG

Below is a pic of the simple feet I put on the bottoms of mine. I never have a tipping concern anymore.

IMG_4117.JPG
 
Firstly, welcome. These are truly a fantastic set of speakers when back up to specs. I too am in the camp of hating Oak cabs, but I am a woodworker and Oak sucks to work with, and frankly is boring.

Coming in a bit late perhaps, but on the topic of refinishing them: First, pull everything out of them (if your skill level permits, if not, cover the hell out of everything with plastic and painters tape). You are going to makes some dust and you do not want that in them. Second, you may want to do a light stripper on them. It's been a while since I have had my hands on mine, so suspect there is a very light poly coating on them. It wont hurt anything if there is not. Next, sand with a palm or random orbital sander (this is where having all the drivers and crossovers, etc. OUT of the cabinet, would help) Oak is a very heavy grain, impossible to get baby butt smooth. Start with a 120 grit and following all grits not skipping each one. I always over sand. I typically go to a 400 grit, but 320 would do fine. Call it my wood OCD sydrome. Following that, stain to your liking only after you have run tack clothes across it several times. Get rid of all the fine dust. After the first coat of stain, you will notice the grain will become more proud. Your choice here. You may want to lightly sand again to knock it down, but be prepared to stain again potentially. As this is not fresh wood, I probably would not use a stain conditioner. However, if you do not have a bunch of experience, it would not be a bad thing. Stain conditioner forces the wood to take stain at the same rate, which will eliminate "hot" spots (blotchy spots). The clear coat selection is where things can go astray. Tack clothe again and between each and every coating. Dont skimp on this point. I would recommend thinning Polyurethane and ragging it on in extremly thin coats followed by extremely light sanding. Why you ask? Because if you are not spraying it in a professional set up, chances are slim to nill it will come out right. By slowly adding coats, you minimize the chances of orange peal and brush strokes. Light sanding between coats ensures you get it right. It will take about 4 coats minimum via thinning, but you can get a pretty damn smooth coating once it is all said and done. Alternately, you can use oils rubbed on. Linseed is affordable and results are dependable. If you go the oil route, you will need to re-oil again at some point. Not sure of when as that will depend upon your climate and UV exposure. Oil is a safer route than the polyurethane. It is more likely to preduce a smoother finish.

I too bought a set with broken grill wood. Use the old ones as templates and find a band saw to cut them perfectly. Cover with new clothe.

Check your caps for leakage!

Check your emits and emims. These can be repaired provided the membrane is not torn. Instructions on repairing these is well documented here as well.

Check your woofers for brittle foam Are they paper or the gray poly? It makes a diferrence. Refoam them as they are due.

When you go to rewire them, make sure you get it right. Plenty of information here on these great speakers. If in doubt, reach out and someone will help you get it sorted out.

Enjoy and have fun with it. It is a wonderful feeling to put right some of these old classics like these! Your ears will thank you!

Cheers

 
Idadude, these look great with way the crossovers look. I absolutely love the feet and I will surly put feet on mine.
 
Theother 1, this is the best description which I have seen on ant thread ever! I have scoured the Internet and YouTube as well. I truly appreciate this description and I will follow it to tee. Thank you so much, you all have been so kind to me and enjoy this forum a lot.
 
I had to bump this SFC, how’s the restore going.
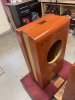
They are restoration is going well and slow. Recently sanded them, dyed with mahogany and lacquered them. Trying to figure out what I will do next.
 

Attachments

  • Resized_Resized_IMG_3501_129258727095061001.jpeg
    Resized_Resized_IMG_3501_129258727095061001.jpeg
    125.2 KB · Views: 29
  • Resized_Resized_IMG_3499_129216434148723001.jpeg
    Resized_Resized_IMG_3499_129216434148723001.jpeg
    145.3 KB · Views: 28
  • Resized_Resized_IMG_3502_129193425592534001.jpeg
    Resized_Resized_IMG_3502_129193425592534001.jpeg
    130.2 KB · Views: 26
  • Resized_Resized_IMG_3500_129155790842809001.jpeg
    Resized_Resized_IMG_3500_129155790842809001.jpeg
    115.6 KB · Views: 26
Back
Top Bottom