It's all about a few things :
Elaborating a few things
@leesonic shared above.
1) keep your tip cleaned and tinned (covered with a thin layer of solder) at all times.
when you pull you iron out of the holder as you are ready to solder something, you should clean the tip:
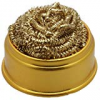
dip the now-heated tip into a ball of brass wool (dip pot as above) a few times so the brass can scrap off burned-on crud
wipe both sides of the iron tip across a wet sponge to get the final bits of crud off and to expose a bright, shiny point at the business end of the iron
when you are ready to solder a component lead to a PCB trace or solder pad, you should “tin” the tip
holding the iron away from your PCB and away from any parts, touch your solder to the hot iron tip to get a little solder melted into the tip. This “tinning the tip” will help connect the hot tip with the lead and pad to be soldered. I do this before each component lead I solder.
now you’re ready to touch the iron tip to the part and PCB
2) heat the joint, and flow the solder onto it. Never drip solder onto the joint. Practice on some scraps of wire, maybe some perforated breadboard first. Iron to the joint, solder to the iron tip, let it flow over the joint.
Press your iron tip onto or against both the component lead AND the PCB solder pad. A perfect position would be pressing the molten solder “tinned “ part of the tip against both the component lead and the solder pad in the PCB
Immediately push the solder (wire) into the joint between the soldering iron tip and the bits you are soldering. It should melt and flow right away.
the rosin core of the solder should melt and boil and clean or etch a little into the component lead and PCB solder pad, making it ready to accept heat and melted solder
now pull away. In a perfect soldering action, you’d have the iron touching the lead and pad about or less than 2 seconds and the solder only 1 second. much longer than that and you are risking damaging the part you’re soldering
when soldering heat-sensitive components with more than one lead, alternating parts so you’re giving the first part time to cool a little before applying heat again via its other leg to solder that one
for example: you’ve got three transistors to solder in place. Position all three, then solder leg 1 of transistor A, then solder leg 1 of transistor B, then solder leg 1 of transistor C, then return to transistor A and solder leg 2, then leg 2 of transistor B, etc., etc. This gives a heat-sensitive component like a small film cap or transistor a little cool down time between heat-ups.
3) clean wires and solder pads solder the easiest. Clean your component lead wires with some fine sandpaper.
4) The size of the tip is important (that's what she said). For through hole components, a tip diameter from 1/16 to 1/8th of an inch is fine. Trying to solder with too small of a tip is worse than trying with one that's too big.
5) You don't need expensive and/or fancy equipment. I can solder with just a basic iron with no station or temperature settings, whereas others have trouble with the most fancy stuff.





 Pick yourself up some junk piece of electronics. And practice your soldering and desoldering. I started soldering/desoldering in 1970. First year of Jr Highschool. Uncle Sam sent me to and FTD -- NASA- High Reliability Soldering Course --